
Landscape Plug-in Effect (without the plug-in) & 10 Book Winners!

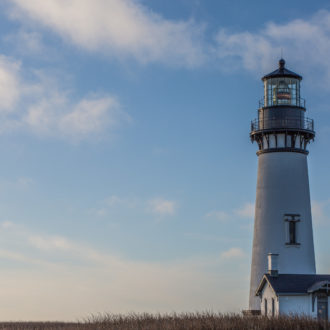
(Above: What you see here is a cooling/warming effect applied using the Nik Color Efex Pro 4 Bi-Color Filter, that makes the sky bluer and the ground much warmer. We’re going to recreate the look all in Lightroom without the plug-in).
OK, sure I could post the winners at the end, so at least you’d check out the tutorial, but you know, and I know you’d just scroll to the bottom anyway, so I won’t make you scroll. The 10 winners of my new “How Do I Do That In Photoshop?” Book are:
Valerie Sweeney
Karla Lugo
Ron Ballard
Kevin Purcell
David Gould
Pat Crawford
Christopher Allred
Dan Saez
Sylvia Labelle
Aga Wlodarczak
Congrats to all our winners (and if you didn’t win, you can pick up your copy at Amazon or Barnes & Noble).
OK, now onto today’s Lightroom lovefest – it’s how to get the look of the very popular Bi-Color Filter Effect (shown at the top of this post) from Nik ColorEfex Pro 4, without actually having the plug-in (yes, even though they’re free now, a ton of people still don’t have them.)

STEP ONE: Go to the Develop Module; click on the Graduated Filter button (it’s the fourth tool from the left in the toolbar under the Histogram). We’re using this first pass of the filter to darken the sky, make it bluer and add more contrast to make the white in the clouds pop a bit.
Drag the Temp slider way over to the left (I dragged over to -73) and drag the Tint over to around -40 to give the sky a much bluer white balance. Darken the Exposure by between -0.75 and -1.00, then crank up the Contrast (I dragged it up to 67). I would up with these numbers by trying to match what Nik’s bi-color filter did (I had the final image open Photoshop so I could switch back and forth to compare).
Now drag this tool (filter, whatever), from the to of the screen down to just below the center of the image (as seen above).

STEP TWO: Now click the NEW button at the top of the Adjustment Panel, so we can add a new Graduated Filter without disturbing the one we just added. Drag the Temp and Tint sliders all the way to the right to really warm up the white balance. Put the Contrast at around +50. Now drag from the bottom center of the image up about 3/4 into the image (as shown here), and this adds the warming to the ground and the lower clouds (as seen here).

Above: Here’s a before/after all done in Lightroom using those settings I just shared.
You can save these settings as a preset, but of course like everything — you might have to tweak these settings a bit depending on the image. I’ve tested them on a number of sunset/sunrise images and it’s pretty solid, but again, it just depends on the image.
Hope you find that helpful (and at the very least, if you do have Color Efex Pro 4 installed, maybe you’ve never tried the Bi-Color Filter effect before, or if you have, maybe you’ve never tried the 2nd preset, so…ya know…there’s that). 🙂
Best,
-Scott
P.S. Today at 4pm EDT we’re taking “How to Market Your Photo Business” with our in-studio guest, Roy Ashen. Roy has some great tips to share – and we’re taking your questions live. http://kelbytv.com/thegrid – see you then!
thank you very much for the tips