
Really Handy Tips for Client Proofing Using Lightroom Web
Hi gang – and greetings from New York City (I’m doing a shoot this morning at the New York Public Library before they open to the public – a shoot for my book “The Great Indoors.”). Anyway, today I wanted to do a post on how to use Lightroom Web for doing online client proofing.
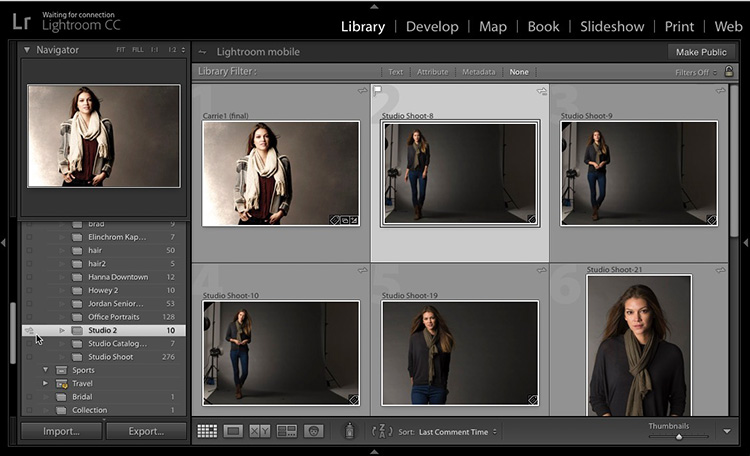
STEP ONE: Go to Lightroom on your computer; choose the collection of images you want to make available to your client for proofing (they can the images they want retouched, pick final images, etc.), and sync that collection to Lightroom Mobile (even though we’re NOT going to use a mobile device in this process at all, you still have to turn on Sync (as shown here).

STEP TWO: Now, in your Web browser go to http://lightroom.adobe.com to go to Lightroom Web, and log-in with your Adobe ID. You’ll see a list of all your sync’d collections on the left side, but don’t worry — we’re not going to share all these collections with your client — ONLY the one single collection you choose to share with them — the one with their proofs.
In the list of Collections on the left side of the screen, click on that one collection you want to share, then click the Share button at the top left of the thumbnail grid. That brings up the Share dialog you see above. Click on “Shared” at the top and you see that Web address that appears below it? That’s the address you’re going to share with your client, so copy and paste that address and email, text, etc. that address with that. REMEMBER: This doesn’t share all your collection — only that one you clicked on.
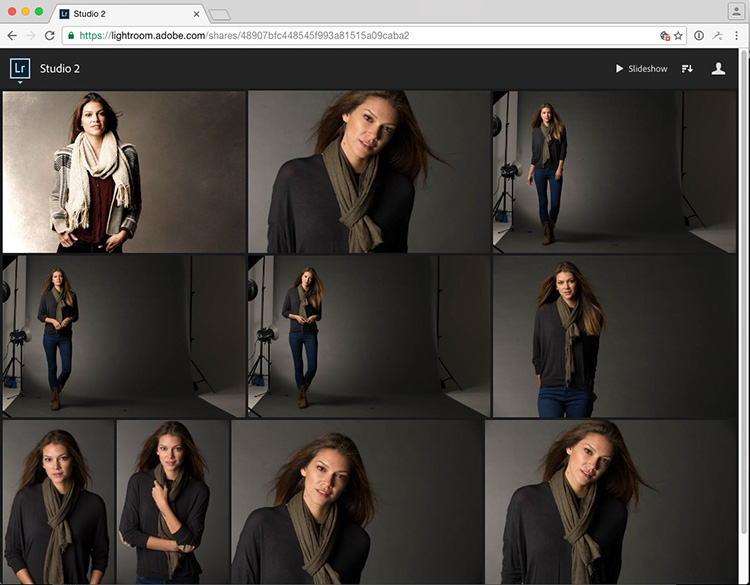
When they click that link, here’s what they’ll see (above) — just that one collection you shared. HOWEVER, they can only see them — they can mark their favorites or leave you any comments back on these photos unless they have signed up for a free Adobe ID. Or…..you can do this for them, and you really only have to do this once for all your clients — make up a fake Adobe ID that you only use when you want a client to be able to provide feedback. Adobe IDs are free, and you’re only making up one extra for use by your studio.
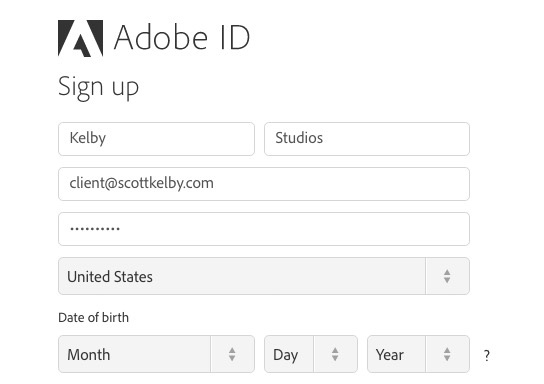
Above: for example, here I made up an Adobe ID with the user name “client@scottkelby.com” and I gave it a password. I can share this with my client, when I share the Web site. Like “Here’s the Web address, and use user name to log-in with is “client@scottkelby.com” and the password is “proofing.” You will use this same password for all your proofing clients (unless you’re a security freak, in which case you’ll make up new ones for each client).
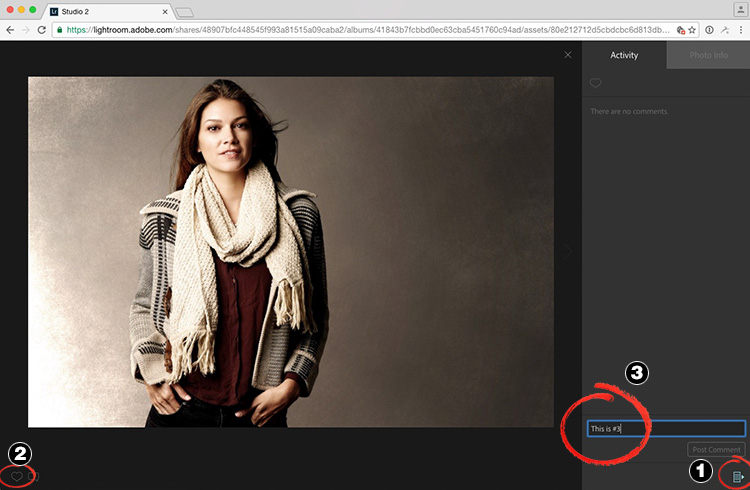
STEP THREE: Now once they log in with that user name and password you provided, have them click on any image to see a larger view of the image (as seen here). Now have them click at the bottom right corner of their Web browser on the little file cabinet icon (marked #1 here) and a little gray panel slides out from the right side of their browser (as seen here). If you don’t care how many images they pick as favorites, tell you client that every time they see an image they like, click the “heart” (favorite) icon in the bottom LEFT corner (marked as #2 here). If, you want to limit how many photos you want them to pick (like, please pick your top 10 favorite photos for retouching), then instead of having them click the heart, instead have them enter a number in the comment field (marked here with a #3). That way, they’ll know how many they’re picking as they pick them (this is #1, this is #2, and so on).
TIP: Make the first image in every collection an instruction sheet from you (as seen above), so your client knows what to do when they click that link you sent them.
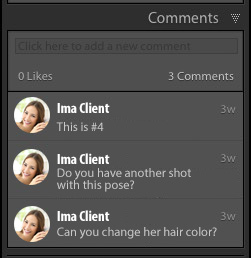
STEP FOUR: When your client tags a picture with the Favorite icon, you’ll see a little yellow icon appear next to your collection in the Collections panel, letting you know your client sent some feedback (either a favorite heart, or a comment or two, likes the ones you see above). That how you know which one’s they picked or left a comment about. When you click that yellow icon next to your Collection, it brings all the images they tagged or commented on to the top of your thumbnail grid in Lightroom on your computer.
So, to recap, here what you do:
- In Lightroom on your computer, sync the collection you want to share with your client
- Go to http://lightroom.adobe.com to go to Lightroom Web; log-in, and click on the Collection you wan to share
- In the ‘Share’ pop-up window, choose the “Share” option, then copy the Web address it displays
- Send your client that link, plus an Adobe user name and password (one you created for clients) along with a description of how to pick favorites and make comments
- Once they make those comments, you’ll see them the Comments panel in the Library Module, at the bottom of the scrolling list of panels. When you see a yellow icon appear next to your Collection, that means you have a comment or a favorite. Click on that icon to bring all of these to the top of the stack (now, you know which ones they chose).
That’s it.
Hope you found that helpful, and here’s wishing you a great weekend!
Best,
-Scott
P.S. On Monday I’m in Nashville teaching my full-day seminar. It’s not too late to join me.
Thanks for the good info!
Is there anyway to allow clients to choose print sizes?
On the fence on this tip because photos can be downloaded, without watermark. Good idea though, until I discovered that. Why couldn’t Adobe do a better job of fixing the real-world hiccups. We need this feature — build it for us.
Hi Scott,
thank you for about a million great tips I’ve read over the years.
Regarding the fake log-in:
I set one up a few months ago and it worked fine, but now I’m getting the message that the trial period for that account has expired. So did I set it up in the wrong way? It seems like there’s no way for clients to view a gallery without creating an account, but then the free trial expires and they cannot view that gallery without a paid account. Confused here.
Client proofing has been a headache of mine for a while. My current process sees me having a separate catalogue per wedding, so if I were to apply your method (which i think is awesome) I think I would have to set up a MASTER sync catalogue and move all of the proofing images from each wedding to that in order to upload multiple weddings? Any ideas on a workaround per catalogue?
You can only sync one catalog at a time, so having a master sync catalog is your only option (short of only having one catalog for all).
I’m glad I found this. I heard Scott talk about this during his Lightroom tour and totally forgot to follow up on it! Now I can print this out and try it. My last client I used Dropbox. This might work better.
Just tried it , from Lightroom Mobile app on iPad and it looks great , certainly slicker gallery for clients than doing it via Dropbox which I currently use.
Only one BIG thing tho.. when you download the zip that’s generated , the images are full size ! But with lots of compression artefacts .
I only want them to get low res at this stage. Plus downloading the zip takes ages , Adobe’s server speed is 1mb/s !
If I want to give them full size , I will do uncompressed and do via a manual made zip saved to my Dropbox or wetransfer .
Has anyone else noticed this ?
Cheers
S
This was so helpful! Thank you so much! Just a question, is there a way to display their collection with a copyright watermark? I’m finding it difficult for it to display when sharing. Using Lightroom classic!
What is your opinion about clients taking images off the screen, I do not see any watermarks on your images?
Scott, this is very helpful – except Step Four seems completely unworkable in the current version: there is NO yellow icon, and NO way to sort anything. We thought the “heart” (like) would equate to a “Flag” and allow us to view/sort by flagged image. As it stands, the LIKE simply turns into a second comment; i.e., “___ likes this photo” and “___ COMMENT-TEXT-HERE” so there are essentially two comments. The client clicked the heart icon, yet it doesn’t show as a “pick” or as a “flagged” photo. This should be so easy to correct…can you help get it on Adobe’s wish list?
Not sure if this a new change but in Lightroom you can sort images by “Last Comment Time,” and I do see the yellow flag when there are comments I have not viewed.
Hi Scott,
Sounds like a good tip. We developed Evlaa (https://evlaa.com) to simplify a lot more this client proofing workflow!
It’s a very easy to use tool for both sides (photographer and client). Check it out and save more time.
We can discuss about it 🙂
Scott, love this concept. Have you created a second Adobe ID called Clients? If so, is it possible to chose which collection syncs to which ID?
I went through this process today and noticed that Adobe changed it. It used to be that anyone with a link could comment/like. The Adobe ID just complicates matters.
Even worse, there is no way to sort by client likes, so you still have to go through each image and pick them. That should be a quick fix for Adobe:
Hi Jonathan – I agree with both (well, all three, really). I’d like to see them remove the requirement to have an Adobe ID (it does complicate matters), and I’d like for the client to be able to sort by picks (that’s the reason I showed the workaround for picking image by leaving a comment “This is #1, this is #2, and so on), because without that, they wouldn’t know how many images they have tagged, and third: I agree – these both should be quick fixes for Adobe, if they agree these changes are needed. Hope they do. 🙂
Scott once again a great work around but hopefully someday Adobe will update the Web portal in Lightroom so we can use it to set up galleries and client sites. I view many of CC trying to create new webpages but none of them allow us to set it up within our established websites. How many of us would love just an embedded link on our webpages without sending the client in search of Adobe websites.
I’m with ya! 🙂
Make sure to let your clients know that ALL your other clients can see their photos. Just so they don’t think it’s some sort of private link.
I am a security freak. Seriously. IRL: https://monkeyhill.us/
If my understanding is correct, multiple users could use a single login, but each would only see the specific collection shared wth them via the eMail they receive with the collection url referred to in step 2.
That’s correct – they’d only see the images you sent them a link for.