
October 2020 Lightroom Updates
Today is the first day of Adobe MAX, and in case you just awoke from a coma or were rescued from a deserted island, it is 100% free and virtual this year, so be sure to sign up for all of the great content (such as my 30 page workbook from my LrC lab).
Along with every Adobe MAX comes updates for Adobe software, so let’s dive into what has been added to Lightroom Classic, Lightroom, and Adobe Camera Raw. That said, Adobe has been releasing new features (along with new camera support and bug fixes) just about every 2-3 months since all apps went into the Creative Cloud subscription, so the number of new features with each release is pretty focused.
Lightroom Classic Updates
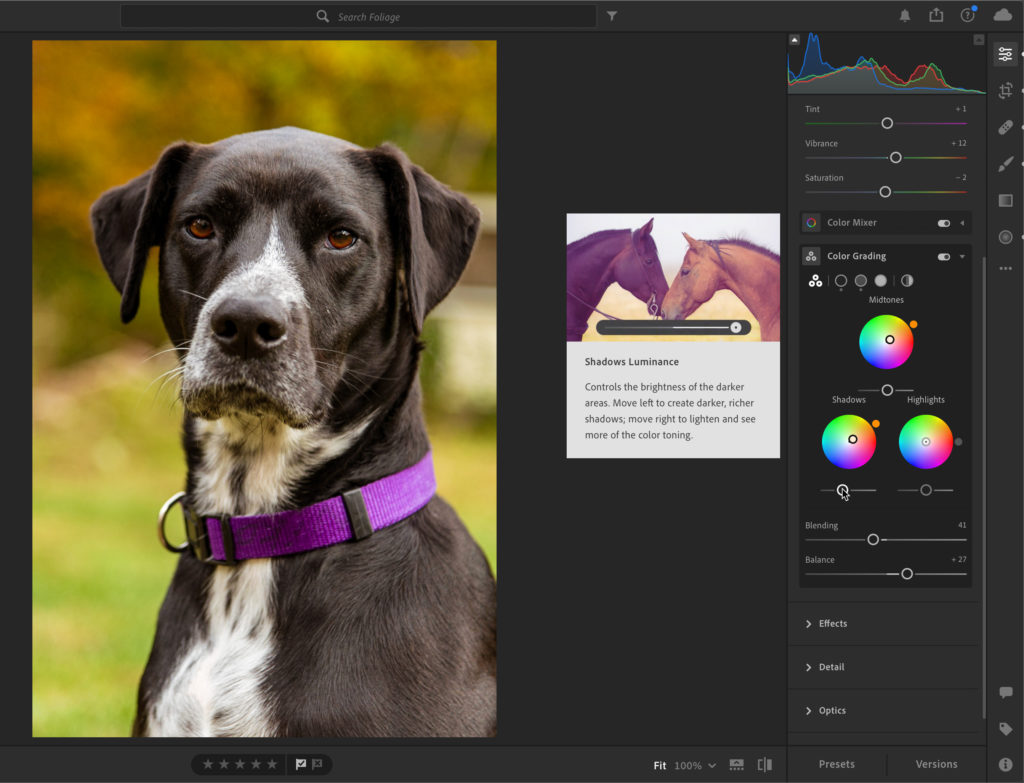
I expect the feature that will garner the most excitement is the brand-new Color Grading panel found in the Develop module. You can think of Color Grading as an evolution of the Split Toning panel, which it has replaced.
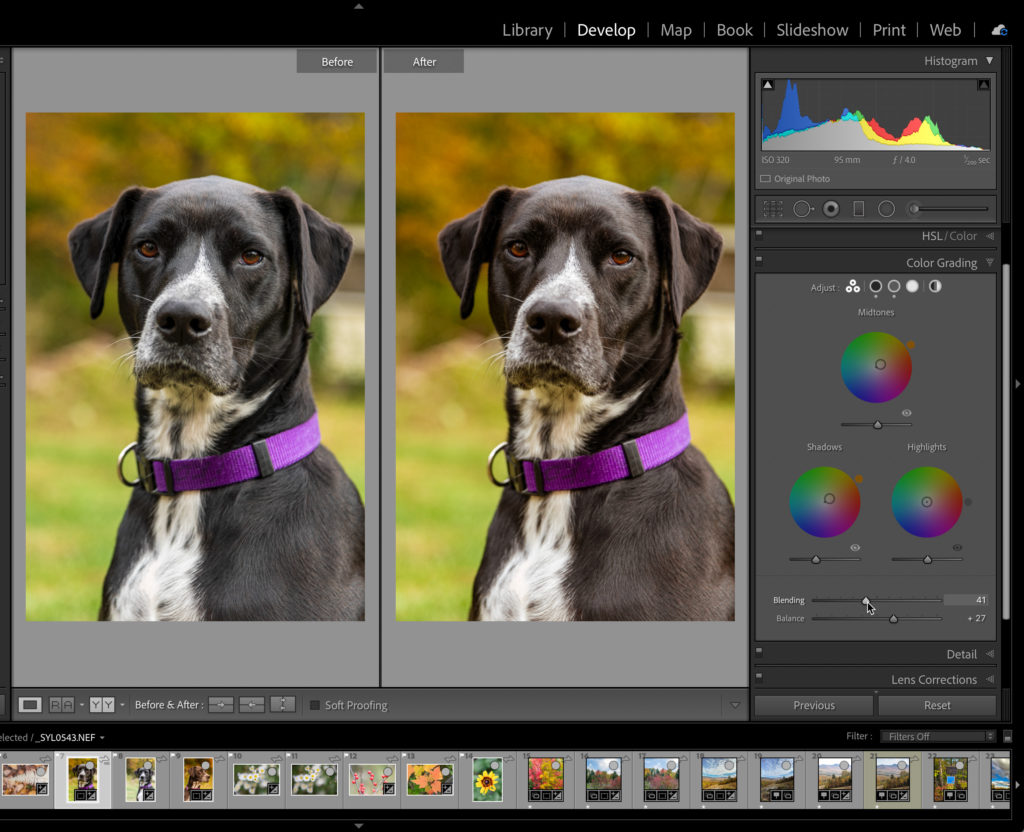
Color Grading
There are some key differences between Color Grading and Split Toning, which is that Color Grading allows us to add a tint to the midtones in addition to shadows and highlights. Additionally, you can also change the luminance of the tint you are introducing. There is a global color tint option as well. All of these options present a huge opportunity for creative expression, enhancement, and tweaking of color. So much so that we’ll be diving deeper into it here on the blog in the near future. Until then, check out what Adobe has to say about the new Color Grading panel.
Side note, your old Split Toning presets still work with Color Grading, so don’t panic.
Catalog Upgrade
The first thing you’ll notice when you launch the new version of Lightroom Classic is a new catalog upgrade dialog box. I appreciate that Adobe has listened to the feedback, and tried to make this process a little less opaque. There’s also a new option to provide a custom name for the upgraded copy of the catalog. This is definitely a step up from what has happened in the past. While it may be ideal if they renamed the old (original) copy of the catalog and kept the same name for the newly upgraded version, I like that we have an opportunity to insert control if we choose.
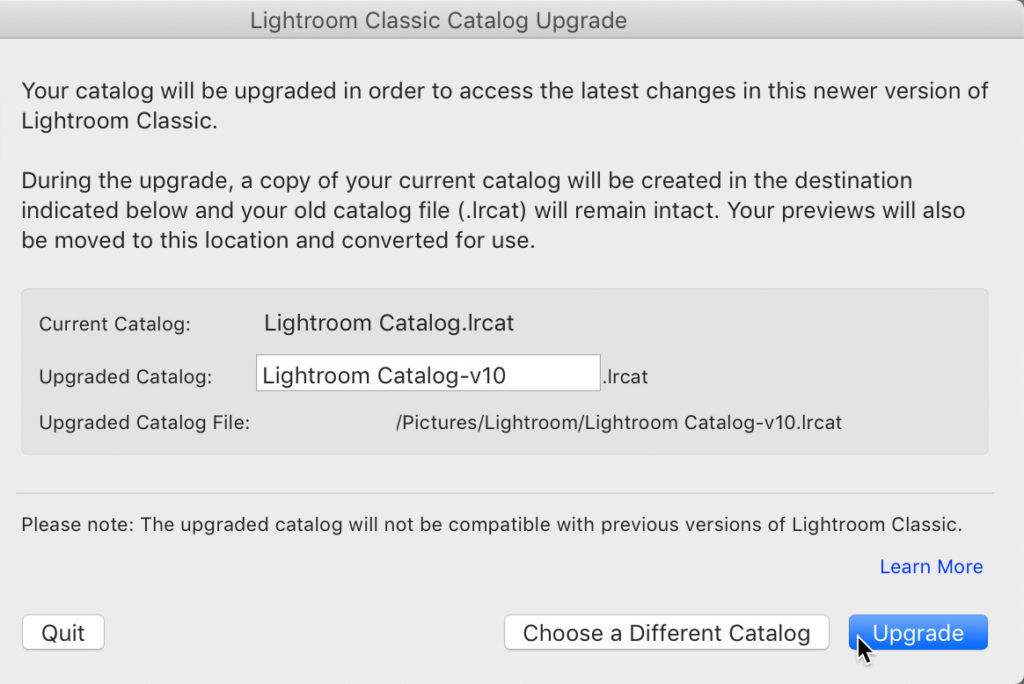
The most important thing is that you understand that your original catalog is left untouched, a new upgraded copy (with custom name) is created, and it is the new upgraded copy that will open in the new version of Lightroom Classic. As part of this process the associated cache files will also be renamed to match the upgraded catalog name and become associated with the new catalog. As long as you are planning to continue using the new version of Lightroom Classic, you can go ahead and delete the old version of the catalog at your convenience (it serves no purpose with the new catalog and only exists to give you a way to go back to the previous version of Lightroom Classic, but if you are not going back it just takes up space).
Zoom Upgrades
Some cool improvements to the Zoom functionality have arrived. First, there is a new way to zoom in the Develop module called Scrubby Zoom, which allows you to hold down the Shift key and click-drag the cursor left to zoom out or click-drag right to zoom in. As soon as you hold the Shift key you’ll see the cursor change to the Scrubby Zoom, then off you go.
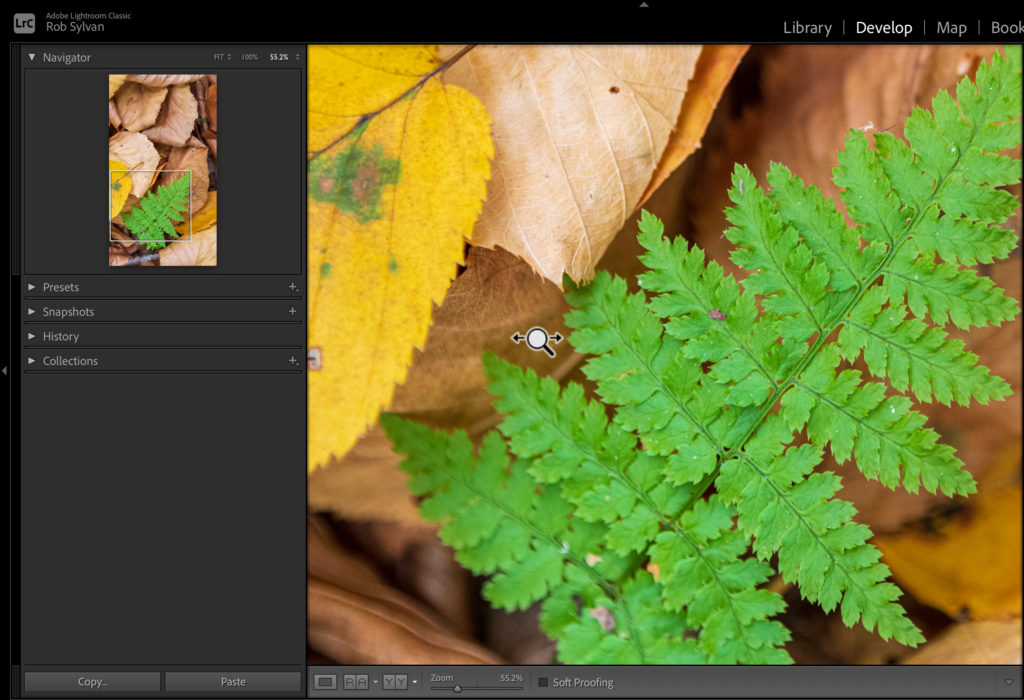
You can return to Fit view by clicking the photo, but note that clicking a second time (after returning to Fit view) will return you to whatever zoom level you ended up on with Scrubby Zoom. A keyboard shortcut worth remembering is CMD+Option+0 (PC: CTRL+Alt+0) takes you to 100% when needed. Along that line, pressing CMD and + (PC: CTRL and +) will zoom you in and CMD and – (PC: (CTRL and -) will zoom you out. Those shortcuts work in Loupe view in both Library and Develop.
A second new Zoom function is called Box Zoom, which allows you to hold down the CMD key (PC: CTRL key) and drag out a box to zoom the view to that area.
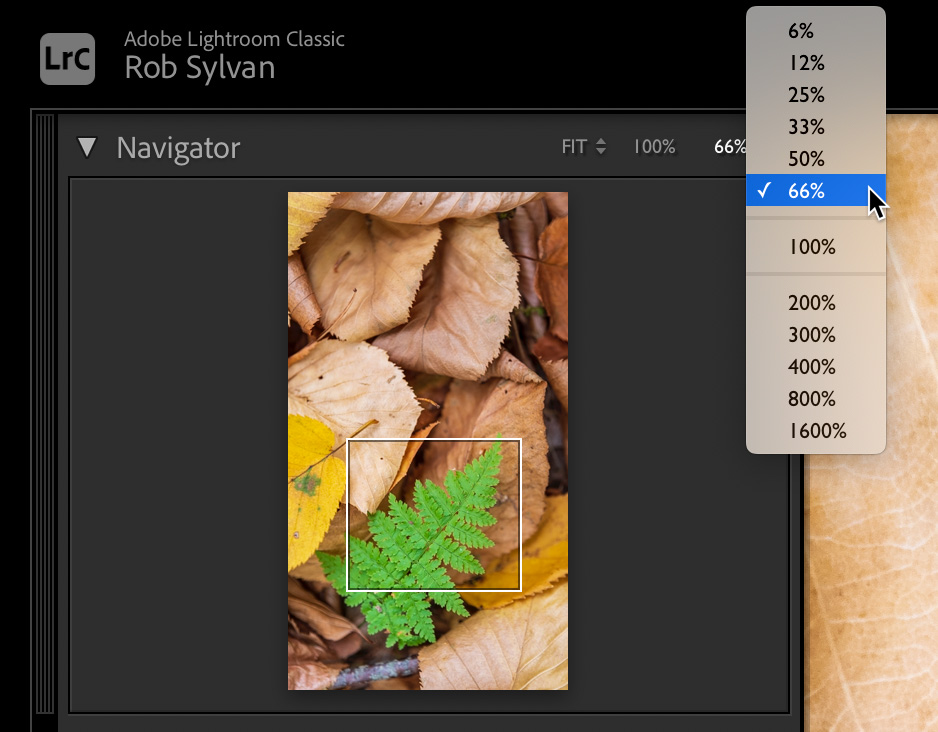
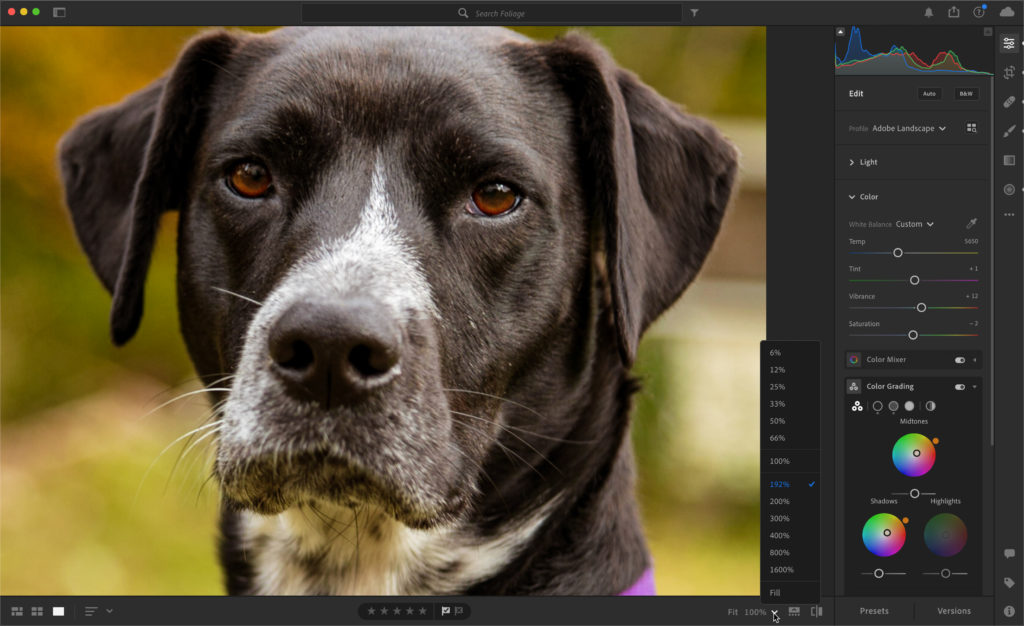
You’ll also notice that the Zoom levels on the Navigator panel have changed from ratios (such as 1:1) to percentages. Additionally, there are only three options showing from left to right on the top of the panel, which are Fit (and Fill is hidden under it), 100%, and a range of zoom percentages from 6% to 1600%. Note that if you select 100% from the far-right drop-down menu it simply selects the 100% view in the middle. The Zoom slider in the Toolbar has also been updated to show percentages.
Tethering Gains Limited Live View Support
If you are a fan of tethering, and a Canon owner, then you’ll be pleased to see there is now a Live View function when tethering supported Canon cameras. We can only hope that this feature will show up with other supported camera models (i.e., Nikon) in the near future. Of course, I’d love to see tethering support on the whole increase to other camera brands as well.
With a supported camera connected, you’ll see a Live button in the tethering bezel. Click the Live button to enable Live View in a separate (and resizable) window. When your lens is set to Auto Focus mode, then the focus controls in the Live View window can be used during the tethering session. Click the Live button again to disable Live View.
Lightroom (cloud) Updates
As the Lightroom apps for Mac, Windows, iOS, Android, and Chrome continue to evolve in parallel to Lightroom Classic (and Adobe Camera Raw), they also have their own take on some of these new features, so while the names may be the same there are some differences that I’ve noted.
Color Grading
Most importantly, the same Color Grading tools I mentioned previously for Lightroom Classic have also been added to all of the Lightroom apps as well. To find it, you’ll need to expand the Color panel, and then click the Color Grading button to reveal the Color Grading tools. Otherwise, it works the same way as in Lightroom Classic.
Zoom Upgrades
Lightroom for Windows and Mac also gained the Scrubby Zoom and Box Zoom functions I mentioned previously in Lightroom Classic. There are a few differences I want you to be aware of before using. First, to invoke Scrubby Zoom, simply click and hold the mouse button until the cursor changes to the Scrubby Slider (no need to hold Shift), then drag left to zoom out and right to zoom in.
You can click the Zoom drop-down menu to see what percentage you have zoomed in or out to. I think it would be nice to see that zoom percentage without having to click into the menu though. Pressing CMD and + (PC: CTRL and +) will zoom you in and CMD and – (PC: (CTRL and -) will zoom you out, but there is not a shortcut to jump right to 100%, and that would be helpful. You can always click on the 100% button to jump to that zoom level.
Box Zoom was also added, which allows you to hold down the CMD key (PC: CTRL key) and drag out a box to zoom the view to that area. This functions the same as in Lightroom Classic.
Versions Enhancements
The concept of Versions, similar to Snapshots in Lightroom Classic, were introduced in a previous update this year. That functionality has been enhanced so that certain behaviors will trigger an automated saving of a version. For example, say you are in the midst of editing a photo and you switch to viewing a different photo or switch to Grid view, in each of those cases an Auto Version will be created and saved in a separate tab within the Versions panel. Named and Auto Versions are then synced across all Lightroom (cloud) applications, allowing you to roll back to a previous state with ease. The three-dot menu within the Versions panel provides options for clearing out those autosaves if desired.

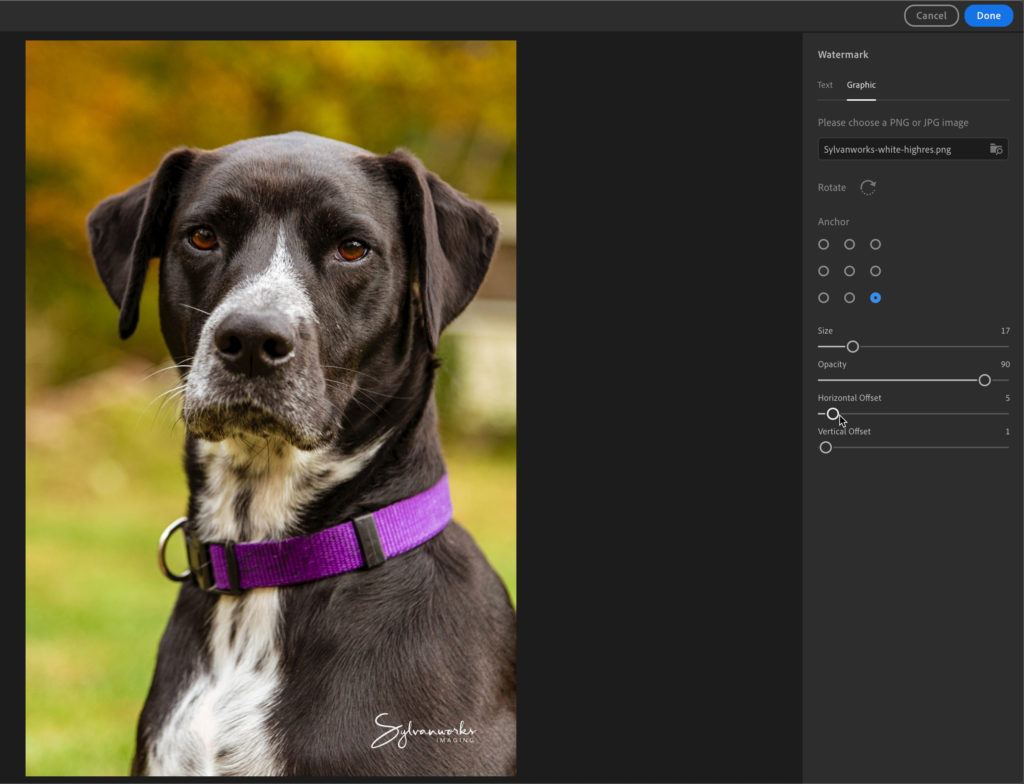
Graphic Watermark
The existing watermark functionality has finally gained the ability to apply a graphical watermark in addition to plain text. This is welcome news, and the functionality is pretty straight forward. You can access the watermark editing options from the share menu by checking Include Watermark, then click the associated gear icon. From there, click the Graphic tab, where you can navigate to the folder where your graphic watermarks are stored. After selecting the desired watermark, use the available controls to anchor, rotate, size, offset, and set the opacity for your watermark. Click Done to complete the configuration and continue with your export to verify the watermark was applied. Once configured, your graphic watermark will sync across to the other Lightroom (cloud) apps for use from any platform.
One final note on Lightroom for Windows and Mac, is that there is now a Previous Settings option added to the Share menu, under Export. This is a very useful feature for quickly sharing out new copies based on the last used share settings, and even more useful with the keyboard shortcut CMD+E (PC: CTRL+E).
All the apps within the Lightroom ecosystem gained support for the same new cameras and lenses. If you are a KelbyOne member, Scott is doing a webcast today on all of these new features (and more) at 11:00 am EST, so be sure to tune in. Adobe MAX starts at noon EST.


“Side note, your old Split Toning presets still work with Color Grading, so don’t panic.”
Nope. Using Rn4 Toolkit fade and Hard fade presets as part of my look. They are completely broken and give totally different looks since the upgrade. Old photos are fine. Applying preset to photos now results in completely different results. Very cross about this.
Could you get rid of spam backlinks that overflow comments ?
Hi Al, Cleaned this post up. Thanks!
I attended Adobe Max, late for your sessions, now have the workbook, and would like to receive the image files, if possible after the fact, so I could better follow along now.
Thanks in advance.
BTW – my daughter is also an aspiring bee-keeper – who lost both of her hives ( in the middle of Wisconsin) last winter
Hi John, You can download the practice files from any of the lab session pages on the Adobe MAX website. Just look for the “Add to your creative cloud” button in the Session Files section. I lost my last hive in the winter as well. These northern winters are tough on the bees. Wish her my best in her future attempts!
Hi Rob
I updated Lightroom to the latest version, but all my users’ presets are gone. Do you know an easy way to get them back?
All the best.
Hi Jean, If you go to Preferences > Presets, is the box to store the presets with catalog checked or unchecked?
hello,
just noticed color grading replaces split toning panel.
I have tons of presets using split toning (sepia, cyanotype,…).
does it mean all split toning of my previous images have been removed from catalog ?
why not keeping old one if we prefer it to color grading ???
best regards
marc
great news, split toning presets have been converted to shadow and highlight sections of color grading
I love Lightroom but it would be nice if Adobe would maybe stop adding new features and make the program import images faster than a turtle. Still sucks at importing images.
super !
color grading becomes as powerful as capture one !
I have just posted an “idea” on “feedback photoshop com” forum to add categories for local brushes and gradients. This right panel is very prehistoric with its bottom scrolling arrow.
Adobe max is an opportunity to raise this problem…
feel free to vote for it 🙂
Marc
The Shift-drag zoom only works if you have a supported and enabled GPU. fyi. The Box zoom works without one.
Ah, yes. Thanks!
But (PC) you can still CTRL-scroll-wheel in and out zoom as well, so it’s not fatal… lol