Dispelling Lightroom’s Hidden “Auto Adjustment on Import” Myth
Hi Gang, and well…it’s Monday. LOL!! Don’t worry — it’s going to be a great day! 🙂
Last week I posted a little tip about getting more precise control in Quick Develop, and when I pointed people on Facebook to my post, one of my readers there posted this comment:
“I am noticing when I import RAWs in Lightroom that there is some kind of auto tone or adjustment it is automatically doing to them. I do not like it and I want to know if there is any way to just see original raw with no automatic adjustments.”
I hear this type of a thing a LOT
So much so, that I address it in my Shoot Like a Pro seminar tour, but I thought I would cover it here as well, because what he’s experiencing (the photo doesn’t look as good after a few seconds and a second version loads), but the reason isn’t what he thinks it is. Here’s what’s happening:
When you shoot in JPEG mode, your camera applies all sorts of enhancements right in-camera, stuff like adding contrast, sharpening, color adjustments and color boosts, noise reduction — a bunch of stuff to make the JPEG look as vibrant, sharp, and finished as possible. When you switch your camera to shoot in RAW mode; you’re telling the camera “Turn off that added contrast, and sharpening, and vibrance, and all that stuff and just give me the flat, raw, untouched image straight off the sensor — I’ll add the contrast, sharpening, vibrance, etc. in post production. That way, I can add the amount of that stuff I want, rather than using what the camera manufacturer thought would look good.

It’s NOT doing an Auto-Adjustment
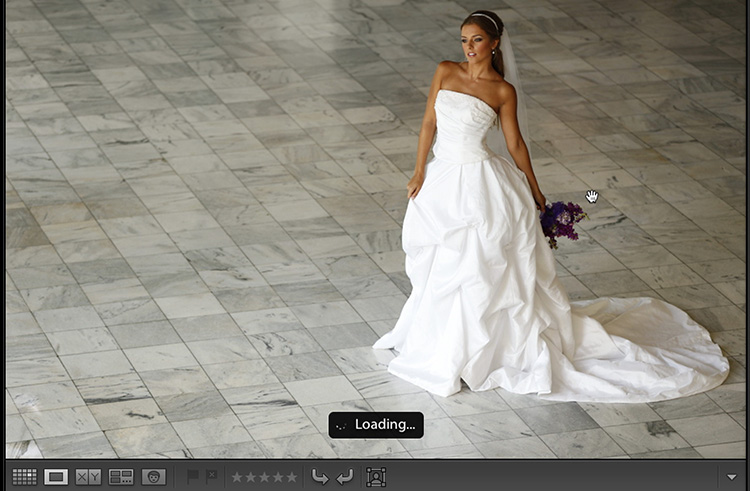
What happens when you import your RAW photos into Lightroom is that it displays the colorful, sharp, vibrant, contrasty JPEG preview FIRST with the word “Loading” appearing near the bottom of the screen (as seen above). That “loading…” message is letting you know that the actual RAW image is being loading in the background.

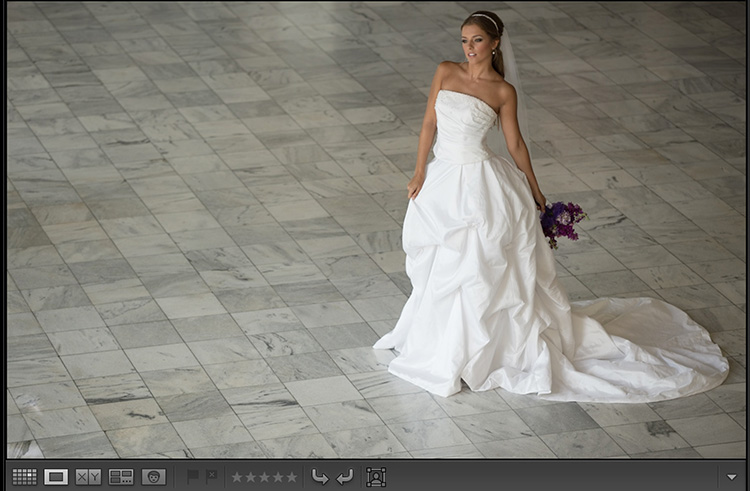
When it finishes “loading” it now displays the flat-looking, unsharpened, not vibrant, RAW image (as seen above. Now, for what’s it worth; on this particular image I like the skin tone better once the RAW version renders, as seen here — but it still needs some contrast and other tweaking for sure. ).
So, it’s not an Auto-Adjustment — you see the colorful JPEG first, then the flat-looking RAW image loads. It’s at this point that you’re supposed to add all that post processing stuff (with the advantage of adding it to a RAW image which has a wider tonal range than a JPEG), but in short; that’s why it looks good at first, and then it looks really flat.
It’s also why some folks choose to shoot in JPEG mode all the time — they like the already sharpened, vibrant, contrasty look of a JPEG without having to add all that stuff themselves. There’s absolutely nothing wrong with shooting in JPEG — you should shoot in the mode that makes sense to you — not something you’ve been bullied into using by people on the Internet.
Anyway, I hope that helps you understand what’s happening upon Import, and I hope on some level that makes your Monday just a little bit better. 🙂
Best,
-Scott


When I import raws the exposure is increased. I have no preset applied upon import. I have tried opening the same image directly from the card in Affinity photo and the image is correct. It is just lightroom 6.14 that is doing this now. It must be a setting I have changed since this hasn’t always been the case and it is the same version. I am foxed, I have to auto adjust EVERY imported raw.
Sorry but this is not the issue.
Did u get a reply from this. Since 2 days ago when I import my (RAW) Photos into lightroom it leaves it with a green tint. It was fine 2 days ago. And it’s very annoying now.
is not a Myth! lightroom adds Auto Adjustment in the backround!
Open raw as plain as possible – get rid of all behind the scenes compenstations
Open a raw in LightRoom or Photoshop raw converter
Switch to Process Version 2010 (PV2010) and
Set the curve to linear
Set the black point, the contrast, and the brightness all to zero
Switch back to Process Version 2012 (PV2012); now all of the settings are changed automatically and they replicate the “look of brightness” of the image you previously had in PV2010.
For Adobe LightRoom / raw converter, the zeroed-out PV2012 (without accounting for Baseline Exposure compensation) has the following settings:
Exposure = -1 (yes, minus one stop)
Contrast = -33
Black = +25
Custom Curve (the converter, be it ACR or LR, will automatically calculate it for you when switching from PV2010 to PV2012)
Subtract Baseline Exposure compensation (BLE) from Exposure, so that now Exposure = -1-BLE(0.15) = -1.15
Subtract raw exposure bias from Exposure to compensate raw underexposure, so that now Exposure = -1-BLE(0.15)+bias(-0.7) = -1.85
Apply camera profile
Save the resulting settings and name them (optionally, you can set them as defaults).
Hi, thanks for taking time about this. Actually, I’m having the opposite!!
First my image looks AS it did with the picture control, while “loading”, and then it displays in full contrast/Saturation… What do I do wrong..?
Shoot with D800 mostly in Neutral, that I customized to lower contrast and lower saturation.
If you have a tip there, that’d be great!
Thx!
I’m having the same issue. After it loads, a brighter more vibrant image is what I’m allowed to edit. I want to edit the flat image! Did you ever find a solution?
Same issue here. I loaded Technicolor Cinestyle. When I shoot video, the video files maintain the flat look, but when I shoot with the Technicolor Cinestyle for photos, it looks flat on my viewfinder loads as flat in Lightroom, but then super adjusts it as an over-saturated photo.
So yes, Lightroom auto-adjusts. How do you stop it?
Did you ever find a solution? I just upgraded to a Mark IV and Lightroom Class C and im having the same problem. The flat images is what I first see and then it looks with a slight pinker skin tone and vibrant tone. I want to edit the flat image though! Help!
Are you shooting raw? Are you applying a preset on the import dialog? What happens if you click the Reset button in Develop?
Hey, I am having this issue and am not finding anything that knows whats up – has anyone actually found the answer?
Please help!
Yes, raw shooting, no presets and nothing happens when I click Reset
Lucas (and others), Are the sliders at zero positions in the Basic panel, or set to some values? What color profile loads? Had you ever set a custom default setting?
Hey, I am having this issue and am not finding anything that knows whats up – has anyone actually found the answer?
Please help!
Are you shooting raw? Are you applying a preset on the import dialog? What happens if you click the Reset button in Develop?
Having exact same problem, at first it’s the flap profile raw file in library tab but in few seconds or as soon as i select the photo or go to develop , it seems to bump up saturation , contrast and vibrance , but there is no change settings wise. And it only happend a week ago , i didn’t change any settings!
I don’t doubt that’s what happening but I have also noticed this if you import jpegs too which shouldn’t be the case. Try it.
I don’t have any auto adjustments set but it does a similar thing, must be unrelated
I will be bookmarking this – I cannot count the number of times I have had to explain this to people!
I have been accused of ” cheating” because I don’t use the right out of the box picture. If a painter can put their spin on a painting, why can’t we do the same thing? This PLUS what correctly stated
I’m not quite convinced that there isn’t more to it. Under some conditions I see quite a color shift taking place (not just flattening)and the magnitude of this “problem” had varied among versions. If it were just a matter of rendering then why does Lightroom bother making all those previews during import if they don’t get used? It seems odd that Canon would embed a jpg sufficient to fill a 30″ monitor
Perhaps it would have been useful to add that, in fact, even when you shoot in RAW (and RAW only – so not RAW+JPEG at the same time), what the camera shows on its display is *not* a RAW, but a *JPEG*! Even though you tell your camera to only shoot in RAW, it will always and inevitably show a JPEG on its display. In many cases this will make you see very different results between camera display whilst shooting and final results in LR after it has imported all photos and starts making previews.
You don’t have to believe me, you can actually do a test which will prove the above. Set your camera to shoot in RAW (RAW only!). Then switch the colour settings on your camera to B&W. Take a few shots. You will see that the camera shows you B&W pics on its display, as you would expect. However, now import the same photos into LR. LR will show you colour RAW photos, nothing in B&W. In fact, no digital sensor can capture B&W, it can only capture images in colour, because of a special kind of filter which is put in front of it. But that’s another story…
Thanks for a great post, Scott. I have wondered about this very thing since the first time I imported RAW to Lightroom!
But Scott!
So many words for one simple fact:
It’s LR’s camera profile that’s most likely set to Adobe Standard.
I would bet that 90% of photographers have their cameras set to something like “Standard” or “Portrait” or “Neutral”. And usually no extra settings for contrast, sharpening etc.
And those 90% also never have set Lightroom to a different camera profile than Adobe Standard on import. Hence once LR finishes rendering the RAW file, the image shows with Adobe Standard profile applied.
So yes, it’s true that contrast, color boosts etc. are applied in-camera. But I think it’s important to point out that usually it’s just the camera profile that’s set differently in LR
Thomas
I was wondering why Scott didn’t state this obvious yet overlooked fact. Thanks, Thomas.
Also, unless I’m mistaken, if you render standard previews as part of your import, unless you’re impatiently looking at your images as they import, you will simply see the native (flat) raw file when you first look at an image, not the jpeg thumbnail.
But, great info for a common misunderstanding!
NO! There always is an embedded JPG in every RAW File that displays first. That’s what Scott was pointing out.
When the raw image is shown than LR uses the profile as well as the developing version that’s being applied. Both can be changed from default behavior but this doesn’t change anything on the relation of the embedded JPG to the RAW being displayed.