
Lightroom Classic 7.4 Update
The June update to Lightroom Classic (7.4) is out, and here are the things you should know:
Disable Preset Rollover
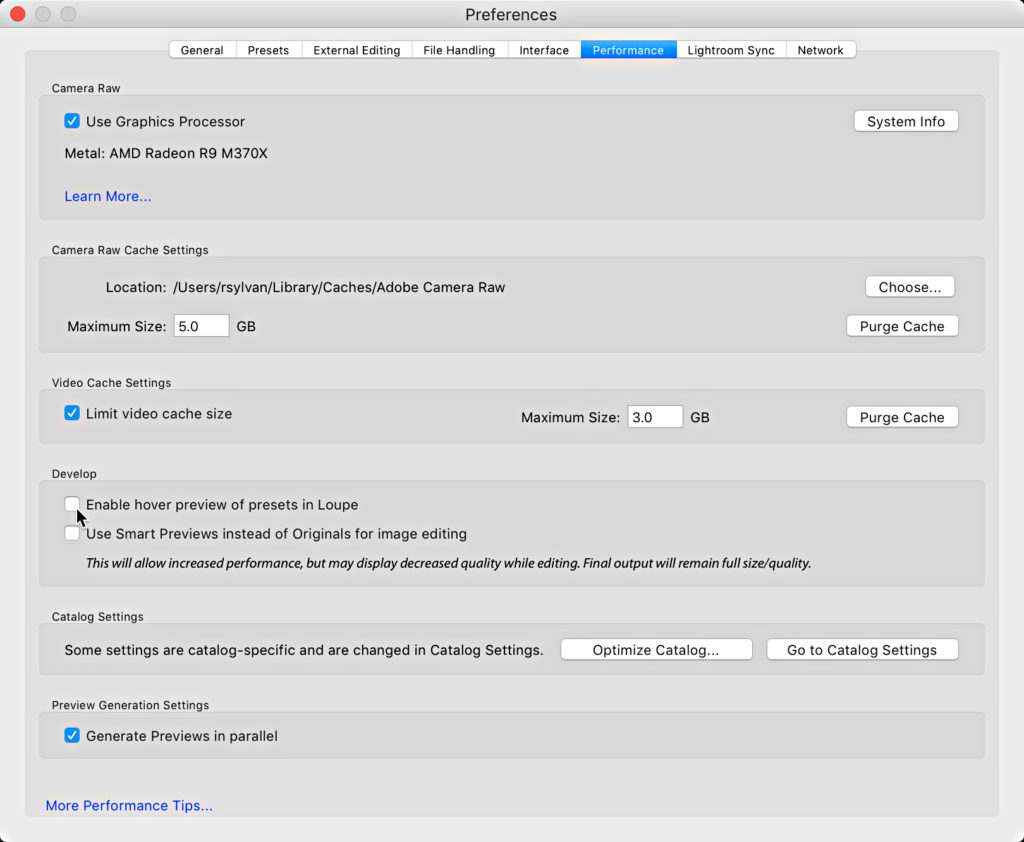
The April update to Lightroom Classic (7.3) included a new feature for displaying a live preview of your Develop presets that some people loved, and others, well, not so much. The problem for some people was that the rollover preview in Loupe view was a little too resource intensive, or it was distracting to how they were used to using presets. A new preference checkbox was added to the Performance tab of the preferences labeled, Enable hover preview of presets in Loupe. If you want to turn off that rollover behavior, just uncheck that box.
Note, that doesn’t affect the rollover nature of the new Profiles. That can’t be turned off for good, but if you hold down the Option key (PC: Alt) while moving your cursor over the Profile Browser it will temporarily disable the Profile rollover preview. Big thanks to Adobe engineer Simon Chen for sharing that tip!
Hide and Show Develop Preset Folders
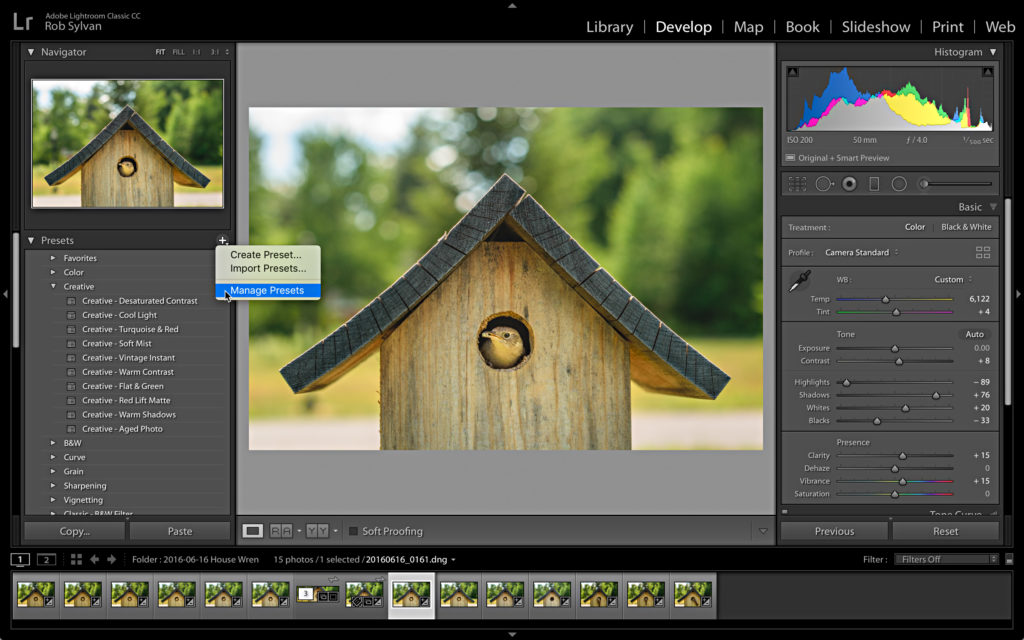
Another aspect of the April update was a chance to Develop presets that introduced some new preset folders, but left us without the ability to remove ones we don’t use. 7.4 includes a new Manage Presets command that lets us hide any default preset groups we no longer want to see. Try this:
Step One: Click the + sign at the top of the Presets panel and choose Mange Presets.
Step Two: In the Manage Presets dialog box, uncheck any preset folders you want to hide and click Save.
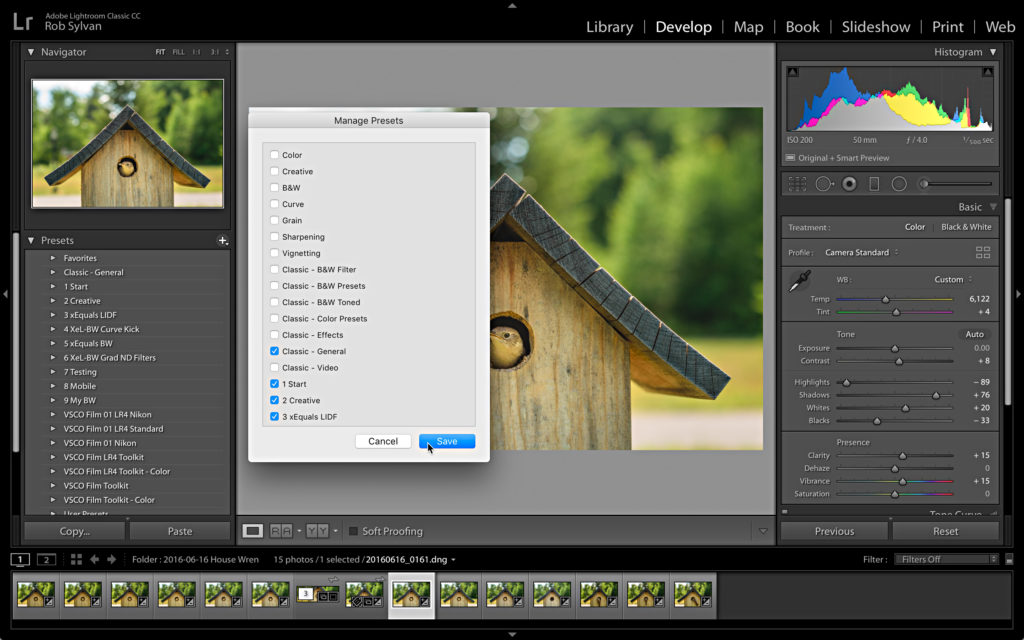
You can bring those preset folders back by returning to the Preset Manger and checking the respective boxes and clicking Save again.
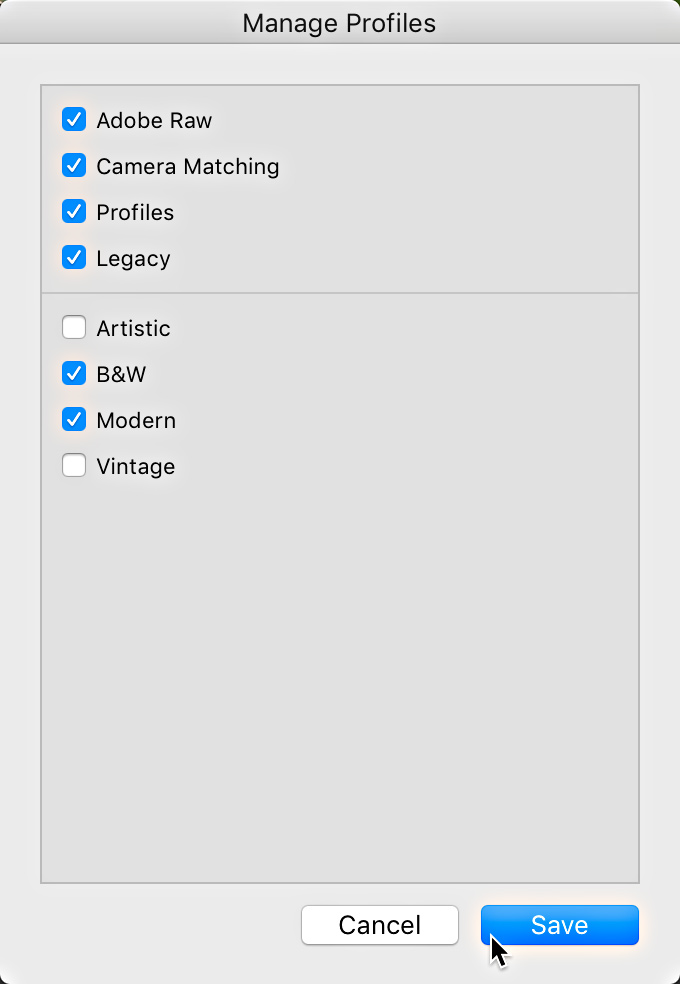
Hide and Show Profiles
The Profile Browser gained a similar tool for showing and hiding profiles based on your workflow. The way to access the Manage Profile dialog box is by right-clicking any Profile group, then choosing Manage Profiles from the contextual menu. Note, there are also options there for expanding or collapsing all profile groups, as well as a way to reset hidden profile groups.
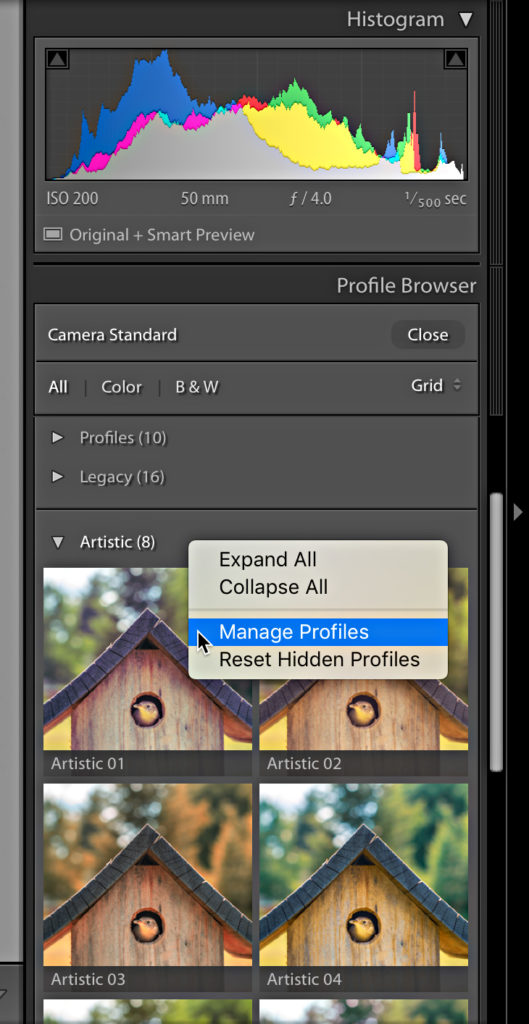
Once chosen, the Manage Profile dialog box appears, and you can uncheck the box next to any group you no longer want to see, then click Save.
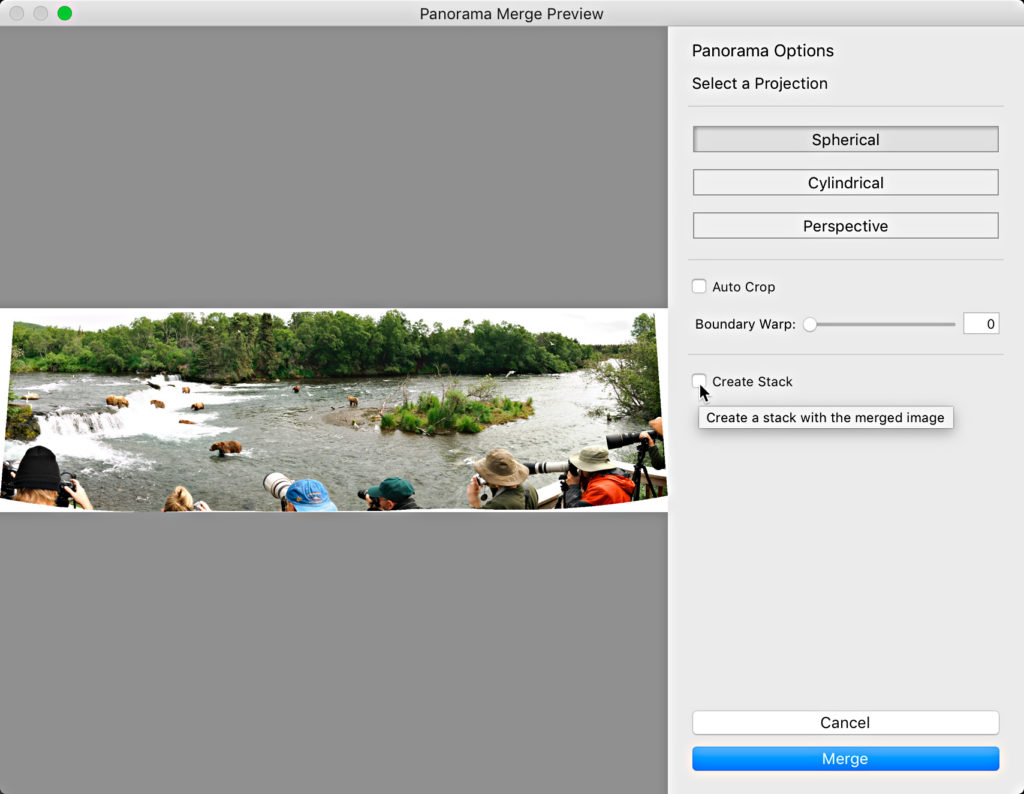
Auto Stack HDR and Pano
Both the Photo Merge > Panorama and Photo Merge > HDR dialog boxes got a new checkbox labeled, Create Stack. When checked, Lightroom will create a stack out of all the selected photos for the merge operation and stack them together, including the merged result. A nice way to keep things tidy, and a welcome addition.
Color Labels for Folders
You can now assign color labels to your folders. I’m all for new tools to help people manage their folder structure and find what they are looking for, and I can see how developing a color coded system could be a real asset. To assign a color to a folder, simply right-click the folder, then within the contextual menu go to Add Color Label, and choose your color from the list.
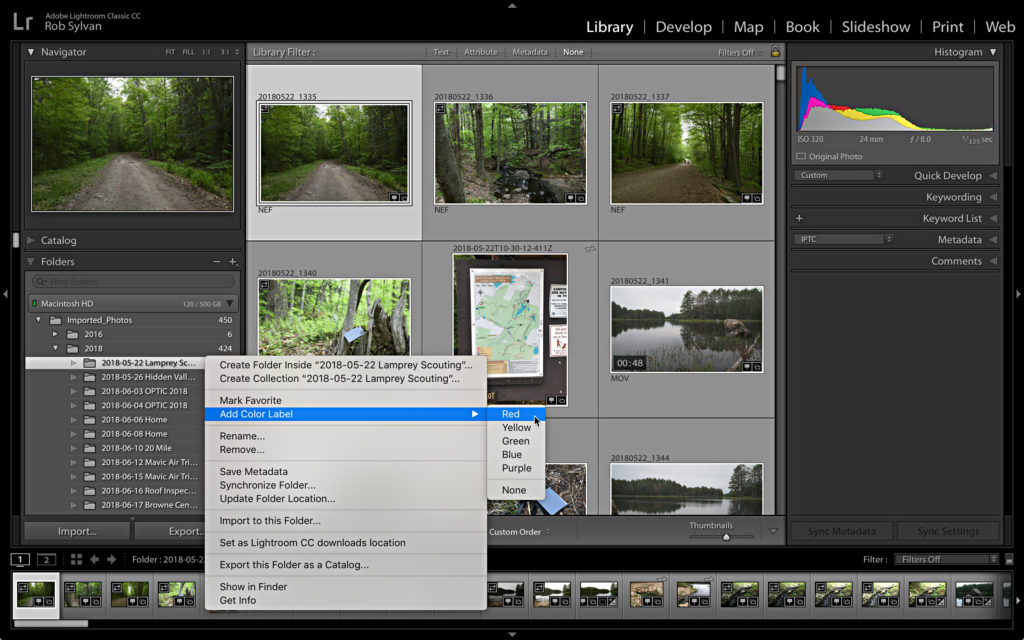
You can remove a color label the same way. Note, you can even select multiple folders and assign all selected a color at the same time.
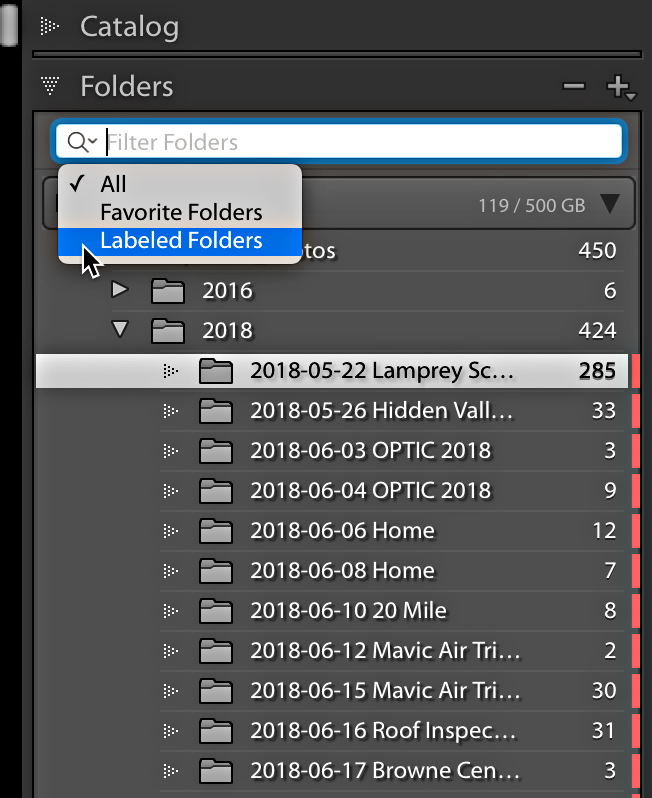
Once you’ve assigned color labels to folders you can use the Filter field at the top of the Folders panel to display only folders with a color label. This effectively hides the non-labeled folders, which could also be useful to some. The Folders panel filter has also had some additional work done to make it work faster when searching for folders. Give it a spin (and don’t forget to go back to the Filter and choose All to bring back your other folders).
I’d like to see this little feature extend to collections too.
Additional Notes
There was also support for new cameras and lenses added, as well as other bug fixes you can read about on Adobe’s own feature summary.
Be sure to check out Terry White’s great video on June updates to Lightroom CC.


Importing templates is pretty much broken in this version. In 7.3.1 I was able to copy preset folders in File Explorer on PC and they would show in those folders in the presets dropdown in the develop module. No longer. I have to import the presets in the develop module and they ALL import into user presets. My user presets list is packed full of unorganized presets now 🙁
Auto stack HDR merges – thank you Adobe. And Rob.
One less thing for me to do.
Rick McEvoy – https://rickmcevoyphotography.com/
HDR and Pano in LR Classic? I didn’t know that even existed. How do I get it?
Select the photos you want to merge, go to Photo > Photo Merge.
I like color labels for my folders but I only see one folder – HOW do I view all folders – this is very FRUSTRATING – I haven’t been able to find help on this ANYWHERE – the ONLY folder I can see is the folder for the current open catalog
please help
Don Gordon
Hi Don, Need more information. You can only see the contents of the Folders panel for the currently open catalog. I’m not sure what you are trying to do.
Thanks for the info, Rob. I’d still like Adobe to allow us the ability to cancel out of exiting when we close Lr. Often, I want to go back and perform a functin but have to wait till Lr closes then re-launch it. It would be nivce to be able to go bak in and cnacelthe log out.
Same goes for me too. Already since the very beginning of Lightroom this “Do you really want to quit Lightroom” on exiting the program is a pain in the neck to me.
Cheers
Cor
Print Module – Show Info Overly NOT working – since YEARS now… I have reported this in all possible ways on all possible forums and feedback systems to Adobe. To NO USE. 🙁 🙁 🙁
Yeah, it is a Mac only issue, and it must not be high on the list of priorities. There are a number of little bugs like this that just linger on …
Patrick,
I would like to chase your report down. Can you give me any links to anything you might have created here: https://feedback.photoshop.com/photoshop_family/categories/photoshop_family_photoshop_lightroom? I searched but didn’t come up with your name – well I came up with lots of Patricks but not you specifically.
Thanks, Rikk!
Really happy I checked this out!! Totally missed the “Disable preset rollover” option.
Hoping with the color coded folders they give us the option to label them differently… Then color labels for images. Hoping to see this added to collections as well.
Lots of little tweaks to make life a bit easier. Thanks for the exhaustive list!
If you use Classic, you can’t sync your presets. However, there’s a workaround: just install CC and import them there.
I looove having my presets in Mobile!
Thank you.