
Create an Auto Transform Preset
Recently, a comment was left on Scott’s post on how to apply an auto settings preset on import, asking, “What about when you want to apply the “auto” under the upright adjustments? I do a lot of real estate photography, and find myself clicking the “auto” button there very often. How would I create a preset for this (which would analyze each photo for upright correction individually rather than applying the same correction to all photos)?” Great, question! Thanks for commenting, Chip. This one’s for you.
Transform Panel
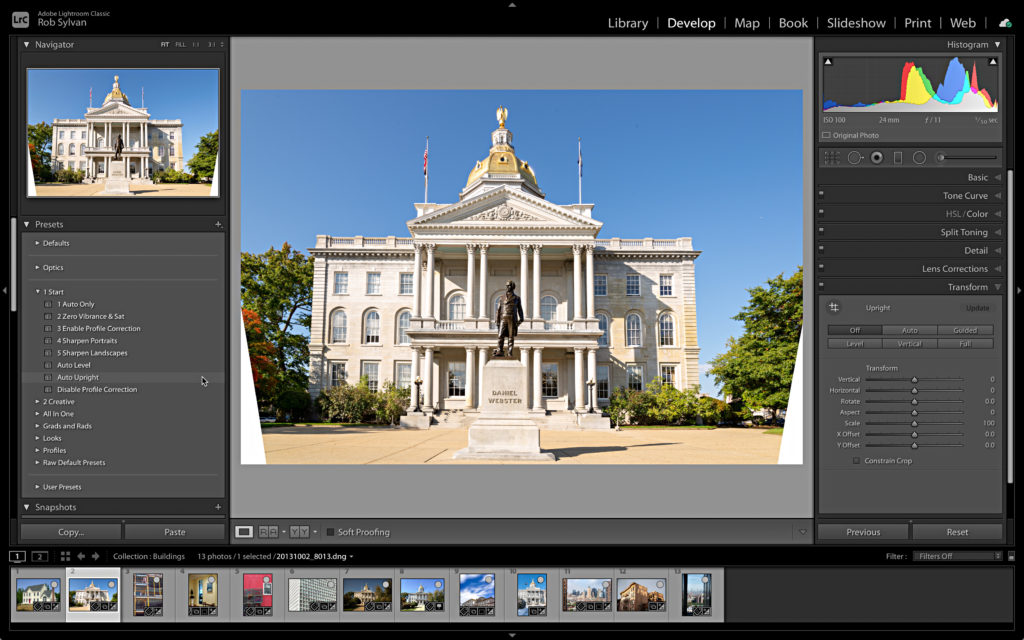
Chip is referring to the Auto Upright button in the Transform panel.
When clicked, Auto does a pretty good job of correcting level, perspective distortion, and aspect ratio (how squished or stretched the building looks after the correction) in one click. Your mileage may vary with each photo you try it on, but it is often worth a shot. Bundling that function into a preset gives you the ability to apply it as part of your import process, in a batch function within the Library, or with a single click in the Presets panel. A cool benefit of having it available in the Presets panel is that you can give a live preview of its effectiveness simply by moving your cursor over the preset. All good reasons to want to give this a try.
Creating the Preset
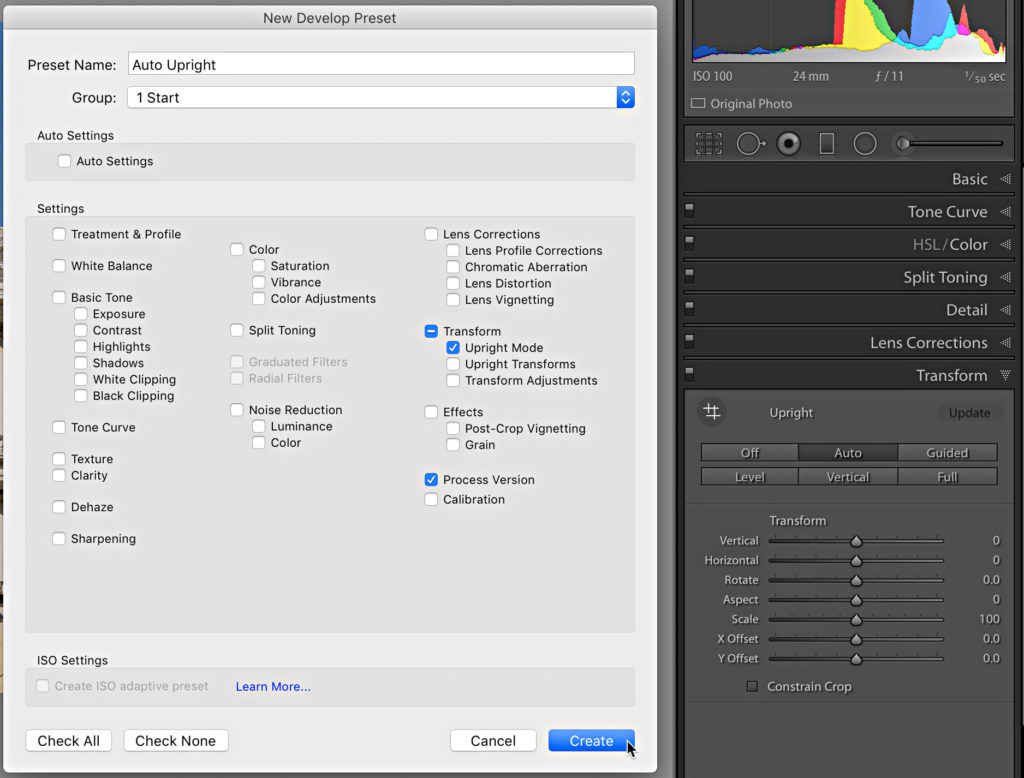
To create a preset that applies the Auto correction in a way that tells Lightroom to analyze each photo to apply a correction unique to that photo you just have to select Upright Mode in the New Develop Preset dialog box. Here’s how:
- Select an un-edited photo, then expand the Transform panel and click Auto. Only apply edits you want to include in this preset.
- Go to Develop > New Preset (or click the + sign at the top of the Presets panel) to open the New Develop Preset dialog box.
- Click Check None to clear any unwanted selections.
- Check the box for Upright Mode in the Transform section (leave Upright Transforms unchecked).
- Include any other settings you wanted to include, or just leave it with Upright Mode.
- Give the preset a meaningful name and direct it to be saved in a logical group/folder for your workflow.
- Click Create to complete the process.
With your preset ready to go, select a photo and move the cursor over the preset to get a live preview. Note, if you don’t see any change when moving your cursor over a preset go to Preferences > Performance, and check the box next to Enable hover preview of presets in Loupe. If you are happy with the correction, click the preset to apply.

I find also find it useful to have a Level preset on hand for the same reasons, as those are the two Upright functions I use the most. Thanks again, Chip for the question, and I hope that helps you with your photography.

Hi Rob, Thanks. I thought as much!
A good tip, thanks. This leads me to another question: I often use the Auto-button for first exposure corrections which works fine in many cases but always tunes in saturation and vibrance which I don’t like. My approach was to create a preset runing “auto” and simultaneously resets the two sliders to zero. Unfortunately when you select “Auto Setting” in the preset-editor, saturation and vibrance is grayed out. Do you know an easier solution except running two separate presets after another?
Thx, Henning
Hi Henning, Unfortunately, the two preset route is the only option. I have a preset that simply zeroes out Sat and Vib for that purpose.