Awesome Lightroom Landscape Technique We Tweak To Use On Portraits
Happy Friday everybody! Here’s what up:
When you’re lighting portraits, you want to draw the viewer’s eye using the light, and our eyes are draw to the brightest part of the image. In a portrait, that’s usually your subject’s face, and then the intensity of the light should gradually fall away (if you look at Joe McNally’s work, you’ll see many great examples of this technique — he lights like a boss!).
In our tutorial today, I’m going to take a technique that’s normally used in editing landscape images (applying Lightroom’s Graduated filter to emulate a traditional neutral density gradient filter used to darken the sky, and then trail off to transparent), on a portrait, by using it in reverse. Take a look:
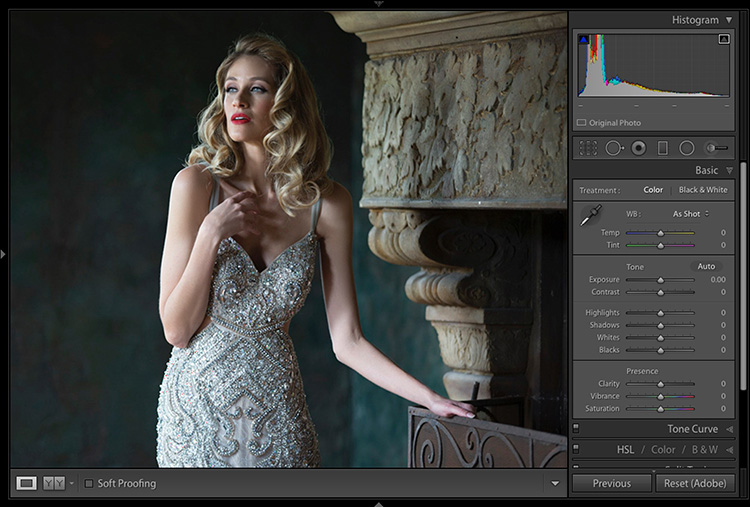
Above: Take a look at our image here. Her face is supposed to be brightest part of the image, but her arms, and her dress are so bright they’re drawing the eye. So, we’re going to darken the bottom of the image and have it slowly lighten as it goes upward until it reaches her face, where it will have no effect. It’s the opposite of what we do with a landscape photo — darkening the sky — instead we’re darkening the bottom half of the photo and having it gently return to normal once it reaches her face.
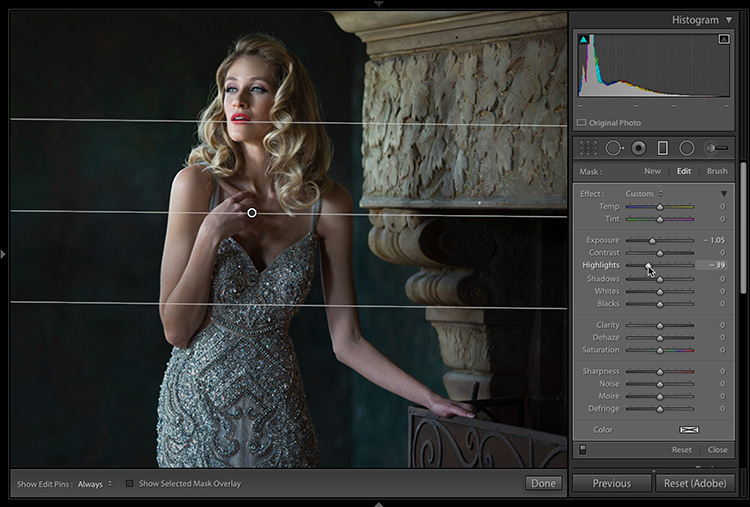
Above: In the Develop Module, get the Graduated Filter tool from the toolbar on the top of the right side panels (just under the Histogram). Double-click on the word “Effect” to reset all the sliders to zero, then drag the Exposure slider to the left a bit to make the exposure darker. Now, take the tool and drag from around the middle of the image up to her face (as shown here) to darken the bottom part of the image, and then have it graduate to transparent at her face. By the way — ignore the “Undo Add Graduated Filter” text on screen. Just my mess-up while making the screen capture.
Above: Once I did that, the dress still seems a bit bright, so I dragged the Highlights slider to the left to lower the brightest parts of that gradient, and it worked pretty well, but then the whole bottom area actually looked too dark, so I dragged the Exposure amount a little bit back to the right (as seen here).
NOTE: I exaggerated the darkening effect here so it’s easier to see in the tutorial – however, in retouching the actual image for a client, I wouldn’t make it quite so dark on the bottom half, but of course, it’s all “season to taste” with stuff like this.
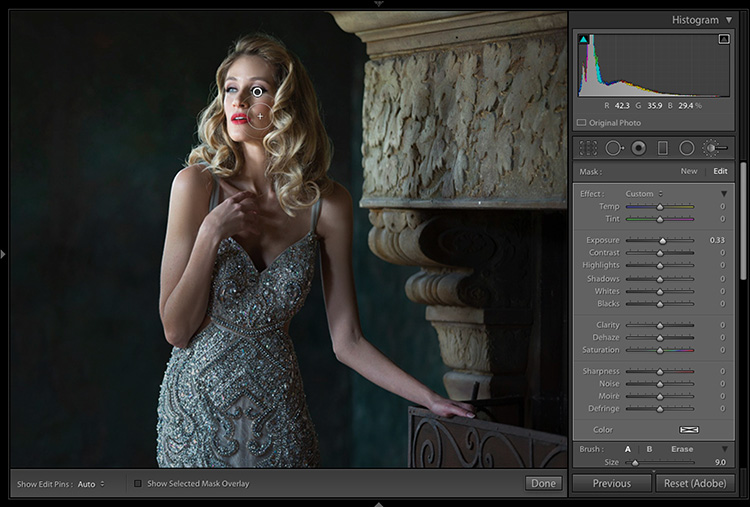
Above: When I’m done, even in situations where we don’t have this lack of fall off problem, I generally lighten the subject’s face just a little bit using the Adjustment Brush. I reset all the sliders to zero, and then raise the Exposure just a little bit and paint over my subject’s face (as shown here).
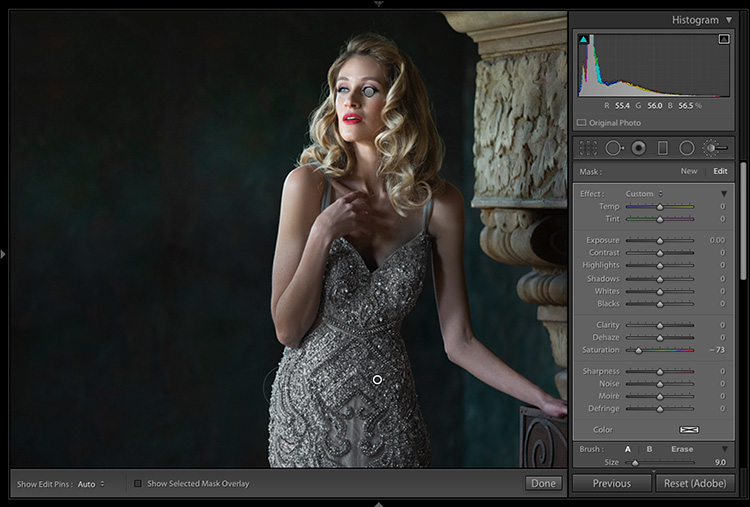
Above: I noticed one thing, and you can see it pretty clearly in the previous step — the darkening we did earlier to her dress gave her dress a bit of a greenish/bluish tint (it’s should be a silver dress). So, I took the Adjustment Brush; clicked the “New” button (since I’m going to paint someplace new, and leave the brightening of her face as is); then I reset all the sliders; lowered the Saturation amount, and painted over the dress to remove the color cast (as seen here).
Above: Here’s a final bef0re/after once I darkened the dress and arms; slightly brightened her face, and removed the greenish/bluish color cast from her dress.
Hope you find this helpful. 🙂
Have a great weekend, everybody! Stay warm. Save the whales. Eat your veggies. Etc.
Best,
-Scott




You wanna be careful with this technique tho, I’ve been using it for quite a while, and still use it VERY frequently.
Notice that in the final image above, it turned her silver dress into a dark gray, and her vibrant, life-filled, yellow arms into dead cold? You would want to make sure that you bring the color back in by just adjusting the Temp slider within that same Graduated Filter tool…and/or, avoid using the Highlights slider and just use the Exposure slider.
Doing the above technique on wedding pics could make the bright-white wedding dress to look dull, less vibrant, or even look as if it was more tan than white. Just be careful to consider the reality of the image.
Hi, yes, I tried it on some wedding images and had a similar slight problem on white wedding dresses.It tends to just make them loose their sheen and glow but it does seem to depend on the material and the lighting. Just go steady and be aware – I really don’t want a bride complaining that her dress is the wrong colour!
Great idea. Thanks.
バーゼルは2015年までに、ablogtowatch 18 kのホワイトゴールドでユリスナルダンfreaklabの初期のバージョンで若干の実際の時間がありました、しかし、我々はここでブラック色の画像中のチタンと炭素繊維であり、限定版ユリスナルダンfreaklabブティック(その名の通りを意味する)だけユーレッセナーディンモノブランド店で販売される。 http://www.newkakaku.com/xinq23.htm
「スター』この映画を、マシュー・アカデミー影帝麦康纳(Matthew McConaughey)とアニー・海瑟薇(アンHathaway)などに主演、クリストファー・ノーラン(Christopher Nolan)監督。この映画は探検家たちの一番新しい発見、ワーム・ホールを利用して、人類の宇宙旅行の限界を超え、広大な宇宙に冒険する物語を航行する。舞台は近未来、男性の主役のクーパーは元NASA宇宙飛行士が、地球の気候の変化のため、作物栽培による食糧にくい人間の深刻な不足のときは、クーパーと女性科学者艾米莉亜(アンHathaway飾)らを担うた人類を救うの重要な計画が、太陽係外へ、人類の新しい生命力を探して。映画のシーンを撮影アイスランド中外星は、火山の爆発後黒砂に覆われた氷山人に一種ではおなじみのなじみのない感じ、醸し出す雰囲気完璧外星。主人公库パーキンは映画の最後に入った五维空間利用時間は線形」をコンセプトに、片侧を建てた90x60x45フィートの部屋で、映画の中で見たどうせ交差の線で、実際には3 Dプリントテクスチャ、これが現れる謎の五维空間。11月10日、「スター」を監督クリストファー・ノーラン连携主演マシュー・麦康纳、アン・海瑟薇などを含めた「スターを越えて》なく現れ上海新天地に参加し、映画の中国での初日舞台あいさつに出席しじゅうたんを見て http://www.bestevance.com/rolex/daytona/index.htm
好易通の「流体力学」を提供し、新モードの観覧好易通の頭蓋骨–2015と今後2バージョン。もしあなたは少し戸惑いをどのようにブランドの最新の腕時計、そんなに心配しないので、私が。あなたが知っているのは、好易通頭骨ダイヤル表示の時間、秒、そして電源準備指標。これは正しいが、好易通の頭蓋骨必要のない分。 スーパーコピーローレックス 何、あなたは急いでは何ですか?あなたの腕にある未来の頭骨! http://www.brandiwc.com/brand-super-15-copy-0.html
非常に優美かつ独特で、ずっと優雅な姿で潮流の最高峰に立って、流行に引率して 豪華スーパーコピーブランドお楽しみください!弊社は個性あふれるブランドコピー、すばらしい デザインと高品質を兼ね備えるスーパーコピーバッグ、優雅の魅力があるのスーパーコピー財布など人気商品が続々入荷! http://www.bagkakaku.com/vuitton_wallet/wallet/145.html
リンデの心は、彼らのムーンウォッチコレクションに加えていると、はい、あなたが尋ねる)-―がなされるだけで59へ行くことができる前に、月に2日間の29.5-dayサイクル数。 ボッテガヴェネタバッグスーパーコピー 新しいリンデホワイトゴールドとブラックを始めたシリーズの最新の繰り返しで、ゴールド版の刻まれた18 kの形で見続けたで上昇した。スマートな方向に行って、このリンデ 白く見えるパリッとしてすべてのビットとして冷静にその前任者として。 http://www.eevance.com/tokei/gaga/index.html
ブレゲ時計ですべてのシリーズの中で、最も直接Classiques経典シリーズを体現したブランドの伝統的価値観と完璧なタブ芸、このシリーズは200年以上の歴史を完璧にブレゲ伝承、それらのシンボル的な特徴が影響した高級腕時計制作史。2011年バーゼルブレゲプラダ カナパ コピー時計展が初めて発表されClassique 5717 Hora Mundi経典シリーズのタイムゾーンの腕時計、ブレゲ経典シリーズの精髄を演繹し。この項表は貴重な材料で作ら:18金やプラチナバラ950。オプション3種類の文字盤:南北アメリカ州、ユーラシア大陸やアジアやオセアニア—-分表世界を代表する一方、国境、計6種類の型番。時計の文字盤は同モデルで中央の藍鋼ブレゲ針の現在の所在指示タイムゾーンの時、分、秒、12時位の日付表示ボックスが同期が3日の日付読取り。一枚の隠しダイヤルを持って円環のマイクロ逆行指針は即時ボックスかも当面の日付を読み、24時間週期でゆっくり滑り。スーパーコピーブランド専門店当日の日付で、右に左からかすめ日付を帯び窓口後、円環の逆行指針は自らジャンプから窓の左側に同じペースで続けと新入生の日の調歩。 http://www.ooobrand.com/bags/hermes/645.html
財布のコピー 時間を発表しますとても長くてとても長い前、人類はすべて更に赤く双足は歩いています。1人の国王はある辺鄙で遠い田舎の旅行に着いて、路面がでこぼこなため、とても多くてばらばらな石があって、刺すのは彼の足を得ます痛くてしびれます。王宮に帰った後に、彼はおりていっしょに命令して、国内のすべての道はすべて一層のほらに敷きます。彼はこのようにすると思って、自分になって、また彼の人民に幸福をもたらすことができて、みんなを歩かせます時もう受けて痛い苦しみを刺しません。たとえしかし最も国内のすべての牛を殺しますとしても、十分な皮革をも調達しきれないで、費やした金銭、使用する人力、更にはかりしれません。まったくできないが、甚だしきに至ってはまたかなり愚かで、しかし国王の命令なため、みんなも頭を振ってため息をつくことしかできません。1人の聡明な召使いは大胆に国王に提案を出しています:「国王!どうしてあなたは大勢の人を動員して、そんなに多い牛に命を捧げて、そんなに多い金銭を費やしますか?あなたは何は両の小さいほらであなたの足をしっかり包むだけではありませんか?」国王が聞いたのはとても驚いて、しかしもすぐ悟って、そこですぐに命令を取り消して、この提案を新たに採用します。聞くところによると、これは「革靴」の由来です。世界を変えたくて、難しいです;自分を変えて、比較的容易です。全世界を変えるよりも、先に自分の–「自分の双足を包みます」を変えるほうがいいです。自分のいくつかの観念と方法を変えて、外来の侵略を防ぎ止めますで。自分で変えた後に、目の中の世界の自然はすぐ引き続き変えました。 http://www.ooobag.com/wallet/louisvuitton/index_9.html
ウブロ1のウブロ2に移行し、現在は社内製造設備の大半を内蔵している。鼓膜を麻痺させるいくつかのcnc機械の騒音ウブロ2の第1のフロアを支配します。熟練した機械工の各成分のウブロの厳格な基準を正確に設計を確実にする努力。その古い時計用語でないことにもかかわらず、ウブロの名前の品質と同義です。 IWC時計コピー その35年の歴史を通して、ウブロおそらく大胆なデザインでより広く関係していました、しかし、この新しい機能は、ブランドについて真剣に発達する評判の時計市場で深刻な革新者としてであることを示した。 http://www.ooowatch.com/tokei/vuitton/index.html
カルティエ 時計コピーよく知らないそれらのために、Ætherの腕時計は、フェニックスaz、家に電話をすると起動する店は、2012年には周辺の石の小川ストラップビジネスの延長として。レビューともう一つの非常に驚いたことを意味し、Æther石の小川のストラップをインストールして来るのを見て、いくつかのカスタム化オプションで利用できます。私のために、これまた超私の良いに興味があって、エキゾチックレザーストラップ(スミス&ブラッドリー遺産によって起こす関心)。 http://www.newkakaku.com/lq1.htm
人気の春夏シャネルベルトコピー流行ファッションや定番アイテムなどファッションアイテムが勢揃いシャネル CHANEL レディースファッション ファッション雑貨・小物 ベルト を海外通販!美しいシャネルのサングラス、格安のシャネルのサングラスコピーこれらの魅力的な割引シャネルのサングラスだけでなく、暑い夏に目を保護することも するのに十分な美しさと優雅さを追加します。シャネル サングラス カメリア・最安価格をぶった斬り! http://www.ooobrand.com/about/index.html
当店は信頼できるルイヴィトンスーパーコピーN級品販売店。100%実物写真ですし、品質が完璧です。高品質ルイヴィトンコピー,安全税関対策+素早い配送+随時の在庫補給+丁寧な対応+スーパーコピー販売業界最低価格に挑戦!ルイヴィトンスーパーコピー http://www.gowatchs.com/brand-193.html
Brilliant, some useful tips here. I’ll be giving this a go.
Hi Scott
I couldn’t find another way to contact you but I have been trying to import your develop presets from the download mentioned in your book [which is great by the way!] but Lightroom tells me that they are the wrong presets???
What can I do about that?
Thanks
Angela
Awesome! Thanks for sharing helpful tips.
Liked to see video before having to comment
Always great quality ideas
I like it
I should add that I do this with landscape photos too! Draw a very long and thin radial adjustment shape across your landscape photo, adjust exposure, etc to taste, and use the radial filter adjustment brush to refine the mask. Really useful when, for example, you want the focus to be on a certain section of your landscape.
Hi Simon, I do the same thing with the radial tool. It works really great on autumn photos. Surround the colorful trees and brighten them up just a tad. What a difference.
Dennis
The other way of doing this is to use the radial filter adjustment. Set exposure to -50 and draw a circle over the face. Then adjust the exposure setting, the shape of the mask, or use the radial filter brush tool to add or remove parts of the mask.
Or, unclick ‘invert mask’ and brighten up the face using the exposre, shadows and highlights sliders until you get what you want.
Great tip – I can imagine that at weddings, where the large rooms usually have taller windows, this can be a problem, too, so this tip could be really useful there. When LR introduced the Highlights slider in LR4 it transformed the ability to show detail in those bright dresses. Fabulous
Nicely done, Scott! A subtle effect that improved the photo dramatically.
I think it also makes her lower body part look narrower.