
Tips For Managing Profiles
Awhile back, Adobe revamped the entire functionality behind applying camera profiles to our photos in Lightroom Classic, Camera Raw, and the cloud-based Lightroom. They really took it up a few notches by giving us the ability to create custom profiles as well as install profiles from third-party suppliers. If you’re like me, you’ve probably explored the pre-installed ones, downloaded and installed a bunch, and possibly even created some of your own. Managing those profiles over time isn’t incredibly intuitive, so here are some tips to help.
Let’s start in Lightroom Classic’s Basic panel, and click the icon to open the Profile Browser.
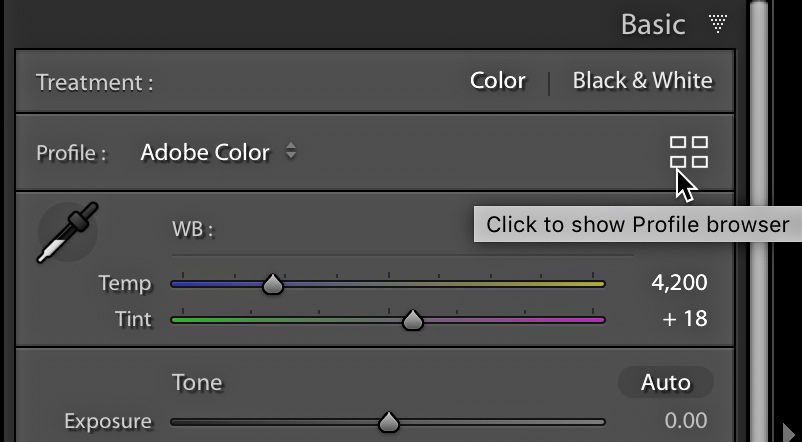
Depending on the file type of the photo you have selected when you open the Profile Browser, you will see all of the available profiles that work with that file type. For example, some profiles only work with raw photos, so if you have a non-raw photo (JPG, PSD, PNG, TIF) selected, you won’t see the profiles for raw photos.
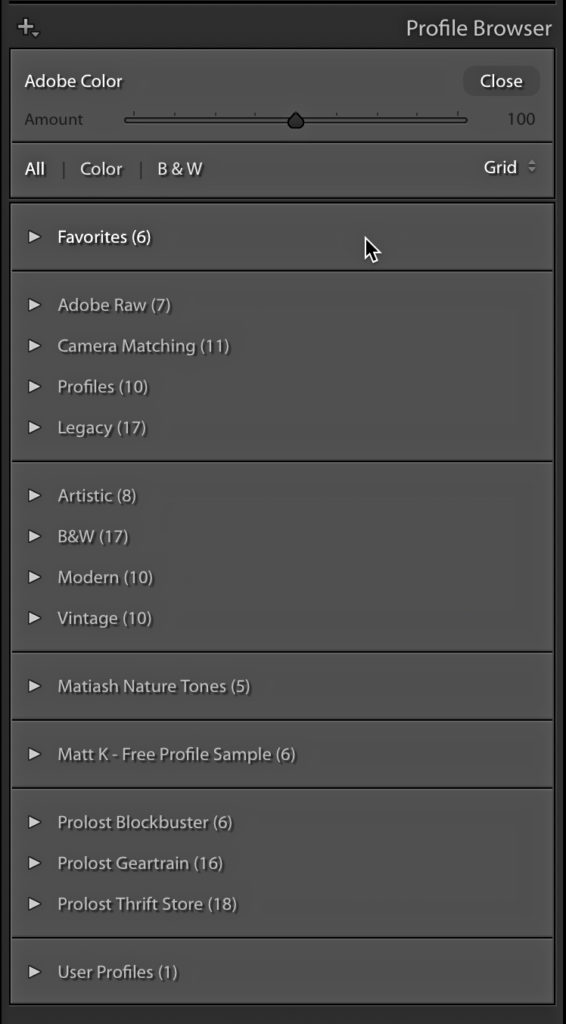
Profiles are grouped into folders, and groups of folders are separated into clusters based on who created the profiles. If you have not created or installed any new profiles, then you will just see the ones that come with the software. Up at the very top is the Favorites section (more on that later), and if you have a raw photo selected you’ll see the Adobe created cluster of profiles for raw photos under Favorites. Below the cluster for raw photos is a cluster of four profile folders (Artistic, B&W, Modern, and Vintage) that work on raw and non-raw photos alike. If you’ve installed any third-party profiles or created your own those will appear next.
Marking Favorites
As you explore the pre-installed profiles you may find that you have a few go-to favorites. To make those go-to profiles accessible without having to jump into the Profile Browser you can mark them as Favorites. Here’s how:
Step One: Place your cursor over the profile you want to mark as a Favorite.
Step Two: Click the star icon that appears int he upper-right corner of the profile to mark it as a Favorite.
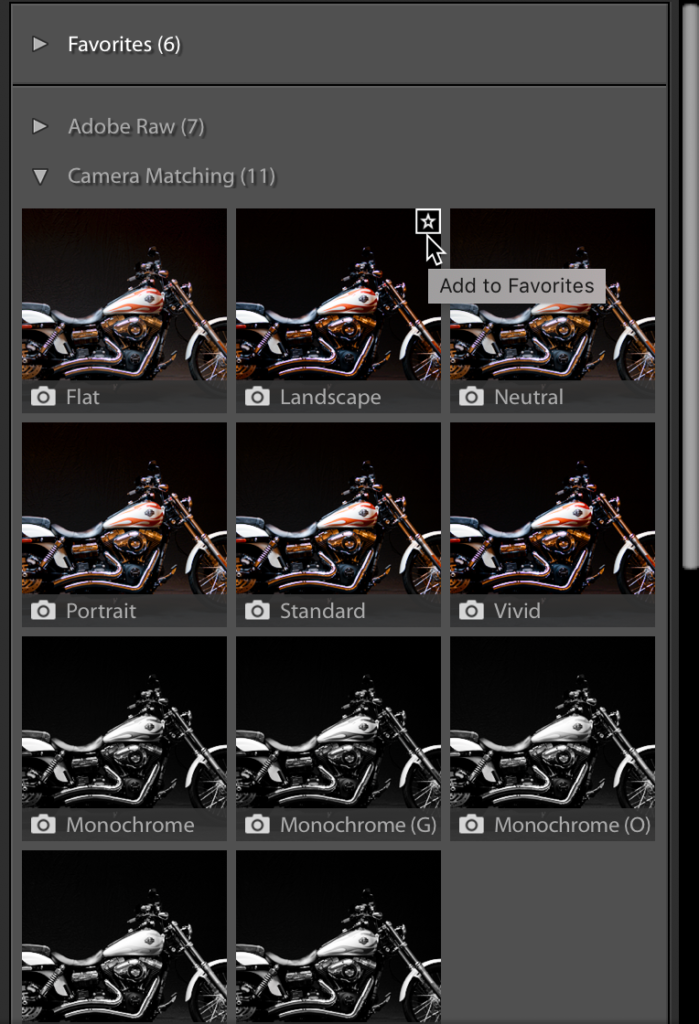
That profile will now also appear in the Favorites folder at the top of the Profile Browser, but more importantly it will also appear in the Profile drop-down menu in the Basic panel for easy application.
Just click that star icon a second time to remove that profile from Favorites.
Hiding Profile Folders
If there are entire folders of profiles that you don’t use and you’d like to clean up the interface, we do have the ability to hide each folder. Here’s the cool thing, if you mark a profile as a Favorite and then hide the folder where that profile lives, the profile will still appear under Favorites. So, if you look through an entire folder, mark the ones you like as a Favorite, and then hide that folder you can still apply the ones you like without having to sort through all the profiles you don’t like. This could make your Favorites section unwieldy with too many profiles, but you get the idea.
To hide entire folders of profiles, click the + sign at the top of the Profile Browser (or right-click the name of any profile folder) and choose Manage Profiles to open the Manage Profiles dialog box.
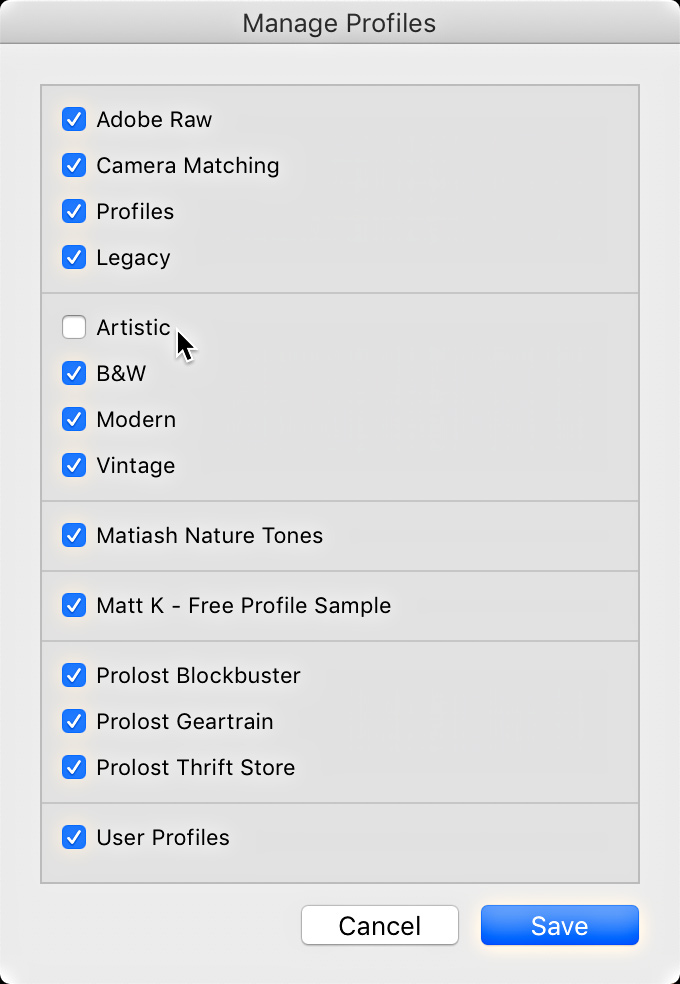
From the Manage Profiles dialog box you can uncheck the name of any profile folder to hide it from the Profile Browser. To reveal a folder again, just head back into the Manage Profiles dialog box and re-check the box next to that folder to bring it back.
Note, any changes you make here in Lightroom Classic will be reflected in the Camera Raw plug-in for Photoshop the next time you launch it. The Camera Raw plug-in also has some additional options not found in Lightroom Classic, so we’ll take a look at those next week.
Rob
This is very useful to know – I haven’t delved much into profiles in LR. It’s particularly handy to know that any favourites, etc get pulled into PS Camera RAW.
Keep it up!
Tim
hello Rob,
I like profiles in LR and i use them a lot, even for infrared raw processing.
But environment is not easy to use in LR.
I am using Lutify profiles in LR and LUT in ON1 and the grid view of ON1, full screen with a slider to select number of thumbnails on display is amazing.
rollover mouse on little vignette in LR is tedious as well as the small right panel allocated for hundreds of profiles in LR. By the way, i prefer camera raw tabs and top menus to have more space in each tab than in LR where you stack closed panels taking lot of room.
I hope ne day LR will have such full screen grid display of presets and profiles.
Moreover, it would be nice in LR we can have a solo mode for profiles and presets because it is also tedious to close each profile category before opening another one.
best regards
marc