
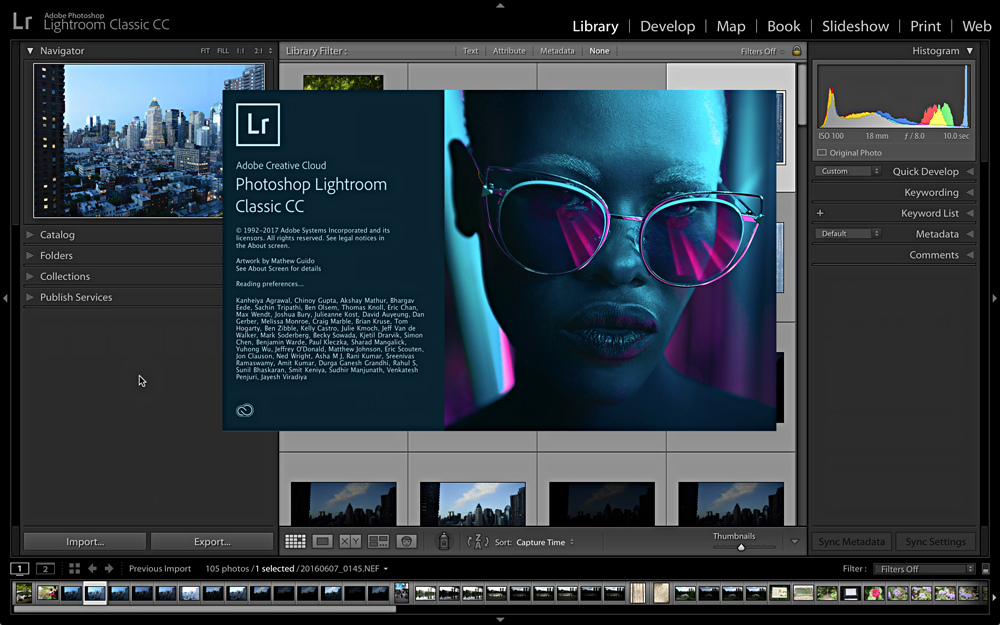
A New Lightroom is Here (and with it a whole new Ecosystem)

This article is an excerpt from Issue 34 of Lightroom Magazine‚ just released today!
It’s been more than two years since we’ve gotten a new version of Lightroom, and I’m very excited to tell you about what’s new, but I have to start by providing some historical context. I also want to give you a heads-up that this isn’t just about a new version of Lightroom; there’s also a whole new application (for both Mac and Windows) in the mix. For clarity’s sake, as there’s likely to be confusion, I’m going to use the full names for these products at the start, and then introduce the shorthand I’ve been using to keep them straight. You’ll understand why very soon.
A Short History of Lightroom
In 2007, Adobe Photoshop Lightroom Version 1.0 was released. Fast-forward to 2015, when we were introduced to Adobe Photoshop Lightroom CC 2015.0/6.0. For the last 29 months, we had two flavors of Lightroom: one paid for through a Creative Cloud (CC) subscription and one paid through a one-time payment for a perpetual license. Both flavors were developed in parallel, with both receiving periodic bug fixes, as well as new camera and lens support. Over that same time period, a mobile-based app for iOS and Android devices, commonly referred to as Lightroom mobile, was rapidly developed and integrated with Lightroom CC 2015. The key to that integration is the Adobe ID associated with your CC subscription. Due to its subscription-based payment system, Lightroom CC 2015 also received a few new features during that time frame, which weren’t possible to add to Lightroom 6. That brings us to present day.
Lightroom Today
Adobe has just announced the successor to Adobe Photoshop Lightroom CC 2015/6, and its full name is Adobe Photoshop Lightroom Classic CC. This is the 7th version of this product. The core goal of this release is a commitment to improving performance across the workflow. We’ll get into the specifics in a bit, but the marquee feature for this release is all about performance enhancements. In addition, there are new features and improvements in the Develop module that are very welcome. For the sake of brevity, I’ll refer to this new version of the application as “Lr Classic” from here on out. What’s the deal with the addition of Classic to the name, you rightfully wonder? Let’s get into that.
Lightroom as we’ve known it, now Lr Classic, is a tool that’s based on photos being stored locally in folders on drives connected to your computer. If you’ve used Lightroom mobile at all, you’ve been introduced to the idea that the photos synced between the catalog on your computer and your mobile devices can be stored, either as smart previews or full resolution images (depending on what device they were imported through), on servers in the cloud. This cloud storage enables you to access those photos from both your computer and all of your mobile devices, as well as Apple TV, and even a web browser pointed to lightroom.adobe.com. Adobe has taken this concept to the next level with a completely new application for Mac and Windows that’s called Adobe Photoshop Lightroom CC (Version 1.0). Yeah, you read that right. This is the reason why the version of Lightroom we’ve known these last 10 years is now going to be called “Classic.” I’ve been referring to this new application simply as “Lr CC,” which I realize can be confusing, but I haven’t found a better alternative yet.
Note: I’m deliberately referring to the operating systems on which these applications are installed because I feel it’s clearer than using words like mobile, phone, tablet, and desktop, which all have evolving meanings as our hardware continues to morph into new devices.
Lr CC is the Mac/Windows gateway to the Lightroom ecosystem that lives in the cloud. The interface is (mostly) unified with the interface you find in Lightroom mobile for iOS/Android and the web (lightroom.adobe.com). Here’s the real kicker, though, with Lr CC you store the full resolution photos in the cloud, and this gives you access to your source photos from every device you own. This is no small thing. That said, this is also a version 1.0 product, and as such, its feature set is not yet complete (more on that later).
Goodbye Perpetual License
Adobe has clearly gone all-in on the cloud, and with that move, there won’t be a perpetual license version of Lr Classic. The only way to get any new version of Lightroom is with a Creative Cloud subscription. My understanding is that Adobe will release updates to Lightroom 6 for an unspecified time, to provide support for new cameras, lenses, and bug fixes as they have these last 29 months.
Hello, Lr Classic
I know from my experience on the KelbyOne Help Desk, as well as from various forums and conversations with other Lightroom users, that improving performance has been high on everyone’s wish list. Adobe has apparently taken this issue seriously and devoted most of its resources for this version to identifying various points in the workflow where speed can be improved. One of the first places you may notice an improvement is in launching the program, which should be more noticeable with larger catalogs. I’ve definitely noticed an improvement here.
Once opened, I think the most-welcome new feature will be the improvement to importing photos by using the embedded previews extracted from the photos themselves. By using the embedded previews, you can begin the process of separating the wheat from the chaff as soon as you see photos start appearing in the Library. To utilize this feature, select Embedded & Sidecar from the Build Previews drop-down menu in the File Handling panel of the Import dialog.
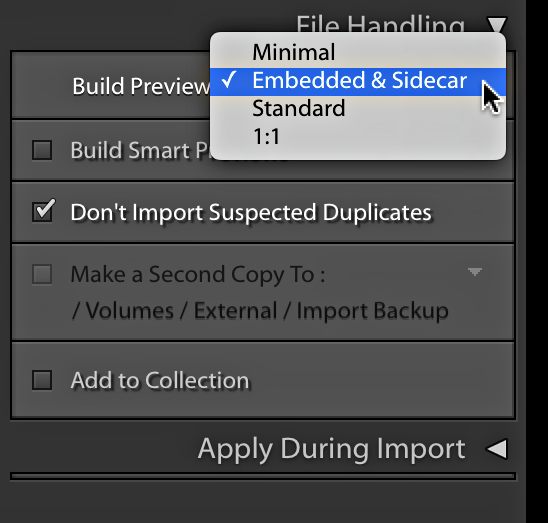
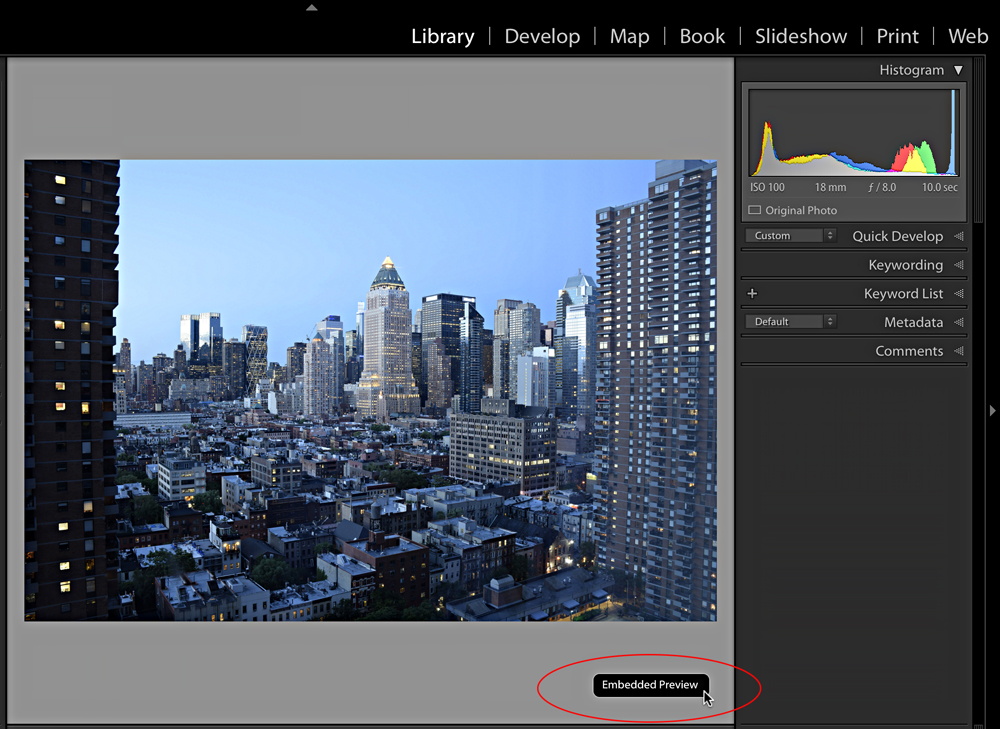
Photos using these previews will display an Embedded Preview label in the lower-right corner in Loupe view, and with a new icon on thumbnails in Grid view.

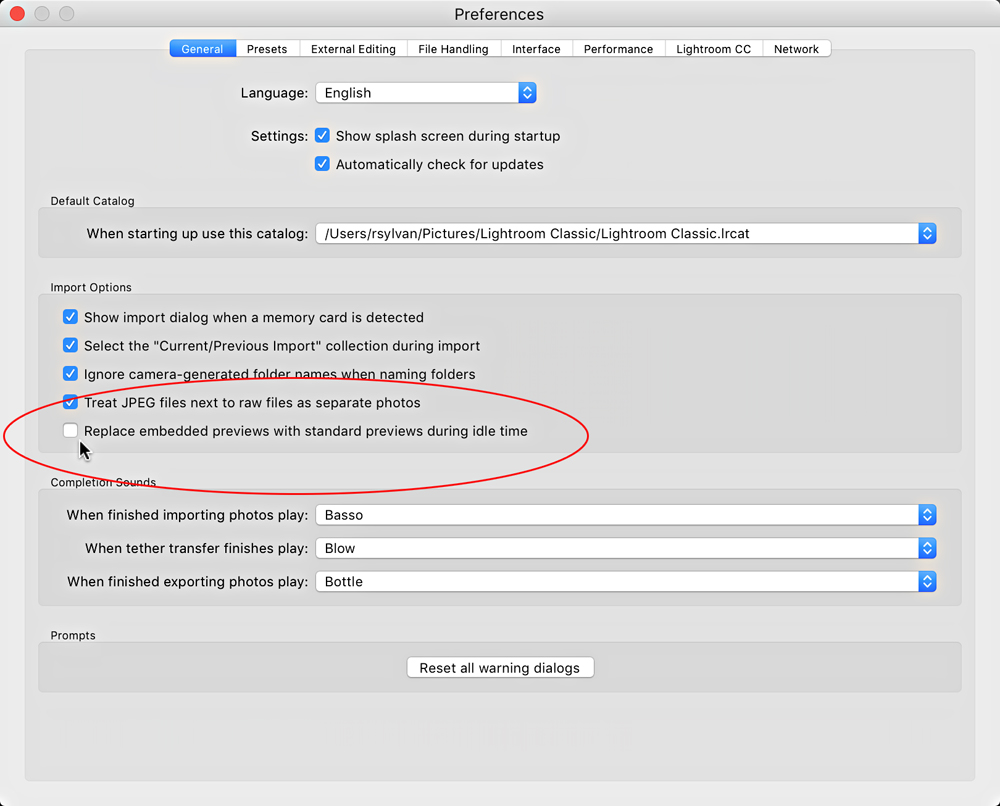
Because we’re not waiting for Lightroom to render previews from scratch, or fighting against it while it renders them in the background, the entire process of identifying your selects is much faster. This is a workflow people have been requesting for years. Lightroom will render a new preview when adjustments are made, or if you manually choose the rendering of previews via the Library>Preview menu. There’s also a new preference (Lightroom > Preferences [PC: Edit > Preferences]) in the General tab labeled Replace Embedded Previews with Standard Previews During Idle Time, which when checked, will automate the process of replacing embedded previews (it’s off by default).
You may also see speed improvements in preview rendering, switching between Library and Develop, the speed in which Develop sliders become active, moving from image to image in Develop, and when using the Adjustment Brush and Spot Removal brush in Develop. As with earlier versions of Lightroom, your mileage will vary based on your hardware, but Lr Classic should be taking better advantage of more robust hardware configurations than previous versions.
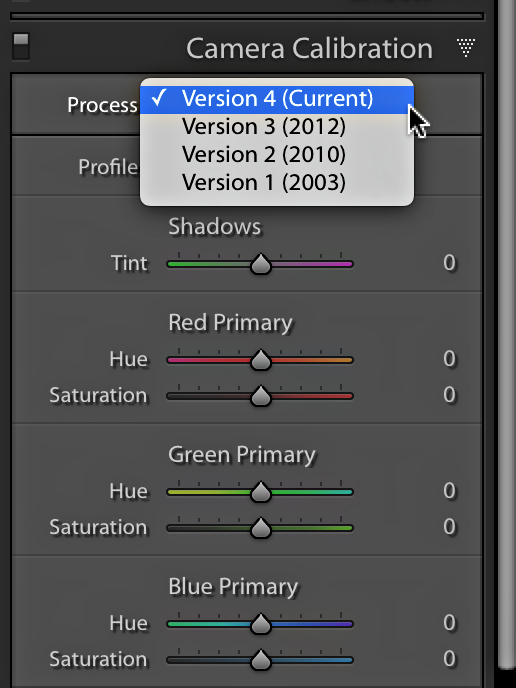
Speaking of Develop, there’s a new Process Version (PV) included in this release, and they’ve also renamed the previous PVs. The latest PV is called Version 4, and earlier versions have been renamed in descending order: Version 3 (2012), Version 2 (2010), and Version 1 (2003). Photos will have Version 4 applied by default on import, but photos from upgraded catalogs will retain whatever PV they had applied until you make new adjustments in Lr Classic.
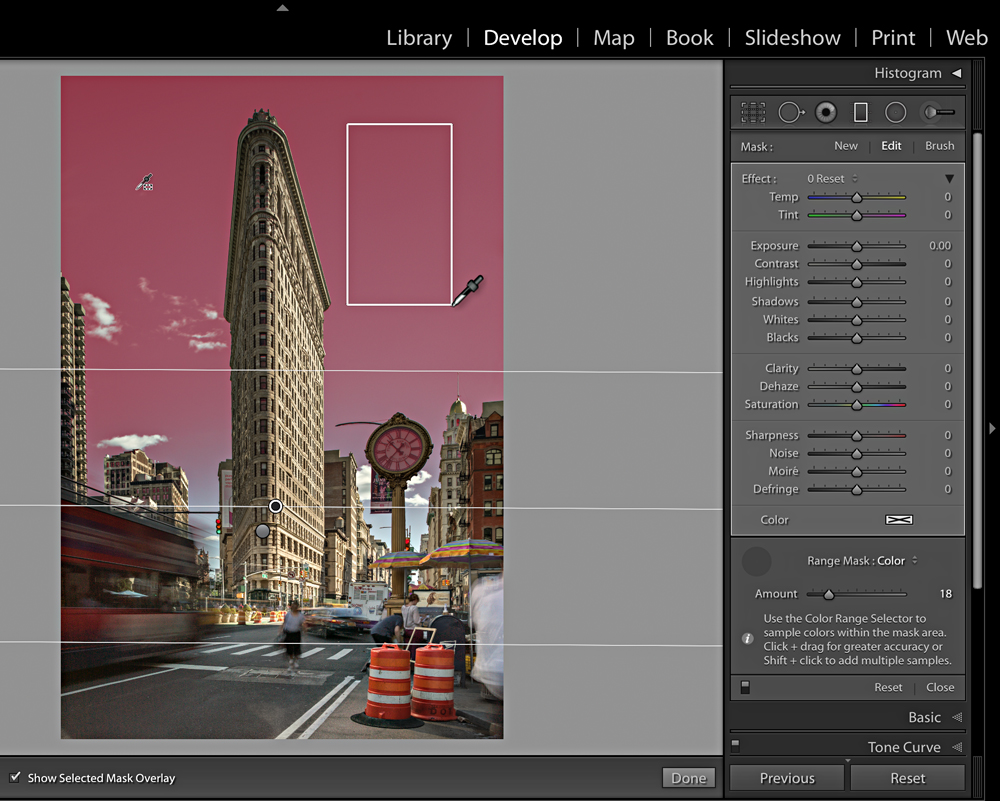
The PV was updated to improve the performance of Auto Mask (in regards to better handling of noise reduction settings) and a new feature called Range Mask. While most of the newness of this release is focused on improving performance, the new Range Mask feature is going to change how you use the local adjustment tools (Graduated Filter, Radial Filter, and Adjustment Brush). Range Mask gives us the ability to refine the affected area of our local adjustment by either color or luminance values. Let’s say, for example, we have a photo with some sky that we want to adjust, but we want to avoid adjusting foreground elements that extend into the sky (such as buildings or trees).

I can select the Graduated Filter tool to create a filter that extends down to the horizon, even though it also covers the buildings. Then, by enabling the Range Mask by setting it to Color at the bottom of the local adjustment panel, I can target the blue of the sky so the filter will only affect that color. You can click a single point to choose a color, but for a gradient like the sky, clicking-and-dragging out a larger selection can yield better results. From there, use the Amount slider to fine-tune the selection.
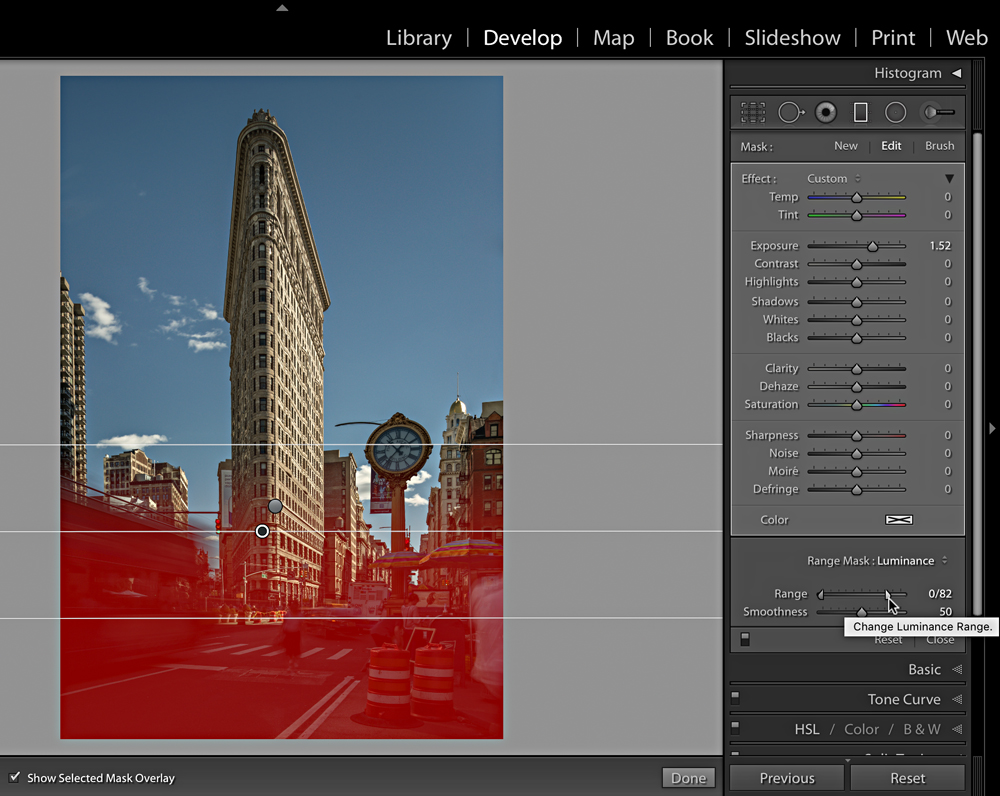
When the Range Mask is set to Luminance, you can target specific luminance ranges for adjustment. In this case, I wanted to brighten the foreground, so I applied a Graduated Filter from the bottom up, and then using Range Mask set to Luminance, targeted just the darker tones for adjustment. Having the overlay enabled in both cases makes it much easier to see the area being targeted.
In addition, there are a number of small, but useful additions, such as a filter by file type on import, a new metadata exclusion option on export, additional smart collection criteria, and the usual support of new camera RAW formats, new lens profiles, and bug fixes. With Lr Classic being only available via subscription, we should expect to see additional new features continue to roll out as we did with Lightroom CC 2015.
One very important limitation to note with Lr Classic is that while it still has the same ability to sync with mobile devices as it had before, it doesn’t have the ability to upload originals to the cloud (though it can download full-resolution copies uploaded through one of the other Lr CC devices). Lr Classic still only uploads smart previews. This is where Lr CC comes into play.
Enter Lr CC
I think it’s helpful to think of Lr CC as an entire ecosystem that includes apps for iOS and Android, a web-based interface through lightroom.adobe.com, and the newly released app for Mac and Windows.

Adobe’s goal is to have unity in the look and feel of the interface across these platforms, so whether you open the app on your mobile device or on your laptop, you’ll have access to the same set of features and functionality, as well as access to all the same photos. That said, this remains a work in progress, and full feature parity is in the future.
So, what’s emerging from this announcement is that Adobe has identified two distinct, albeit potentially connected workflows. One workflow is for those of us with a folder-centric workflow stored locally using Lr Classic, and the new workflow is for those of us who want to be free of local storage and have access to all photos from every device using Lr CC.
Lr CC is clearly an evolution of the features and functionalities we’ve had in Lightroom mobile for iOS and Android, with the obvious difference being that we can install it on our Windows and Mac computers. Lr CC has a much simpler interface to navigate, as it doesn’t have the output modules found in Lr Classic, and is really just focused on accessing photos through Albums (formerly Collections), and making them look better with the included editing tools (which are largely the same as we’ve had in Lightroom mobile and Lr Classic).

The key difference in using Lr CC over Lr Classic is that everything you do is automatically synced to the cloud, including your photos. You can import photos on your computer running Lr CC, then switch to your phone to continue working, then switch to another computer running Lr CC and finish the job. From each device, you have access to the same photos and the same edits. I can’t tell you how often people write in to the KelbyOne Help Desk asking how they can work with the same photos on more than one computer. Well, now you can.
There’s clearly a lot more that can be said about the specific features and tools in the newly released apps, but I just wanted to introduce you to the bigger picture of what has changed. I look forward to being able to dive deeper into all of that in future articles.
Plan Pricing
There are two subscription plans for acquiring these applications. One is the same Creative Cloud Photography plan that we’ve had these last few years, and there’s one new plan:
Creative Cloud Photography plan: For $9.99/month, you get Lightroom Classic CC, Lightroom CC, Photoshop CC, integration with the mobile apps, everything else the plan had before, plus 20 GB of cloud storage for photos imported through Lr CC and mobile devices. Additional storage plans will be available.
Lightroom CC plan: Also for $9.99/month, this plan includes Lightroom CC only, and 1TB of storage for source photos. Additional storage plans will be available.
There’s a lot to absorb from this announcement, so my advice is to move forward slowly, and with care (I say this about any new software release or operating system update). I’m excited about the opportunities for completely new workflows, as well as refinement of existing workflows. I look forward to digging further into how to get the most out of these tools and reporting back what I’ve learned, as well as providing support on the Help Desk. Keep those questions coming!
NOTE: Photoshop CC is getting a big upgrade today, too, and KelbyOne has a full-length course going live today on all the new features to get you up to speed fast, plus a Members-only Live Q&A Webcast with Scott Kelby about all the changes to Lightroom. If you’re a KelbyOne member, don’t miss it (11:00 am EDT)

Discouraging. I have slowly been moving old images into LR6 (desktop version) as well as integrating all new photos. I live in a very rural area; we have a generator, but that does not mean the internet will always work. I use the desktop version so that I always have access to my photos and Lightroom. The same problem is happening to me with financial software. The software wants to be cloud-based and no longer supports desktop version.
What about inter-APP compatibility ? Will edits made in Lr CC be recognized and re-adjustable in the classic environment ? Example: Shoot on a boat for two weeks, make edits in Classic on the laptop. Dock, upload to CC. Go home and load from Cloud into Classic on home computer. Possible ?
I am also a casual photographer who does not use LR every day – sometimes not for many weeks. I am getting tired of paying the subscription price for my limited usage. Also, I don’t see that the updates have been worth the $100’s of dollars I’ve spent for the subscription plan, because I am not a professional photographer. I do like the way I can develop the photos, and the Library system is good for keeping track of things. But it’s only worth so much.
The problem is, if I leave LR, is there any other software that is similar in organization and developing? If not, I may be stuck.
If I stop paying the subscription, do I lose all of my edits?
Are there any other software companies out there worth looking into? Thanks – from someone who just likes to play around with photography, not doing it for a living.
I’d suggest checking out Photoshop Elements 2018. Very powerful, yet simplified version of Photoshop and Camera Raw. It even has its own organizer (similar to Bridge).
Go on Ebay and buy an older version with disc, etc. I’ve been working off an older version since they went CC. I refuse to pay a subscription price…
My LR 5.7 just keeps on ticking. Two years of $9.99 is how much money saved… I’ll let you do the math. I’m happy right where I am.
A ton of Pro begin already to leave Adobe and it’s well deserved…without talking about the improuvement of the new LR Classic who are non-existent & more ; take a look on the Adobe Forum and see how many users claims about the this Slower LR, where in the before last version it was ok….
I am French Pro photographer, and today i can say, i can do the same work, maybe faster, with app like Afinity Photo, Luminar, aurora and some plugin….After 20 years as Adobe User and Fan, i just say today Bye , Bye ADOBE…
Dear Mrs. Adobe, I don’t want your cloud.
MORE THAN 10TB OF IMAGES ON MY HARD DRIVES. MORE THAN 15 YEARS USING ADOBE SOFTWARE.
NO ADOBE. YOU WILL NOT SEE MY IMAGES ON YOUR CLOUD. THEY BELONG TO ME.
YOU ARE SAYING: “TAKE IT OR LEAVE IT”.
WELL THAT IS FINE: I AM LEAVING YOU TODAY.
Am I understanding this right?
My images won’t be on my computer? They will be on someone’s server somewhere?
I have way too many images for that AND I don’t want my images anywhere but with me.
I can’t keep my work local? That’s horrible.
DrMike,
If you use Lightroom Classic, then all your photos are stored locally, just as they have always been with previous versions of Lightroom.
The new Lightroom CC stores all photos in the cloud, and it does have the option to store those same photos locally too.
For most Lightroom users, just sticking to Lightroom Classic makes the most sense, as it is essentially Lightroom 7.
Thanks Rob. That calms me a bit. The article points out that it’s confusing and Adobe’s website does explain much better.
I think I will still likely just keep using my stand alone light room and PS 6 as long as they run on my machine. I would pay Adobe 3 times what they want for their cloud service just to be OFF the cloud service.
Why don’t they hear guys like me?
Exactly right Mike!!
What happens with books, maps, slideshows and prints in the new Lr CC?
Not included in new Lr CC. Only found in Lr Classic.
so what’s the path to print from the CC app ?
File > Edit in Photoshop.
Today I’m seeing TWO versions of the three Adobe apps I use in the CC downloader that sits in the menubar on my mac. There are CC and 2017 versions of LR, PS and PP.
I’m confused.
It is confusing, but you are just seeing the current version you have installed, and the new version of each app.
As some others posting comments have voiced, i also will be migrating to competing editing programs as my LR6 and Production Premium 6 age into oblivion. I have no intention of having a computer i depend on to do work connected to the internet, and neither do i intend to have my bank account connected to a software company on a monthly or yearly basis. I’m thankful there are some companies that are respectful of consumers’ desire to not be perpetually obligated (financially, and via internet) to an outside source just in order to do their work. I was perfectly happy to buy Adobe’s products and use them, but since that arrangement is no longer good enough for them, we will be parting ways.
I refuse to have my bank account connected to a company that’s been hacked.
Thanks for this Rob,
I fear from the comments this is not going to be well received.
One question from me, If I upload all my 200gb+ photos to the cloud what happens should I cancel my subscription?
Cheers
From the FAQ: https://helpx.adobe.com/lightroom-cc/faq.html
How do I retrieve my photos after my membership ends?
You can use the Image Downloader Utility to download your photos from Creative Cloud after your membership expires. This utility will be available soon.
Can anyone confirm whether this version is working with Google Nik Collection? I did not upgrade to last version after reading that users are having trouble to use Nik collection with Lightroom. What’s the current situation?
I used 4 of the modules after upgrading to Lightroom Classic yesterday. I’m on Windows 10, latest release 1703…
I can successfully round-trip an image through Silver Efex.
“Goodbye Perpetual License”
And that means for me: Goodbye Adobe.
I don’t mind the CC pricing (although since I don’t use PS or their cloud storage, the price only for LR is three times higher than buying and updating a “buy” version), but I do mind that Adobe takes my pictures hostage when I decide to leave the cloud. No further processing?
This move may be good for Adobe and its stock holders, but it’s not acceptable to me.
Best regards and goodbye, Adobe
Matt
Same with me. I feel as if I’m being held hostage with my Images. I will be leaving adobe.
While you may feel that way it is not the case. Just download them before you leave.
What are you talking about? If you quit paying the subscription and you are using LR Classic you still have all your files on your disk. If you want to keep the changes you made in Lightroom export out TIF or JPG versions or export out the xmp files if whatever you are going to support those.
If you are using LR CC download your photos before you leave. Nothing is being held hostage.
Don’t kill the bogeyman all the haters have created. So close to Kalloween, no less! Let them imagine Adobe is hungry for their images and will eat them all the moment they cancel their subscription.
Reading the comments on various FB forums and elsewhere, I think the naming convention is very confusing and, in some way, very worrying.
Specifically, I am talking about the use of “Classic” – it smacks of end of life, TBH. If they are trying to differentiate the two products, why not make it Lightroom Pro or Lightroom Desktop for the old LR CC, and something zingy for the new version.
I’ve had a look at the new CC and I will use it on my day job PC with shared collections from my main machines. There is no need to use the web for my work in this way. I’m double backed up (2 x Drobo plus online via OpenDrive) so I won’t be using Adobe’s service.
I think it would be very useful, very comforting, to get a statement from Adobe about their long term plans for Lightroom. If “Classic” is just an expectation setting exercise as they move everything to be web focused, I won’t be happy.
Now, it may not be about end of life but the naming is clumsy at best. Classic does denote “something old; venerated but old”. To give the Desktop product this name whilst at the same time introducing something with the old products name indicates a REPLACEMENT not an ADDITIONAL product.
I think the Adobe marketing team need to get their skates on here.
And as someone posted on a different forum, think about Classic Coke and how well that turned out!
Classic Coke is what everyone wanted and what we have to this very day. If they had called it “New Lightroom” it might be a better analogy.
I agree, “Classic” sounds end-of-life. I have no need for cloud-based photo editing; I don’t use multiple devices and have 4+TB of images.
And syncing is always, always a bug-prone feature for any type of data, and I’d like to keep my images far away from it.
Anyone knows what the new Setting is for under performance at the bottom to create previews in parallel? Tried it out but don’t find any difference in creating as an example smart previews and 1:1 previews at the same time during import or later on.
My understanding is that it speeds up the preview rendering process, but the real benefit may only be noticeable on quad-core (or greater) machines. I need to find out for sure.
Thanxs, yes that’s what I thought. Tried it out by building 1:1 previews and smart-previews during import, but on a lot of pix to import in only makes a difference of let’s say 5 pix faster. In any case it starts rendering during copying like back at LR5. Prefered the rendering after the import like in LR6/CC. That was my understanding for this setting, but I think it’s not working like it should. For the rest i?m really happy with the new version and the speed on rendering 1:1 previews
I’m also a bit disappointing about dropping the perpetual licence. I’m currently still on LR 5 and was looking forward to the newer version. As a few other posters here I’m not a professional photographer and don’t make money with my images.
The path Adobe is walking is very clear: in a few years from now everything will be fully cloud and even the Classic version will cease to exist. I can’t help the feeling of being taken hostage by Adobe when signing up for their cloud subscription.
Add to that the crazy subscription price in Europe which is 12.09 Euro per month while in the US people only pay 9.99 USD. I wonder if Adobe’s calculator is broken? Why is a subscription so much more expensive in Europe than in the US?
With the Can money at 25% it means about 12.50 a month which I won’t give. Going with OnOne.
I bet it has to do with taxes in European countries.
Very disappointed. A single new feature (color/luminosity masking) and not much else, except for a rather transparent attempt at squeezing more money out of users’ pockets by pushing a grossly overpriced ‘cloud’ version.
Was hoping for a better Lightroom to justify coming back after switching to Capture One Pro. Next step will be finding a way to replace Photoshop – that will be a tougher job. Perhaps ACDSee…
Substantially faster for me, But what are the feature advances you want to see which would “sell” this new generation/release of the Classic version for you ? Not knocking your comment, but specifically what features would remove “not much else” ?
Layers, for example.
I guess you don’t include speed as a feature. It’s the #1 feature request Adobe had for Lightroom
It‘s not e feature.
It’s a bug fix!
No perpetual license is a killer for me. I will not subscribe with any vendor especially the one who continues to offer the hack ridden “flash player”. I would have gladly paid a higher price for a new perpetual license. But alas, this is not their new business model.
Adobe, I will milk my perpetual license for V6 and in the interim find a new replacement.
Bye..
Subscriptions are here to stay. Especially since a lot of the newer features use cloud services. I mean in the Adobe MAX keynote yesterday how many times did they mention their cloud AI processing (I forgot the name). I’d say 80% of the business software we use at work is either a straight up subscription or you buy it and have to pay a yearly maintenance fee on it.
What will be the workflow between LR Classic and the new LRCC–if I put everything in the cloud, would I have to download it and import to a LR Classic catalog to work with it in LR Classic, then manually upload to the cloud to get the edited full size version back into LR CC?
Sounds like a great topic for an article. 🙂
For me it’s cristal clear, I will not use LR6 (perpetual licence) anymore nor LR Classic, I switch to the new On1RAW 2018 software (with perpetual licence) wich is a lot better for the Fuji raw files, I don’t like at all to pay for the cloud, so bye bye Adobe!
Has Adobe outright forgotten that some people have the full Creative Cloud membership? I have the full membership (e.g., all of the products) and I don’t see any mention on the Lr CC page for what is or isn’t included, it’s just the Lr CC plan or the Photographers plan, same as what’s mentioned on this site. If I want to play with the product I’d kind of like to know what’s included seeing as how I’m paying quite a bit to Adobe.
I did see a post on the FAQs that it was coming to teams and the full CC subscription. Stay tuned.
I believe you get 1TB of storage for LR CC with the full plan. Or at least that’s what mine says.
I just upgraded but everything looks the same. Catalogs are still catalogs collections are still collections and no mask eye dropper tool to name a few. And yes it did upgrade with the new splash screen at the start. Windows machine. Any idea what gives?
Lee
Add a gradient, then look at the bottom of the sliders box – there is a range option – choose one of Color or Luminance, then the dropper appears 😉 It’s one of those don’t make things obvious UI things we software people are so proud of. LOL
😀
This entire LR product has so many really useful, but kinda hidden things you have to stumble across that it’s maddening.
I am a bit disappointed. There is still no option to install user presets in Lr CC on a mobile device. I know you can add a collection in Lr Classic or CC (desktop) with your own presets applied to synced pictures. But if you do so with the new Lr CC for iOS the camera profiles get lost. At least the synced pictures on my Mac and my iPad with exactly the same settings look totally different. It is not an issue of monitor calibration. I guess the camera profile is not synced…?
Is there going to be just one version of Lr for iOS & Android – the new Lr CC – or will there be two, the new Lr CC & the current Lr Mobile? If one – how will Lr CC for iOS work with Lr Classic on my laptop? If two different apps, how will they differ?
Yes, Lr CC is the version for all operating systems. The current Lightroom Mobile is Lr CC. Lightroom Classic works the same with with Lightroom Mobile (Lr CC) as it has previously.
If I use LR Classic, will I still be able to sync collections over to Lightroom Mobile? It’s a great way to have selected pictures on my iPad and to view photos on a TV with Apple TV
Yes.
Thanks. I was hoping that would be the case.
Rob, I have been looking forward to upgrading my PC to something really fast. It was my understanding that the old Lightroom 6 and Photoshop 2017 did not take advantage of more than 4 cores. Can you shed light on whether that capability is being taken advantage of with the new versions? Specifically, I want to know if the software is taking advantage of the new 6 core/12 thread processors from Intel, and the 8 core/16 thread processors from AMD. Thanks!
Yes, and it should be most noticeable with regards to all types of preview generation (standard, 1:1, and smart).
Hi Jeff, my Ryzen 1800X is being utilized on all cores by Lightroom Classic CC on image export. I haven’t assessed the other processes.
Wow, PV 4 is the same as the old 2012 version. Nothing has changed! Maybe they need to work on it for the Mask Range but IQ wise nothing has changed. That’s just a big disappointment!
The big question here is the bottom end user are left behind.
I am low budget and photography enthusiastic, but love edit my photo wit LR and and with Adobe scraping the perpetual license there is no chance for me to get the new LR. It is a pity. I was looking forward to get hold on this new version, but with the option plans available I cannot embrace such “expensive” journey of 119.88 USD per year.
The pros of getting “regular” updates are in clear disadvantage when compared with the Cons of paying that amount per year.
I am very sorry to hear about it.
I am not a photography professional and get no revenues from my photos, therefore a 9.99$ monthly plan is too expensive for me.
I would suggest checking out the new version of Photoshop Elements 2018, which is a perpetual license product and very powerful.
I do like the developing module but I love the catalog and this is one of the things made me buy the lightroom license. what will happen to me now? I will wait until Affinity Photo complete its Digital Media Manager and swith to it. I already did it with Photoshop.
Yes, the casual user has been excluded from Adobe’s plans. Though you should have seen that writing on the wall for some time.
Rui, Did you ever upgrade from year to year before Creative Cloud? If I remember right it was $199 every 2 years for Photoshop and $99 for Lightroom every 2 years. I have been more than happy to pay just 9.99 a month for these.
I’m with Rui. I’m not a pro, so don’t make money on the photos. I use LR occasionally, and in the past I’d buy a new version every 3-4 years, normally paying $60-$110 depending on the promo I use. I also buy a PS Elements/Premier combo because once in a blue moon I need to edit pictures in Elements and I occasionally edit home videos (I normally spend about $50 on the combo). So it costs me about $160 every 3-4 years. My wife has a CC subsription and it makes sense to her because she uses PS/LR almost daily. In my case, this is a bad news. 🙁
With the subscription you can use the programs on two computers. If she isn’t using the second one you can.
Good point. Thanks Stephen. I didn’t think about it.
That’s exciting news. I’m disappointed that they don’t have a third plan that lies somewhere in-between the two price points. I was totally against the subscription model until the Photographers CC plan came out. It really fits my needs. I use Lightroom extensively for importing and managing my photographs. I also do 90% of my editing in Lightroom. I use Photoshop to do some heavy edits and graphics design.
If I want to use the new plan just for Lightroom (to work across multiple devices) it would add a additional 10.00 when I already have Lightroom cc. It would have been nice if Adobe would have recognized that some users would want both LR Classic and PS and had a price in between, say 14.99 per month.
But with the Photography plan, you get Lightroom Classic, Lightroom CC, and Photoshop for $9.99. So you’re getting more than what you suggest for less than you suggest as well.
I don’t think so…I you want both it’s 19.99 per month. I looked on Adobes site.
Rob, can you confirm this? I’m I reading this wrong?
The difference is in the storage amount. Current CC Photo Plan is $9.99 and includes both versions of Lr and 20 GB of storage for source photos. To increase storage to 1TB, the price goes to $19.99.
Rob, sorry for the confusion. With your reply, when I upgrade I keep my current subscription plan, (9.99) with LR and PS (photographers bundle) will I get the new LR App and be able to store my source photos in the cloud and access them across multiple devices with the limitations of 20 gig?
Yes.
Did they get multiple concurrent users on the same catalog support included ?
Any difference with LR Classic’s interaction with PS CC (and can it still work with older PS versions) ? Any hard requirement changes in memory or GPUs ? How does the preview generation (if you want it) work on higher core count machines, and any improvement on pano/hdr processing times ? Any new features on the LR Classic print module, like being able to resize individual image scales in a layout ?
If you jump on the 7.0 Classic, what’s the rollback like if you encounter problems ?
If you have the subscription, can you start using the LR CC (cloud oriented) at the same time at a later date ?
Thanks for the info –
Hey Bob, Lot’s of good questions. This FAQ from Adobe is a good start: https://helpx.adobe.com/lightroom-cc/faq.html
Wow. That’s a lot to digest. So, if I want to continue with just LrClassic and presently have the $9.99 Photography plan, the only thing that will change is the name of the plan (to Creative Cloud Photography plan)?
That’s the name of the plan now- Creative Cloud Photography plan- so nothing changes there.
Right. When you see Lr Classic appear in the CC application manager you can download and install it. When you launch, it should see your existing Lr catalog and upgrade a copy. You’ll move forward with the upgraded copy.
Rob, I mainly plan on continuing to use Lr Classic and wait to think about using the LrCC maybe somewhere down the road. When I use Lr Classic and Lr Mobile is this effected by the 20GB storage or is part of the LrCC storage model. In otherwords, will there be an additional charge for storage over 20GB. There is no release of info on the LrCC charges for storage pricing over 20GB.