
File renaming may be one of the more mundane tasks in a digital photography workflow, but it’s a critical component to managing your digital assets. Lightroom’s file renaming function is powerful and customizable. Let’s look at all the different ways you can rename using Lightroom.
If you’re used to using Bridge or some other software to rename your photos you can still do that before you import them into Lightroom, but once those photos are part of a catalog you’ll want to use Lightroom from that point forward. Once the photos have been through the import process, the filename becomes an important piece of data that links the work you do in Lightroom to your photos. If you rename your imported photos outside of Lightroom, you break that link and are then faced with the tedious task of reconnecting all of those photos back to the catalog again. Avoid breaking that link by using Lightroom to do the renaming. You can use:
- The File Renaming panel of the Import screen when you’re using Lightroom to Copy, Copy as DNG, or Move your photos.
- The File Name field of the Metadata panel in the Library module to rename individual files.
- The Library>Rename Photos menu in the Library module when you want to rename a batch of photos.
- The File Naming panel of the Export dialog when you want to rename the copies you’re exporting.
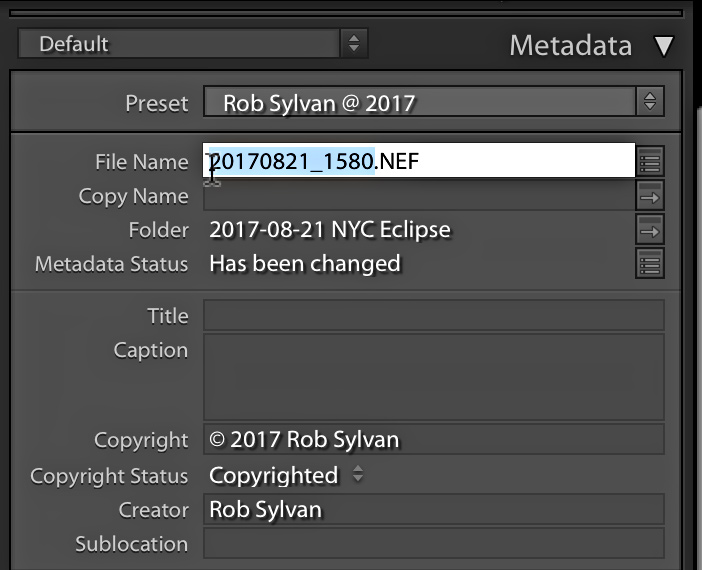
If you just need to change the name of a single photo inside of Lightroom, the process is very straightforward. Simply select the photo you want to rename, expand the Metadata panel, set the panel to Default view, click into the File Name field, and edit the filename as needed. That’s fine for single image renaming, but the real power is in the batch renaming process. Typically, a filename serves the purpose of providing some information about the photo, possibly some information about the creator, and a unique identifier like a sequence number. There are many possible combinations of those pieces of data, and Lightroom allows you to create custom filename templates in its Filename Template Editor.
The Filename Template Editor and the custom filename templates you create are accessible from everywhere you can batch rename photos. This provides a great deal of flexibility to suit any workflow. Let’s walk through a simple process of selecting a folder full of imported photos, creating a custom filename template that contains custom text and a sequence number, and then applying that filename template to the selected photos.
STEP ONE: From Grid view, select all the photos you want to rename.
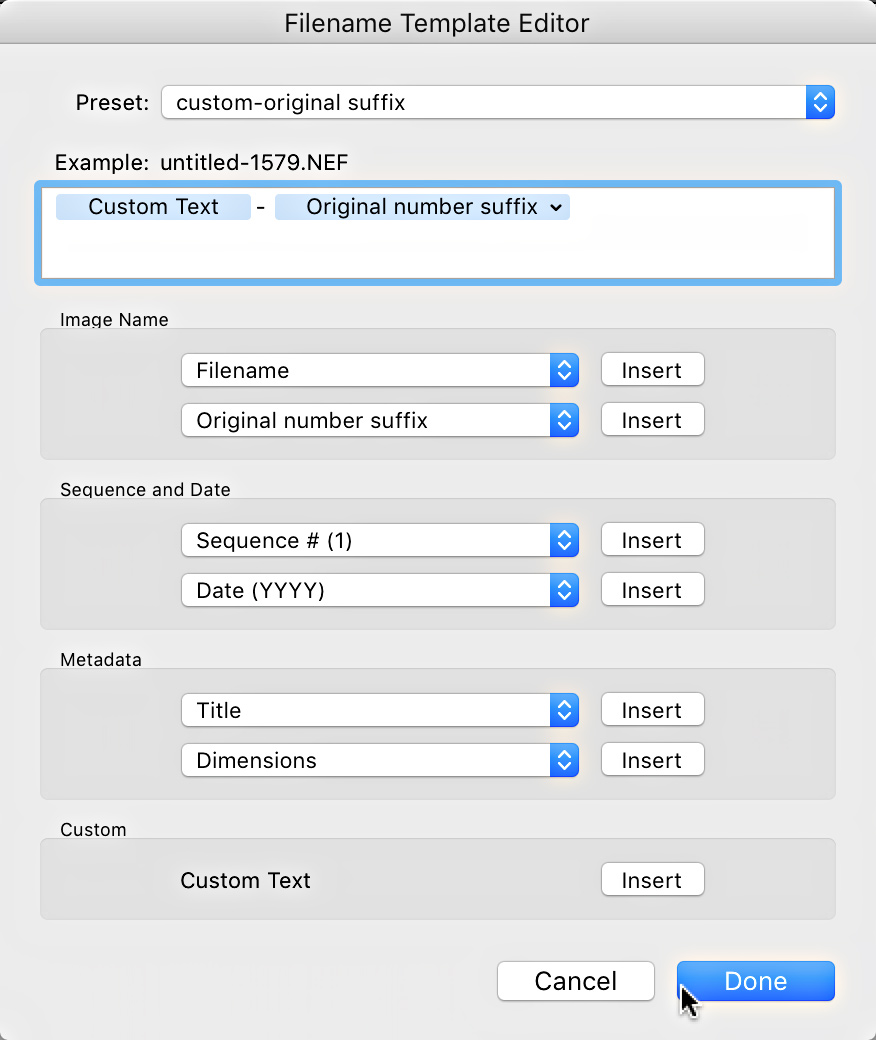
STEP TWO: Go to Library>Rename Photos to launch the Rename dialog, then click the File Renaming drop-down menu and choose Edit to open the Filename Template Editor. Note that there are several pre-installed filename templates in the drop-down menu, and the active template will appear in the editor to start. A filename template is comprised of various tokens, where each token represents some piece of data, such as elements of the capture date/time, the original filename, various bits of EXIF and IPTC metadata, and even custom text placeholders.
STEP THREE: In the Filename Template Editor, click into the edit field and delete any existing tokens you see there, then click the Insert button next to Custom Text at the bottom of the editor to add that token. You can also type directly into the edit field to hard code any bit of text you want to include in your template; for example, you can type an underscore to add an underscore after the Custom Text token. This will separate the custom text from the sequence number we’ll add next.
STEP FOUR: Click the Sequence # drop-down menu, choose a sequence number token based on the total number of digits you want to include in your template, and click its Insert button to add another token.
STEP FIVE: Save this as a new template by clicking the Preset drop-down menu and choosing Save Current Settings as New Preset, then give it a name that helps you identify what the template does. Click Done to exit the editor and return to the Rename dialog with your new template selected.
STEP SIX: Enter the Custom Text you want to use as well as the Start Number for the sequence. You’ll see what the final names will look like next to Example at the bottom left of the Rename dialog. Click OK to apply the template to the selected photos.

Thanks. The Meta Panle option was the one I was needing, wasnt aware I could change the filename on the spot right there
when i export as a catalogue and import elsewhere the adjusted filename is not preserved. making this function rather useless if you have more than 1 catalogue.
Thanks for the article. Is there a way to delete a custom made preset?
Yes, first select in the Preset drop-down menu as if to edit it, then click that same preset drop-down menu a second time and you’ll see an option to delete the selected preset.
Hi Rob, thanks a lot for this very useful article !
I tried with a fodler with photos and vidéos and it worked only with photos. Do you by any chance have an idea why ? My videos get renamed with the import data.
Thanks a lot !
Jay
Thanks so much Rob!! Am renaming individual photos – assigning product numbers – and didn’t think of using the Metadata panel until I read your post. A million thanks for the reminder/time-saver. 🙂
You’re welcome!
This is great option, but still, after all these years, not as powerful the Rename Batch option in Bridge. To do something similar as Bridge, I found a great solution written by John Beardsworth in the article “Complex file renaming in Lightroom made simple(r)”.
Link: http://lightroomsolutions.com/complex-file-renaming-in-lightroom-thanks-to-search-and-replace/
True. John’s a great source of info. Thanks!
Nice, concise article!
Currently,I have a large photog-project to import, for which I have outlined a new Lightroom template to use (to add sequence #’ng for each image) however, some folks suggest that Bridge will be much more efficient in this case.
Your article defers quickly to Lightroom, as the “go-to” because of possible breaking the links for the image files. If I were to use Bridge for the purpose of re-naming to prep for this large ingest, what is then required to make sure the renamed files are properly linked. Considering the large number of image files, re-linking all, would be tedious.
Any suggestions would be most appreciated!
Hi
Is it true that F2 is the keyboard shortcut for this.
Thanks
Yes. Though depending on your keyboard, you may also need to press the Fn key in conjunction with F2.
When I did the batch renaming with LR6 on my Mac the sequence numbers applied were only even digits….002, 004, 006!
That’s not right. I’d reselect all of those photos and re-run the renaming function.
Thank you so much for this article. It was incredibly timely for me, as I am in the midst of completely overhauling my photo workflow because I updated to LR6 and changed operating systems from Windows to Apple. Literally last night, I was wondering how on earth I was going to do my photo renaming in an efficient way (I had a tried-and-true method with Windows, which may not have been the best, but it worked well enough–but wasn’t working on my new OS). Then lo and behold, I open up my Feedly this morning to see this article! So helpful!!
F2 is the keyboard shortcut for this.