
How to set up Lightroom to Automatically Apply a Lens Correction To Your Imported Images
Hi, gang. This is a follow-up to Friday’s post about my new Canon lens that most definitely needs to have Lightroom’s Lens Corrections applied each and every single time, or it makes the lens just about unusable (well, without Lightroom or Photoshop or even Canon’s own DPP software fixing the Lens issues).
Anyway, here’s how to set up Lightroom so it will automatically, by default, apply the proper lens profile and chromatic aberration fixes when you use a particular camera body.
STEP ONE: Open a RAW photo using the camera and lens you want to have Lightroom auto-correct (in my case, it’s a Canon EOS R mirrorless with Canon’s new RF-mount 24-240mm f/4-f/6.3 lens). Make sure all your sliders are set to their default positions (in other words, don’t make any changes or edits to the RAW file you opened).
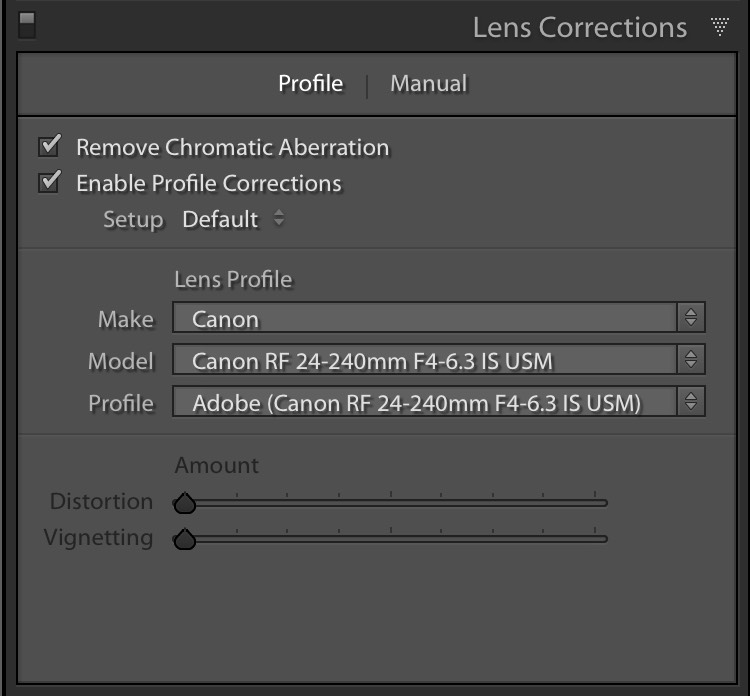
STEP TWO: Go to the Lens Correction panel and turn on the checkbox to ‘Enable Profile Corrections’ and turn on the ‘Remove Chromatic Aberration’ checkbox, as well (as shown here). You can see it applied the profile correction for my 24-240mm lens.
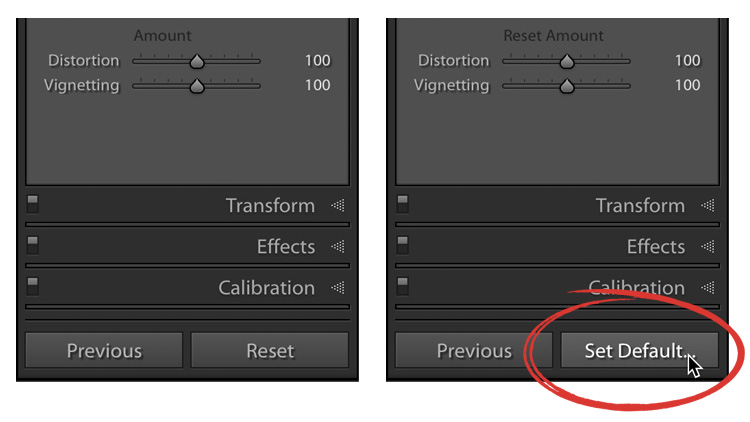
STEP THREE: Go to the bottom of the Right Side panels. Hold the Option key on Mac (the Alt key on a Windows PC) and you’ll notice that the Reset button changes into the ‘Set Default’ button, shown circled above in red. Click that button.
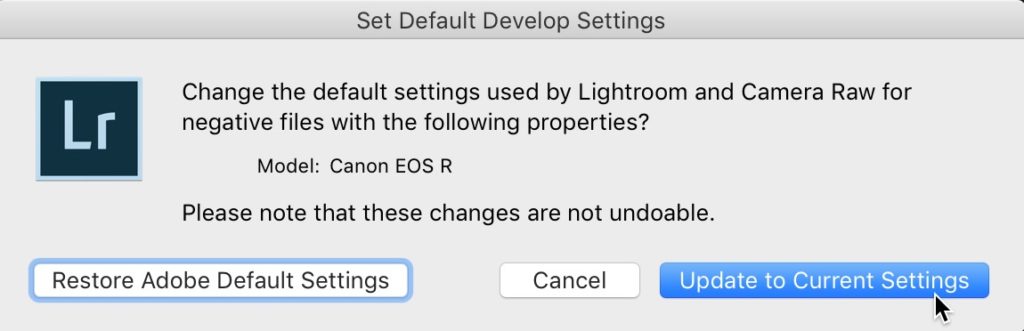
STEP FOUR: That will bring up the ‘Set Default Develop Settings’ dialog you see above. Click on ‘Update to Current Settings’ and it sets the new defaults for your camera to automatically apply those two lens corrections (in my case, you can see in the dialog it’s going to change the defaults for how Lightroom handles images from my Canon EOS R body). That’s all there is to it. If you ever decide you just want to return to the standard Lightroom defaults, go back to this same window and click the ‘Restore Adobe Default Settings‘ button in the left corner of the dialog.
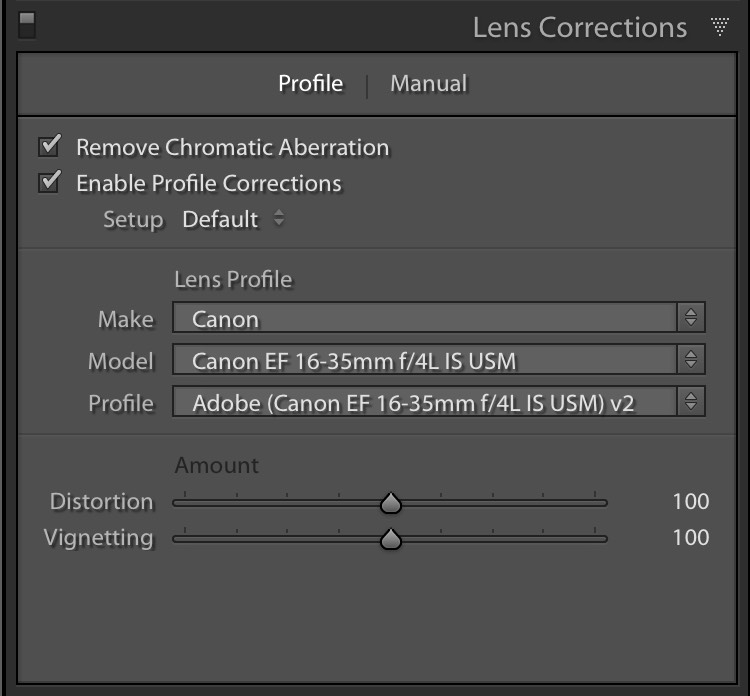
NOTE: What happens if you open an image taken with that body, but you used a different lens? Don’t worry — it won’t apply the lens correction for your 24-240mm; it would apply the appropriate lens correction for whichever lens you used (providing, of course, that Lightroom has a lens profile for that lens, which i
Also, if you want more info on assigning a set of custom Lightroom default settings to your camera, check out Rob Sylvan’s excellent post here on the topic right here.
Hope you found that helpful.
Reminder: this Saturday is my Worldwide Photo Walk
It’s not too late to join a photo walk in your local city — go to WorldWidePhotoWalk.com and sign up for the walk near you, and we’ll see you this Saturday for the world’s largest social photography event. It’s fun, it’s free, and you’ll have a ball. See you on Saturday! (Well, I will if you’re in the local walk I’m leading in Chicago, anyway).
-Scott
Doesn’t work as described in the article – but does work (I think), by choosing SAVE NEW LENS PROFILE DEFAULTS as described by Jim (on March 7th) above.
But…
Why do I still need to tell Lightroom to actually make the adjustment for each and every photo? In other words, how do we get LR to auto-apply the lens correction to each and every imported raw file shot with a given lens? The way it is now I still have to go select ENABLE PROFILE CORRECTION (and remove chromatic abberation) as that box is UN-checked when I open a new image for editing.
the ALT key on MacBook pro in lightroom classic 9.3 does not change the button from Reset to Set Default as pictured. my files are RAW files converted to DNG on import. Any help how to do this now?
Hi Sarah, Adobe changed the process for setting a custom default. See here for the new method: https://lightroomkillertips.com/customizing-camera-raw-defaults-in-lightroom-classic/
I just tried this on Lightroom Classic which updated yesterday. No luck it does nothing.
What file type of photo are you trying it on? Most lens profiles are only made for raw photos. Additionally, some (most?) mirrorless cameras apply a built-in profile to raw photos, which would show as no effect in LrC.
ah, that’s where it is. Never would have known aboout the alt-key change without this! THanks
Thanks, Jim for helping me solve this. I know it worked for me before but somehow was not working due to one of the LR updates. Scott – probably worthwhile updating this useful post!!
Found it!
Under the two check boxes at the top of the Lens Corrections panel is a “Setup” dropdown. One entry is “Save new lens profile defaults”, which, if you select it, performs as advertised. There’s also a “Reset lens profile defaults”.
So it appears the dialog one used to access via Ctrl+RESET is now just the dropdown.
This no longer works with LR Classic 9.2. On Windows I tried Shift, Alt, Ctrl and all possible combinations of 1, 2 or 3 keys, no luck.
Anyone know what the new shortcut key is on MacOS?
On LR 9.2, the Reset button does not change when Option is pressed.
Thank you!
Mmmm, nothing happens when I select Nikon Lens Profile and ticked the Remove Chromatic etc.then press Alt and Reset. Just resets. Using LR Classic 9.2
And to think I’ve been using presets etc to accomplish this all these years.
Who knew? Thank you for saving me oodles of time.
you’re very welcome, Tim 🙂
Does LR have the iPhone11 Lens Correction yet?