
Customize Your Default Develop Settings
[Update, as of February 2020, these instructions only apply to Lightroom Classic version 9.1 and older. Starting with Lightroom Classic 9.2 and above, you want to read the updated instructions for customizing raw defaults.]
Lightroom has a set of default processing settings that are applied to all raw photos after import. These default settings control everything applied to your raw photos from the moment the start. Did you know that you can customize those settings to start your raw photos down the processing pipeline using your ow preferred choices? I’m not talking about a preset selected on the Import screen, but rather the built-in default settings. Save your import presets for something creative, and customize the baseline settings. Just think of all the clicks you can save by starting your photos where you want them.
Let’s go through the steps to customize the default settings to include two of the most common adjustments people ask me about, lens corrections and camera profiles, but feel free to add any other settings you want to customize your process (or not include these if you’d rather not).
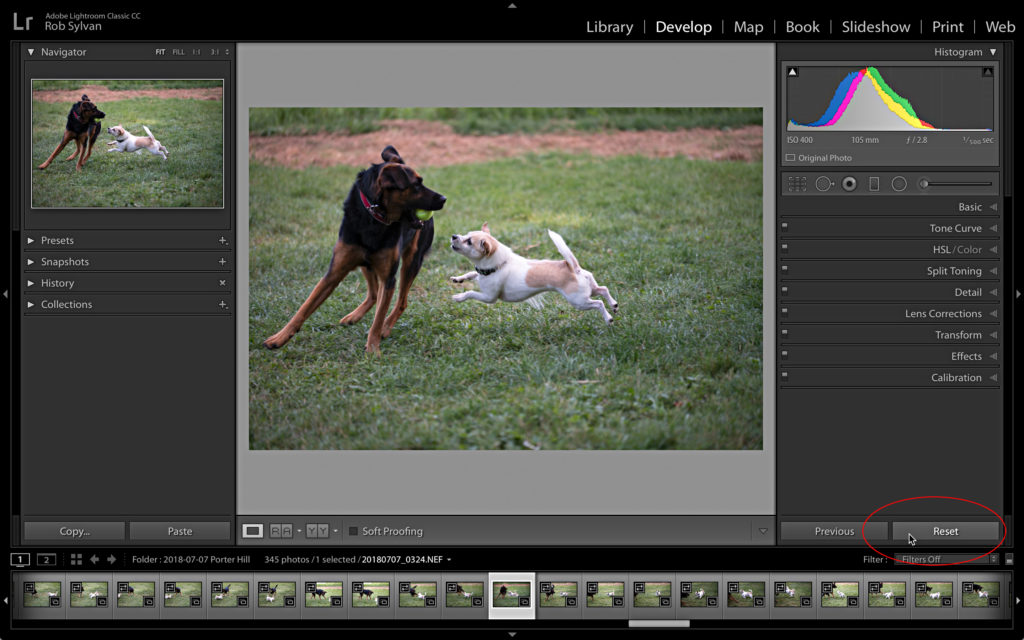
Step One: Select a raw photo that has not been processed at all beyond the default settings and press D to jump to Develop. Click the Reset button for good measure to ensure it has no other settings applied because every adjustment (even set to 0) is included in the default settings.
Step Two: Expand the Lens Corrections panel, click the Profile tab if not active already, and check Remove Chromatic Aberration and Enable Profile Corrections.
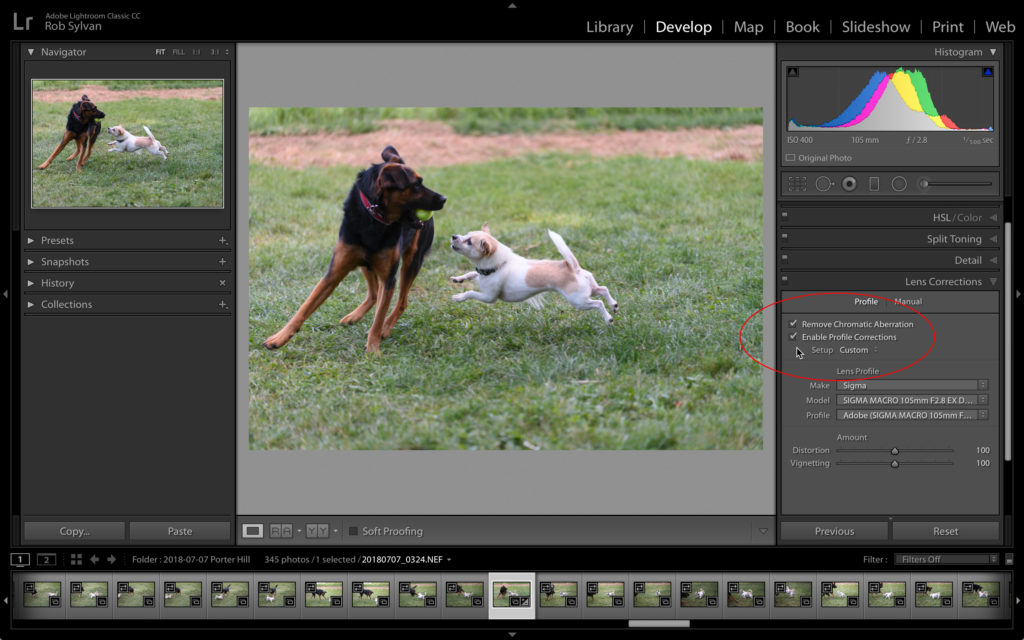
Note: Including profile corrections can be resource intensive, so exclude this from your defaults if performance is degraded.
Step Three: (Optional) Expand the Profile Browser in the Basic panel, choose the camera profile you prefer to be the starting point. If you like the new Adobe Color, then no need to change.
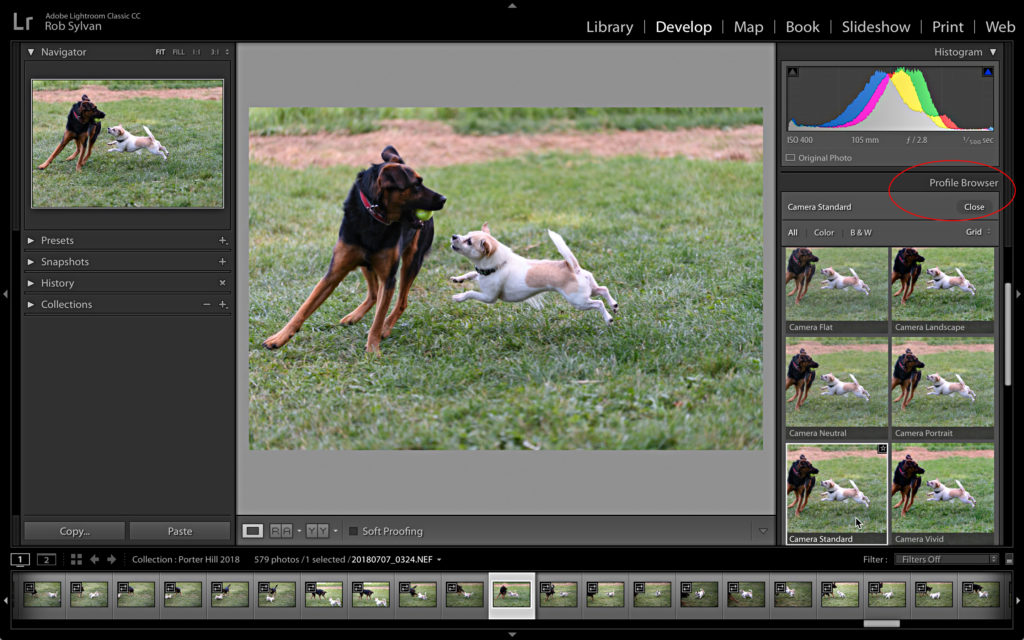
Note: The list of camera profiles varies with the camera model used to create the selected photo.
Step Four: Go to Develop > Set Default Settings to open the Set Default Develop Settings dialog box. Default settings are specific to each camera model, in this case a Nikon D850, so if you are using multiple camera models you will need to update the defaults for each model separately.
Tip: You can also hold the Option (WIN: Alt) key and watch the Reset button change to Set Default and click that button to open the Set Default Develop Settings dialog box.
Step Five: Click Update to Current Settings to customize the default settings to include the changes you made.

Note: While it states the changes are not undoable, this just means that you can’t revert back to the Adobe defaults via the Edit > Undo menu. You can always open this dialog box and click Restore Adobe Default Settings if you want to go back to the original settings.
This will only affect raw photos from that specific camera model as they are imported in the future, and if you hit the Reset button on a previously imported raw photo from that specific camera model it will reset to the new default.
You must repeat that process to set defaults for any other camera models you are using. This does not change the settings on any previously imported photos. Give it a try, and even if you only customize one setting you change all the time, those clicks add up!
Succeeded in setting correction profiles this way, but it stick to the lense profile used when I set it, regardless the lense the picture was taken with. When I overrule this by using custom, the right lense pops up as soon as I select he brand, so apparently nothing wrong with the exif data. Any suggestions?
Thanks
I have used the above Killer Lightroom Tip to set my develop settings. But I find that I’ve made a mistake in some of the settings and want to revert to the Adobe Default settings. However when I go into Develop/set default settings, and click restore, nothing happens and the original settings I added are still there.
Can you help and advise how I return to Adobe default please.
When you click that button you set the defaults back to the Adobe default, but you won’t see any change to the active photo. You will only see the effect on newly imported photos (will be at Adobe default instead of your own) OR if you click the Reset button.
This is the best tip I’ve read in a long time. TYVM.
wonderful!!! I added Constrain to Image and did all 3 camera models! Does it change the lens each time?
It should recognize the lens from the metadata and apply the correct profile automatically.
Great tip! Going to play with those! Thanks!
Thanks for inspiring me to get off my butt and do this!!!
Thank you, thank you! I’ve been meaning to do this for a while, but I could find the option I needed.
Very helpful and timely