
Before we get into this, just a heads up: this isn’t a hidden feature — it’s a workaround for people who have Lightroom and Photoshop, but at least it works.
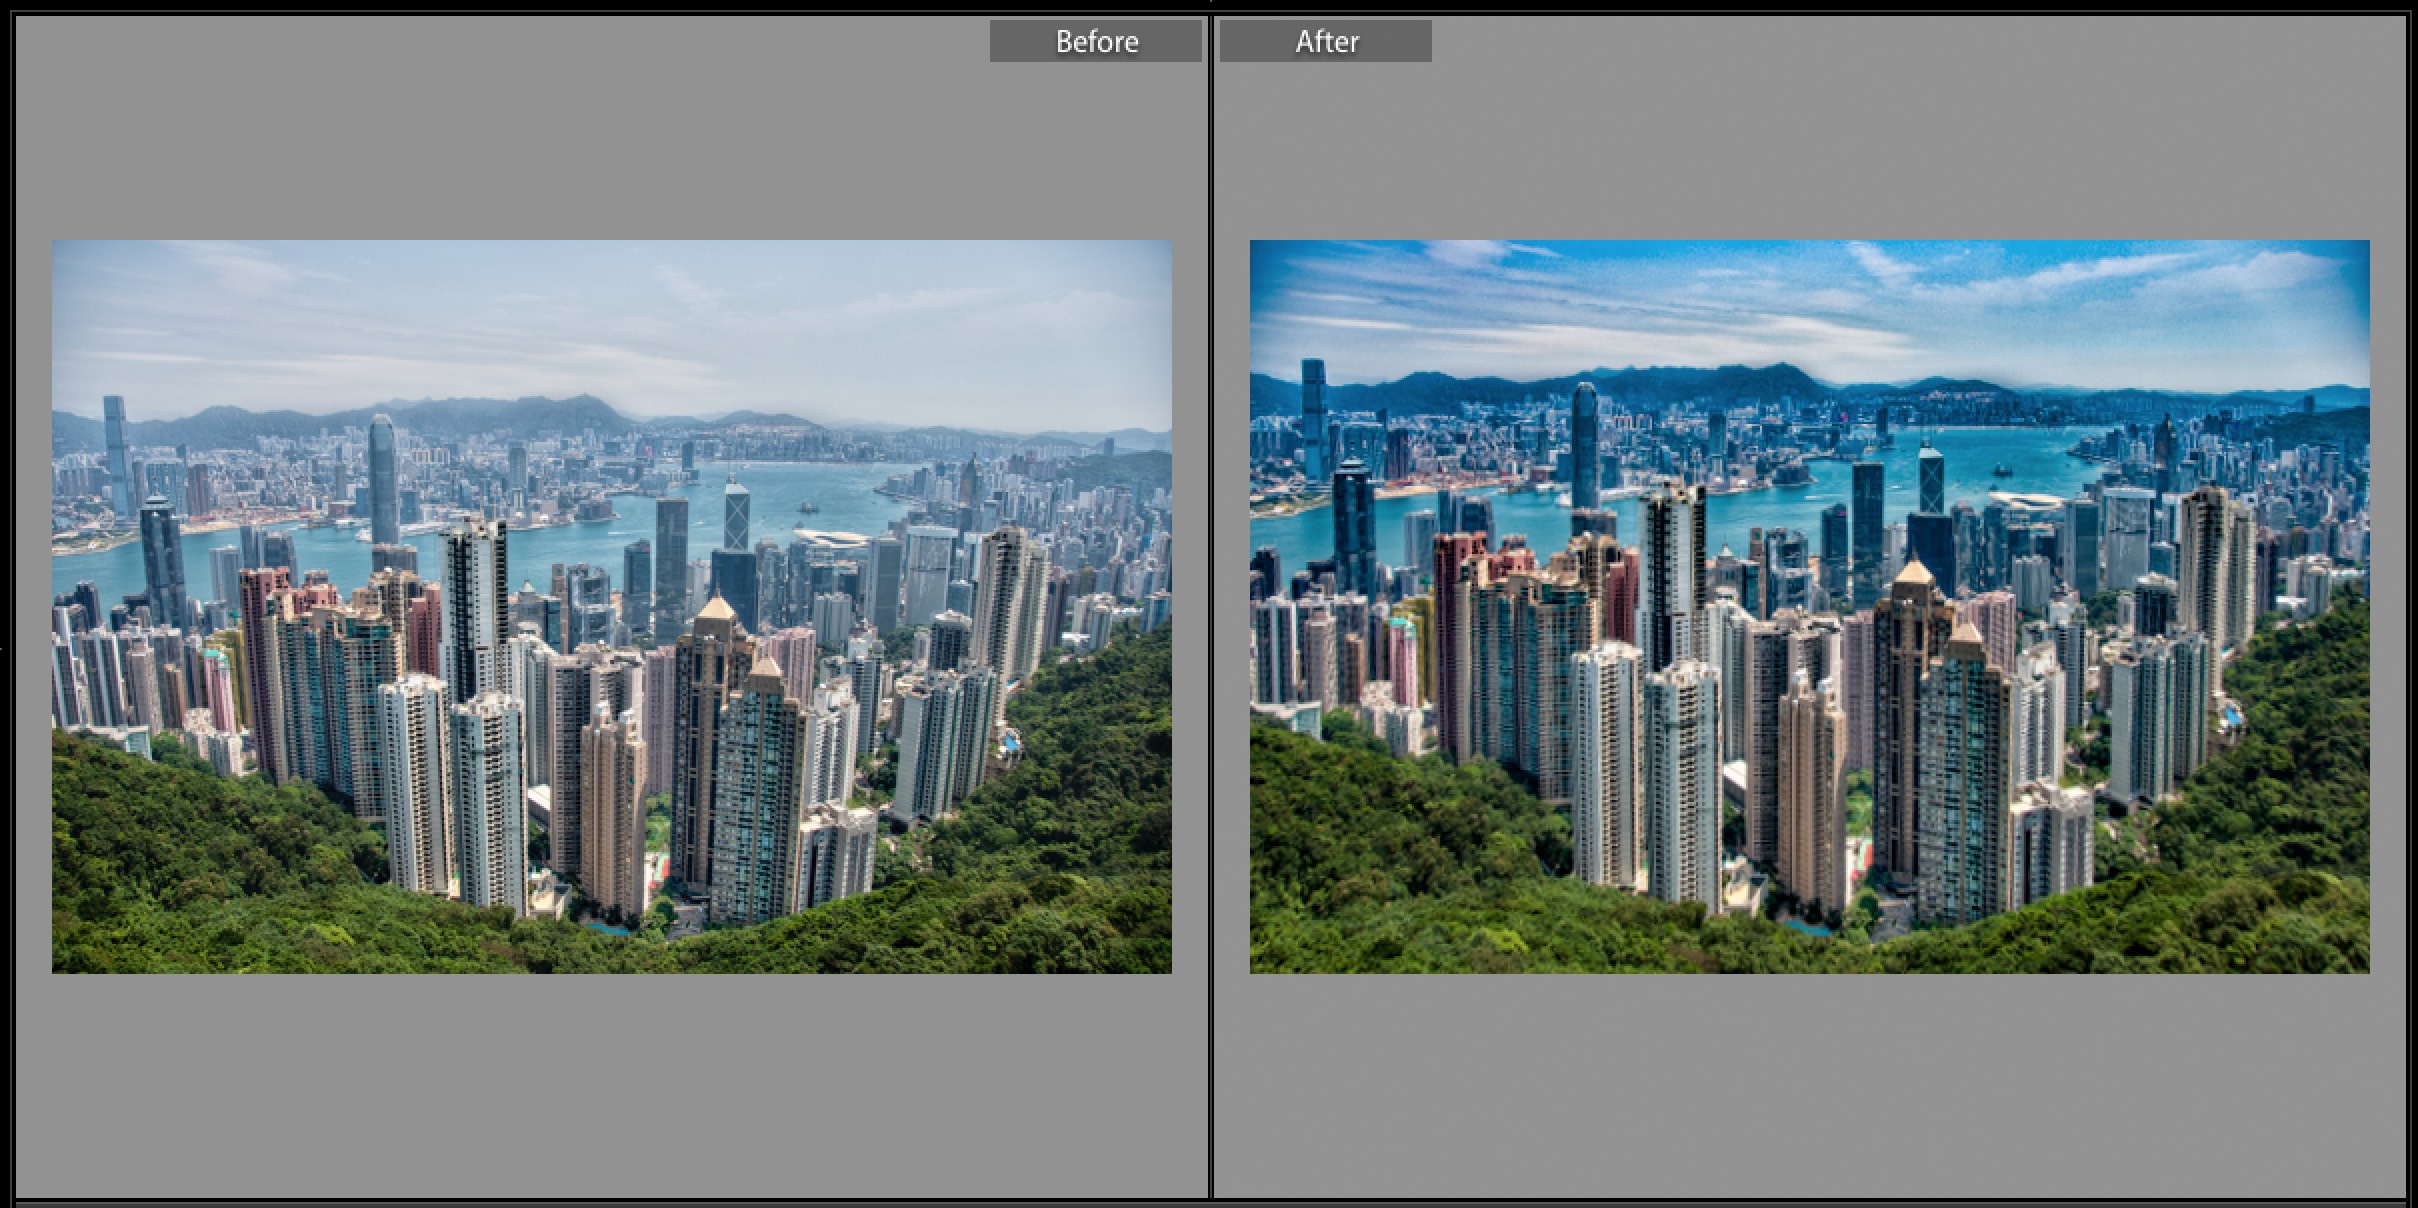
First, the problem — as awesome as the new Dehaze slider is (it’s found in Lightroom CC’s “fx” menu), the problem with it is that it applies the effect to the entire image. For example, in the shot of Hong Kong above left, the background buildings (in Kowloon) are really hazy, but as you can see from the image on the right, while the Dehaze slider pretty much cuts the haze, it also makes the sky look kinda HDR’d (in a bad way), and exaggerated the edge vignetting, and make all the building in the foreground (that were not hazy) too contrasty. That’s why it would be great to have the Dehaze slider added to the Adjustment Brush, but so far, that hasn’t happened (hopefully, it’ll be there one day), but in the meantime, here’s what you can do:
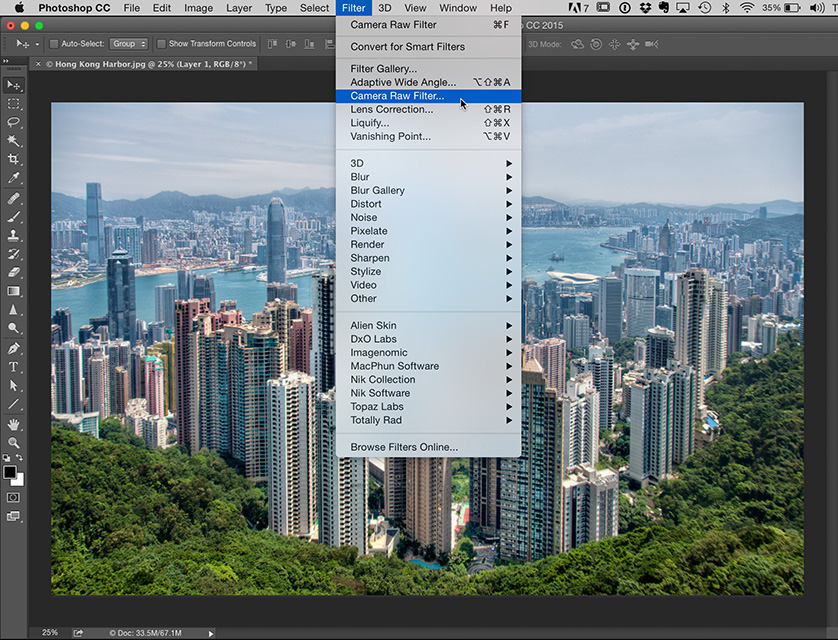
STEP ONE: Don’t apply the Dehaze slider in Lightroom. Instead, press Command-E (PC: Ctrl-E) to open the image in Photoshop CC. Now, in Photoshop, duplicate the background layer then go under the Filter menu and choose Camera Raw Filter (as shown here).
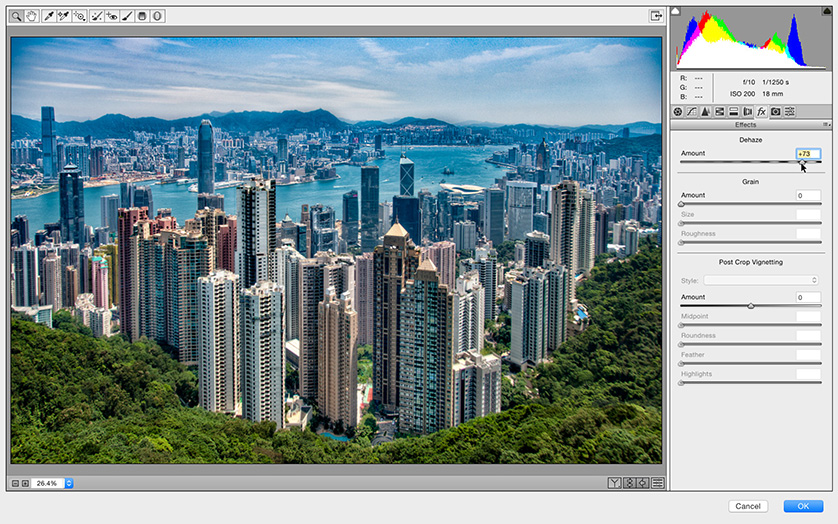
STEP TWO: When the Camera Raw window appears (seen here. By the way, this is just another version of the Develop Module, just in a slightly different layout), click on the “fx” tab right under the Histogram (seen here), and then drag the Dehaze slider to the right as shown here to apply the Dehaze effect. Now click OK to apply your Camera Raw edits.
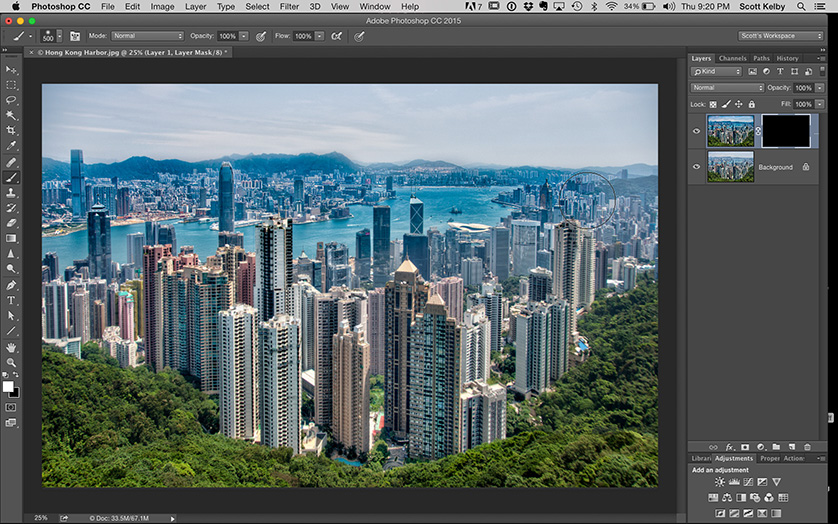 STEP THREE: Now we’re going to add an inverted layer mask to our duplicate layer (this is going to enable use to paint with Dehaze). Hold the Option key on Mac (the Alt key on Windows), and click on the Layer Mask icon at the bottom of the Layers panel (it’s the third icon from the left). This adds a black mask to our layer (you can see the black mask appear to the right of the layer’s thumbnail. The Dehazed layer is still there — it’s just hidden behind this black mask). Now get the Brush tool; choose a large soft-edged brush from the Brush Picker up in the Options Bar at the top of the screen. Make sure you Foreground color is white and simply paint over the parts of the image where you want the Dehaze effect to appear. In my example, I painted over the building in the background and the harbor, but not the sky or the buildings or three in front.
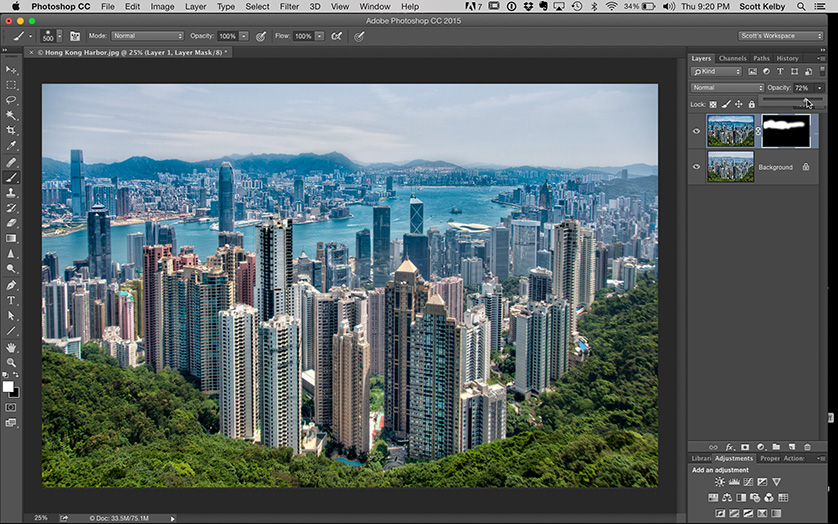
STEP FOUR: Since we applied the Dehaze filter to a layer, we can how control the amount of Dehaze after the fact, by lowering the Opacity slider (top right of the Layers panel) until it looks right. In this case, I lowered the Opacity of this top layer to 72% (as seen here). Now just flatten the image (in this case, you can just press Command-E on Mac or Ctrl-E on Windows to merge the top layer down with the Background layer). Now just hit Save; close the document, and your image returns back to Lightroom with your “Dehaze on a brush” changes all in place.
So, it definitely is a workaround, but it works.
Hope you find that helpful, and here’s wishing you a most-awesome weekend (which is better than a mostly awesome weekend). 😉
Best,
-Scott
P.S. If you live anywhere near Charlotte, don’t forget to catch RC’s Lightroom Power Tour next week. Here’s the details.

Great tip! Exactly what I was looking for- Just got back from Lake Como, and it was hot and hazy. Some of my images of the mountains were hazy, with a clear subject in the foreground. This was exactly what I needed to dehaze my backgrounds!
Hi Scott, with Haze slider Adobe has come up with a solution to a photographic problem which has always haunted us photographer …haze.
What I think both Photoshop and Lightroom really lacknand I am writing this to you hoping you may convey the message to the powers that be at Adobe is to apply thiis and other adjustment of the develop module in Lightroom selectively on a) lighter or darker part of the image b) most saturated and less saturated part of the images . Being able to tweak the develop module sliders in such a way, applying effects for example only on the least saturated part of an image or the lightest part of an image (without having to create complicated mask in photoshop would be SUCH a major breakthrough for lightroom users . Some might argue that this would make the develop module too complicated . answer: make an “advaced” develop module available on request where for example I can apply the contrast only on the lighter /darkest part of the image (even better if there were 5 gradations between dark and light to make it even more useful) THANKS
Awesome tip, thanks!
Awesome work around.
Nice tip. However it only enhances one of the most remarkable features ever contained inside Photoshop. I have used the “dehaze” function to turn fuzzed out, long range(5 miles) images of Half Dome in Yosemite NP taken on Velvia almost 20 years ago into stunning, almost three dimensional images.
If you haven’t tried it, try it!
I have the most updated version of Photoshop CC (did the updates today) but I don’t have the Dehaze feature under FX. Is there a trick to see it? I have Grain etc.
Hi,
great tip, but you can also create similar working brush as a custom preset in LightRoom, and then just paint over desired area of picture.
Probably it will not be as good as a original dehaze but it exclude use of PS.
Nice post Scott! I tried to find the dehaze tool in my Lightroom 6. I looked at Julieanne Kost’s video on how to use it. When I open the Effects panel, the slider isn’t on the bottom like in the video. Is this something that is only available in the LRCC version and not the LR6?
Yes, Lightroom CC only.
Why do you have to flatten the image? Why can’t you just hit save and then close it?
I tried this tip on a photo of a ship inbound in the Corpus Christy channel Port Aransas, Tx. Yes it did clean up the haze and the colors became very viberant. The clouds took on a more natural color. With this adjustment, I was able to make minimum adjustments in LR and polish in PS. I’m using LRCC and PSCC. The photo was taken with a Nikon D600 using a Nikkor 80-400mm lens, aperture mode f/11,ISO 100. Light meter, Sekonic L-758DR
Yes, this is a must in LR. Ok Adobe, install/update now in LR.
I have not tried this &’won’t be able to until Monday, but would it be possible to apply the de haze filter , see what changes it makes in the settings, and then make a custom brush with those settings?
I was able to play around with a couple of photos and reasonable recreate the effects of the dehaze slider. I then took those changes and made them into a custom brush. I haven’t had time to test it yet but hopefully it will be another work around.
It works, kind of 🙂
And still – you are able to change strength of effect.
Great tip, Scott!! When Dehaze tool was released, I instantly wanted it available in the adjustment brush. This is a great workaround. So now Adobe needs to work on this for their next update 😉
Or, some tip.