
Adobe Releases Major Lightroom Update: It’s a Whole New, More Modern Editing Workflow
NOTE: This update spreads across the whole Lightroom universe: It’s for Lightroom Classic, Lightroom CC, Lightroom Mobile and even Camera Raw over in Photoshop.
Adobe just changed the way we work in the Develop Module forever, and it’s awesome! So much to share, so let’s just get right to it:
OTHER NOTE: If you’re a KelbyOne member, we’re releasing a full-length in-depth course today on this new update to Lightroom featuring the new workflow, all the profile stuff, and more to get you up and running fast!
A Profile-Based Workflow
If you read this first, it will make all this make that much more sense. When you shoot in JPEG mode, your camera applies all sorts of edits to your image right in the camera — everything from adding lots of contrast, sharpening, vibrance, noise reduction — a whole bunch of stuff to create a fully processed nice-looking image pretty much ready to share.
When you switch your camera to shoot in RAW, you’re telling your camera, “Turn off all that contrast, sharpening, vibrance, noise reduction, and so on, and just give me the flat-looking RAW image my camera captured. I’ll add that all contrast, and sharpening stuff myself later in Lightroom.” However, the image you see on the back of your camera (and the one that first appears on screen in Lightroom) is still a JPEG (that sharper, more colorful, more awesome-looking image). Then, in Lightroom, you see the word “Loading” on screen. That’s it rendering the actual RAW image. When it does this, it needs to use some math to interpret this RAW image, and since the beginning of Lightroom (nearly 11 years ago), by default, it has applied a RAW profile called “Adobe Standard.” It’s a very accurate rendering of your image tonally, but also a very flat-looking starting place for tweaking your RAW image. I’ve joked for years at my Lightroom seminar that this Adobe Standard profile is misnamed — it should have been called ‘Adobe Dull’ because the resulting RAW image looks…well…dull. Nothing like the JPEG preview you saw on the back of your camera.
By the way — you could see this color profile (and even apply a different profile — more on this in a moment) in the Camera Calibration panel, and the reason to do this was to make your RAW image look more like that colorful, vibrant, contrasty JPEG you saw on the back of your camera.
Today, Adobe fixed that. And then some!
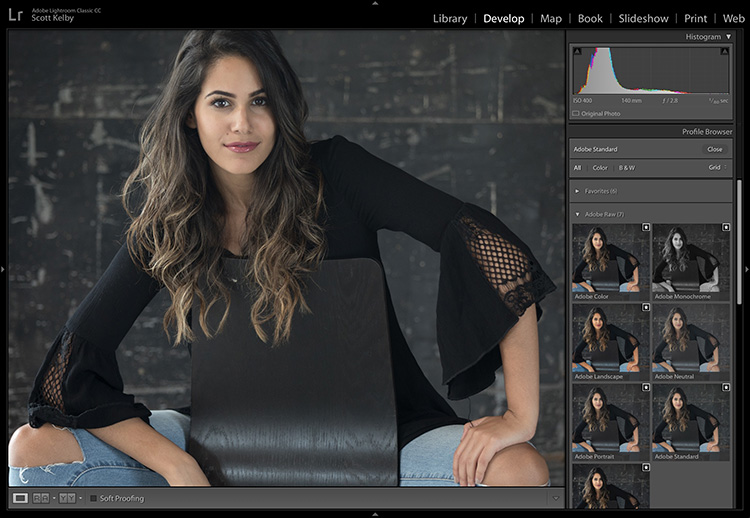
Today we have a new default profile for our RAW images called Adobe Color, and it’s a much more pleasing starting place, but that’s just the start. First, Adobe moved access to the profiles to the right at the top of the Basic Panel (where I believe they belonged from the start).
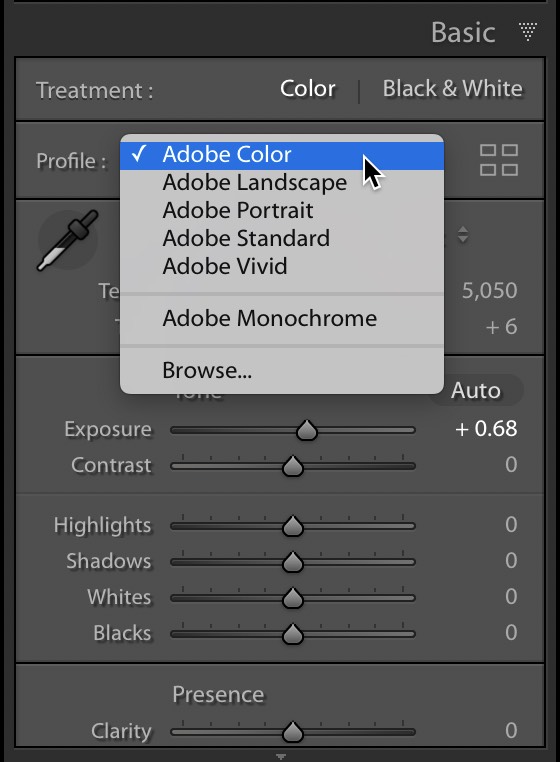
Above: Now right near the top of the Basic Panel you can change your Color Profile — and yes, you could change your profiles back in the Camera Calibration Panel, but these new Adobe RAW profiles are significantly better than the legacy profiles that were previously available. For example, here’s what Adobe says describing this new default RAW profile:
“Adobe Color was designed to greatly improve the look and rendering of warm tones, improving the transitions between certain color ranges, and slightly increasing the starting contrast of your photos. Since Adobe Color is the new default (but only for newly imported photos), it was designed to work on the widest range of photos and ensures that regardless of the subject, your photo will look great.”
I think they did a great job with this profile. It is noticeably better without making your image look overly processed. It’s not a night-and-day difference from Adobe Standard (and that’s a good thing — if it looks a lot different, it wouldn’t be an accurate rendition of the RAW image your camera captured), but it’s certainly a better-looking more modern interpretation of the RAW image.
The other Adobe RAW profiles are all a big step up, compared to the original RAW profiles we’ve been using for 11 years, which are still accessible through the Profile Browser (seen at the top of this post).
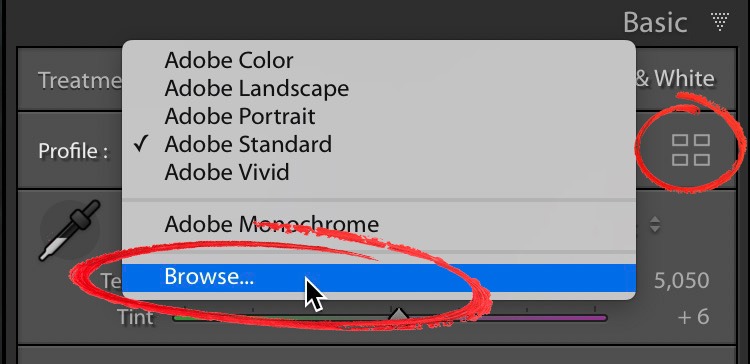
To access these new profiles, just choose “Browse” from the Profile pop-up menu at the top of the Basic Panel (as seen here), or click the icon with four tiny rectangles to the far right of the Profiles pop-up menu (circled in red above).
More than just RAW profiles — Creative Profiles!!!!
Adobe just dipped it’s big toe (and maybe an entire leg or two), into creating “looks” — one click effects that are more like Filters. Here’s why: Presets move sliders to preset locations for you, right? These don’t. You can apply a Creative Profile, and it doesn’t move a single slider, so you get these cool looks, and then you can still tweak to your heart’s content using all of Lightroom’s tools. This is a whole new world, and I love it!!! (Note: these use a form of color look-up tables to make their magic happen).
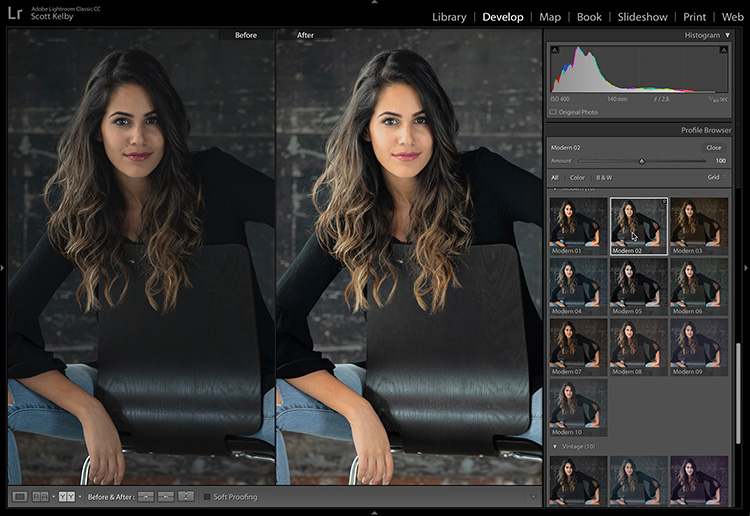
Above: One thing I love about these profiles is that you can hover your cursor over them and it gives you an on-screen preview of how the profile would look it you applied it (as seen here).
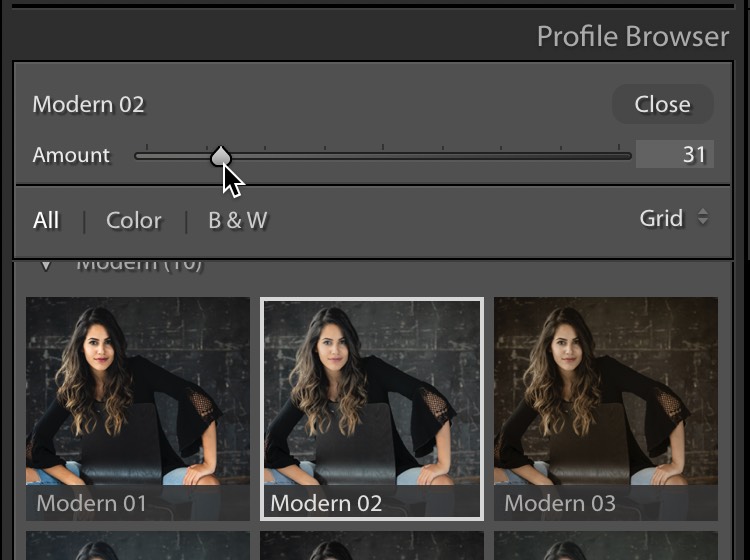
Holy Cow there’s an Amount Slider!
With these Creative Profiles, you can control the amount of the effect of each profile (just the Creative Profiles — not the Adobe Raw profiles) — it’s right at the top of the Profile Browser. Click on the Thumbnail to apply the look, then use the Amount slider to dial in just the right amount.
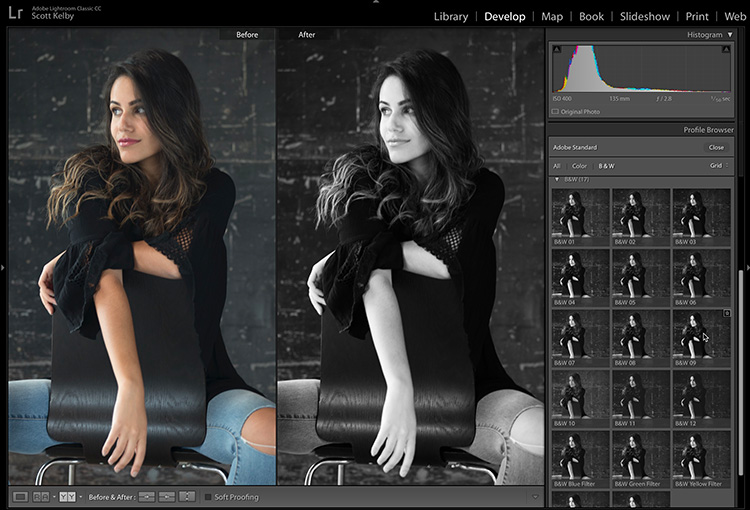
Really nice B&W Profiles are here, too!
These are pretty awesome (and just to note: the B&W panel is missing from the HSL / Color panel — now it only appears when you choose a B&W profile. When you close the Profile Browser, you’ll see that where the HSL / Color panel used to be is now the B&W panel).
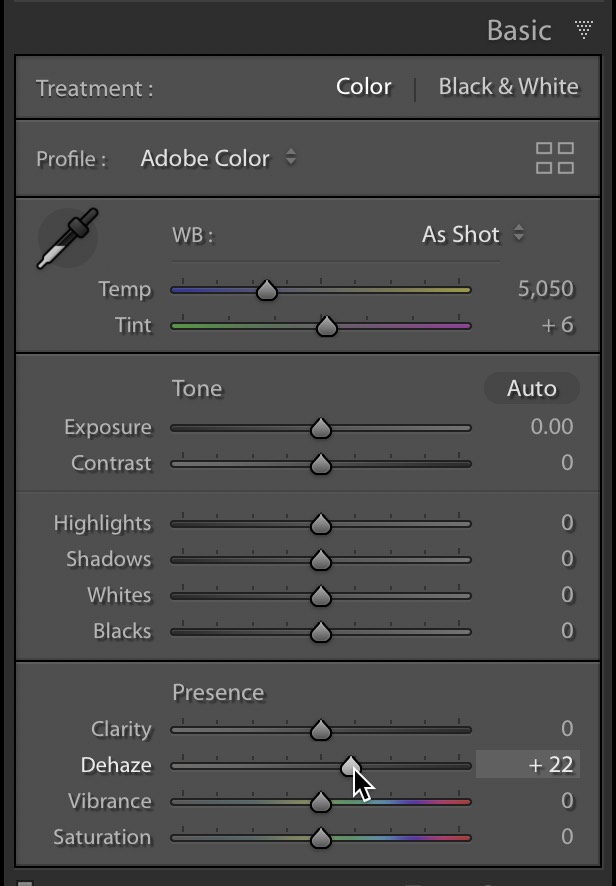
Look! The Dehaze slider is finally where it belongs
It’s moved from the Effects panel to the Basic panel (right below Clarity). No more “out of sight, out of mind” for this brilliant slider.
Plus…
The Tone Curve is larger to make working with it easier, and the algorithm for the Face Tagging feature has been improved (that’s a win because…well…ya know). Plus, lots of bug fixes, new camera, and new lens support.
Lightroom Mobile Gets Some New stuff, too!
Like a new Geometry panel where IOS (iPhone) users will find the Upgright Feature, and even Guided Upright (yes, in Mobile, but the Mobile app is called Adobe Photoshop Lightroom CC). Android users instead get the Sharpening and Noise Reduction panels (already in the IOS version).
Hope you found that helpful. 🙂
If you’ve been waiting for the update of my Lightroom book…it’s on the printing press now!
We’ve known this new workflow was coming for a while now, so we intentionally delayed publishing the book until now. We didn’t want to release a version of the book earlier and have it already become obsolete today — so this new version, with all the new profile and all the latest features is already at the printers and should be out soon. This is my biggest update to the book EVER, and it includes the most updated version of my Simplified Lightroom Image Management (SLIM) System, too!
You can pre-order yours and be the first to get your copy from either Amazon or Barnes & Noble.
Heads up KelbyOne members — my new Lightroom course on all this comes out today!
I cover all the new stuff in-depth and how to make the most of this new workflow. Lots of cool stuff to share in that course. Over at KelbyOne.com
Best,
-Scott
P.S. I’m off to Venice, Italy today. Whoo Hoo!! Follow my trip and pics over on my Facebook and Twitter pages.


All of my personal presets are gone after the update. How can I access them now?
Did you install the 7.3.1 update that just came out?
eeeeesh this update is AWFUL – heading right back to 7.2 cuz this is beyond whack ~ I hate all these novice presets everywhere that I can’t seem to delete – cmon now we’re not amateurs here !
Totally agree.
Adobe keeps saying they’re going to deal with the immense lag in this program but this update is heavy with unnecessary stuff and lags more than ever. The shift of user-created presets to XMP makes the entire thing so. bloody. sloooooowww.
When the last update come into effect, did anyone notice that Spot Removal is not working correctly? It is only half removing spots no matter which settings I use, Opacity and Flow are at 100 for both Clone and Heal and both are leaving a big part of the spot behind
Never mind, dumb moment on my part. It works just fine. I had the feather set to 100, not sure where I thought I was getting Flow from
No, it is broken! Regardless of feather settings
One of the little things that really impressed me was that they added support for Canon’s new CR3 RAW format.
I bought the just released (March 26) M50 and it is the first camera to use that format. With this one-week-later (!) update LR and ACR can handle those files.
As an aside for others.. they’re way smaller and completely lossless. With the giant megapixel cameras eating up SD card and hard drive space, this is a big deal. I can make some samples available if anyone wants to experiment with them.
Well I never knew that Before and After view was there!
Hi Scott,
Thanks for the excellent overview on the recent developments in Lightroom. I will be attending PhotoshopWorld 2018 and With the Conference being weeks away I’m wondering how these changes are going to affect all of the many Lightroom classes. It seems that this could have an impact on many of the Lightroom instructors.
Doug
Oh boy! What a bullshit. Now they even make classic nothing more than a smartphone app! What about the presets? I neither can’t find my Nikon profiles (I could guess, I don’t need all these funny colored pics which are irritating)! Where are my own build presets? I don’t know what Adobe was thinking…
WARNING! Don’t use this update without backing up your catalog file first! LR crashes after playing around with profiles and I can’t reopen as the catalog seems corrupted. At least it can’t be fixed by opening LR!
So better try first with a dummy catalog. Anyway, I’m super angry….
I can reproduce the crash. Apply a new profile (not preset!) to a pic and then try to do an undo with cmd-Z on macos…LR crashes each time. anybody else?
No, I can’t reproduce that. However, there are plenty of people with crashing issues. Worth reporting over at https://feedback.photoshop.com/photoshop_family/categories/photoshop_family_photoshop_lightroom
Terrible update! Every time I open the new version of Lightroom CC, my computer crashes within a couple of minutes (reboots without a single warning). I’m on Windows 10 64-bit.
Warning to you all – the new version of LR CC may corrupt your database!
After the latest crash (see my comment above) I can’t even open my LR catalog. I get the notice box that it “cannot be opened because another application already has it opened”, which is not true and doesn’t change even after I restart the operating system.
Marcin,
With Lightroom closed, open your file browser and open the folder containing your catalog file. Do you see a file in there with a .lock extension? If so, move that .lock file out of the folder. Once it is out, double-click the catalog file to open it into Lightroom. Does that work?
Hi Rob, thanks for you reply. First of all, in my post I meant Lightroom CLASSIC CC, sorry for mixing up the names!
Yes, I’ve already found the .lock file and deleted it. So now I can open LR Classic all right, the database seems to be fine, that’s a relief. However, it keeps rebooting my PC. I cleared the video and photo caches, switched off video card acceleration, completely uninstalled and installed LR – nothing works. When I roll back to previous version (7.2), everything is fine. When I upgrade again to 7.3, the restarting nightmare begins 🙁
Ok, glad you got things working. I would stay in 7.2 for now.
Hi Marcin, how do you manage to roll back to 7.2. By backup or is there any chance to download it from adobe?
Just uninstall via the Application Manager, then in the same place, instead of clicking the big Install button, click the arrow to the right and choose Other Versions. In the pop-up that appears choose 7.2.
Thank you Rob!
Hi Scott! Can you say something about the problem with presets? New update converts old presets to xmp files and in the process rearranges them very badly. I have a lot of presets and can’t even manually arrange them now. Seems to me Adobe makes 2 good things along with 4 bad things lately… So sad. Hate to be a party braker 😉
My CC app doesn’t even show the update available yet.
Any speed improvements? Develop is still slow with D810 raw files and a big catalog. I don’t care about import/export speed, I don’t have to sit and watch it painfully do it’s thing. I care about edit time, and right now it’s too slow to use. Brushes/healing, nearly unusable. Other aspects of editing a are slow too, such as moving between images in the develop module even with 1:1 and smart previews fully rendered. In case anyone is wondering, my hardware should be overkill (64GB RAM, OC 6700K @ 4.5GHz, NVMe SSD for catalog and images, fast GPU).
Who translated in italian?Landscape is PAESAGGIO and portrait RITRATTO.. please correct!!! 🙂
I believe they are aware of the translation errors.
Correct it by yourself!
Replace these two lines “$$$/AgLibrary/Filter/BrowserCriteria/AspectRatio/Landscape=Orizzontale”
“$$$/AgLibrary/Filter/BrowserCriteria/AspectRatio/Portrait=Verticale”
like it should be.
You can find file your Lightroom folder and /resources/it/TranslatedStrings_Lr_it_IT.txt
There are much more than these two lines though.
Open file and replace all “Orizzontale” to “PAESAGGIO” and so on…
Great tip!
Well, it seems that Adobe doesn’t want me to get this update. When I try to open the Adobe Creative Cloud application on my PC, or check for updates on LR or PS, I get a message that the apps are unable to access the Adobe server. I checked my firewall and virus protection software (which have never interfered in the past) like they said and found no problem. On the Adobe help site I find many old forum references to this problem yet no solutions.
Anyone else having this problem? If so how did you resolve it? Or is something wrong with the Adobe server, such as LR update overload?
Might just be on their end. Try again tomorrow.
Same problem here. Saids everything is “up to date” on all updates and download. Weird. I’ve been trying all day.
Did you try logging out, then back into the Adobe app manager?
Rob, the problem is that I can’t get to the app manager. When I try to open the Creative Cloud app manager all I get is the notice that it can’t access the Adobe server. I’m afraid to log out of PS or LR for fear that they will then stop working as well. The best I can find at the Adobe site blames anti-virus software, but mine have never caused problems in the past and turning them off does not change things now. Adobe makes it extremely difficult to find a way to get help directly, so I guess I’m stuck.
Hi Leon,
I would post an explanation of what you are seeing, with as much detail as possible, over here:
https://feedback.photoshop.com/photoshop_family/categories/photoshop_family_photoshop_lightroom
The Adobe support staff and engineers monitor that site, and may be able to help.
Is the new Adobe Color any different than the result achieved with the new Auto Tone?
Profiles are made to be used in tandem with the Develop adjustments. The profiles don’t touch/change slider settings, so you can use a profile and Auto settings if you wish. Auto settings gets applied on top of whatever profile you have selected (or the default if you haven’t changed it).
[edited because my first pass came across like a grumpy troll, sorry – Rob] 🙂
Finally will the processing (fine detail extraction) of the fuji raw be improved?
Nope but it’s slower than ever 😀
I’ve done some extensive testing over the last couple of days and I can assure you the Fuji x-trans processing is much improved over the previous version. In my opinion, it is now better than Darktable, RawTherapee, Iridient X-Transformer, Silkypix, Alien Skin and ON1 (but only marginally better than Darktable). The previous version of Lightroom used to be worse than all those products!
One thing that’s VERY frustrating – when Lr 7.3 converts presets from the lrtemplate format to xmp, they tend to be out of order. i.e. if they’re set up in a numeric alpha format (i.e. 1a, 1b, 2a, 2b, 3a, 3b, etc). 1’s may be in the 3’s group and vice versa…..and it appears you can’t rearrange them.
Perhaps KelbyOne can convince Adobe to fix this fast
Thanks for resuming it in a better and more enthusiastic away
I think the best change was moving the Camera Profiles, I mean, Profiles to the top! I am updating right now and curious to try the new profiles. I hope Adobe didn’t removed the camera’s profiles.
Have a safe trip and enjoy Venice!
Super exciting! Thanks for the overview of the changes… now to update and play!
Thanks a lot for the heads up. That’s great news specially the different Adobe RAW profiles since I’m shooting with Pentax as they don’t have the profiles Canon & Nikon has.
Thanks for the highlights / overview.
You bet. 🙂
Sounds pretty cool! So that means the Lightroom cc classic big book I just bought and am only halfway through it is obsolete??? I also bought your big Photoshop book will that be obsolete too? Haven’t even opened that one yet.
Thanks…
Louie
No. Now it’s just a “classic.” 😉 The Photoshop Book is based on the current version, so you’re OK there. Also, all kidding aside on the LR book – 95% of Lightroom didn’t change with this update – just the profiles (and they changed for the better). 🙂
Thanks very much for the reply! Since i already have your book, would it be overkill to buy the new one coming out for just these updates or would it be very beneficial in your opinion???
Will your new book come in a spiral version!
We aren’t planning on a spiral edition at this time. Sorry ’bout that.
Scott,- you left out one important point. The first time you start LR after updating, the program is goind to apply custom presets toyour photos. My computer has been locked up for over two hours waiting for LR to complete the task.
Mine just updated normally…
It doesn’t apply presets to your photos. It does convert any custom presets to a different file type (.xmp), and if you have a lot of presets I suppose it can take little while. It sounds like your system froze/crashed though, so you should quit and restart.
Rob – do you know if Adobe has or will provide a tool to convert lrtemplate files to XMP?
Also, I noted the newly created XMP files are located here – Application Support\Adoibe\CameraRAW\Settings
Classic converts them on launch, and copies them to a location shared with Camera Raw. I haven’t tested to see if it checks with each launch to convert newly imported presets. I don’t know of any external tool.
I love the fact that they moved the Dehaze slider, but wished they put it at the bottom of the panel. In my processing, I frequently jumped from Clarity to Vibrance without hardly looking. Now I have to retrain myself.
I just discovered the power of the camera calibration panel a couple of weeks ago, so I’m pretty excited about this update.
Did you jump the gun? I can’t find the updates.
They roll out over time. It is released, but you may not see it immediately. One thing you can try is to open the Adobe Application manager, then click the 3-dot menu (upper-right) and choose Check App for Updates to see if it finds them. If not, try again later. It appeared on one my machines before the other.
Dziękuję za pomoc. Aplikacja zainstalowana 🙂
You’re welcome. 🙂
Thanks for the detailed post on the new stuff in Lightroom! Have a safe trip to Venice. Wish I could join you and Mimo Meidany. I’m sure it will be a great workshop!
You know, Italy is very close to Portugal (just a little bit of Spain and the South of France between us) – you could hop a quick flight and come join us for dinner one night. That’s how a Chicky Nando rolls! 🙂