
So Many Ways to Import
Importing is the most fundament aspect of using Lightroom Classic, and is also one of the least understood, which makes it the source of a great many problems. Because it is such a key aspect of the Lightroom Classic experience there are also a multitude of options for running your photos through this process. Do you know them all, and all the little nuances of each? In this two part series I want to first demystify the import process, and then reveal all the options you have at your disposal for introducing Lightroom Classic to your photos.
What is Import?
At its core, the import process is simply a handshake between the Lightroom catalog and each individual photo you want Lightroom Classic to manage and edit. That’s it. Whichever import route you take, the primary function is for the catalog to ingest all the information stored in the photo’s metadata (such as camera EXIF info, and any metadata, like ratings or keywords, you may have applied in another program) and store that information in the catalog. Along with that metadata, the catalog also writes the complete path to where that photo is stored on your system. On a Mac, that begins with the volume name (while on a PC, that begins with the drive letter) of the drive where the photo resides, and then includes all parent and child folders leading to the file name of each imported photo.
Lightroom Classic uses that exact path to reference the source photo from the moment of import into the future. If anything in that path changes outside of Lightroom Classic (such as renaming a folder, renaming the volume, renaming the photo, etc.) that path becomes invalid and Lightroom Classic will be unable to find the photo. So, as long as you do all your file management tasks within Lightroom Classic, then the catalog is updated along with any moving, renaming, or deleting you do. This is why the import process is so fundamental to the Lightroom Classic experience. This is also why we need to understand what is happening, and why we need to be in the driver’s seat for all decisions relating to where our photos are stored.
Additional tasks, such as moving or copying photos to a new destination, or applying metadata or presets, can sometimes be included in the import process, but those are secondary functions intended to help make our workflow more efficient. Those options are not required at the time of import.[
Types of Import
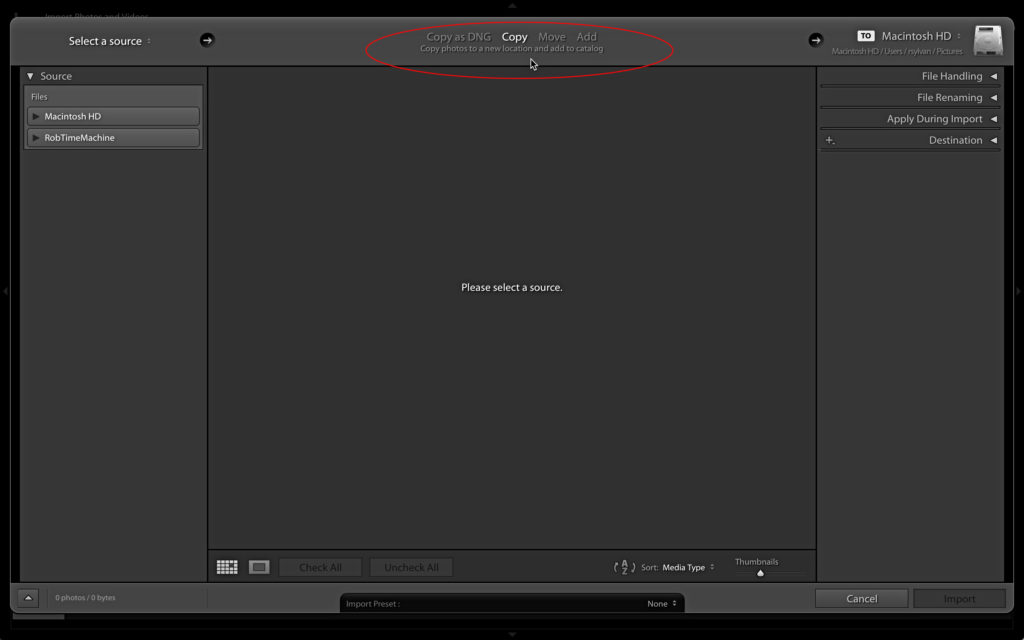
Every Lightroom Classic user has encountered the Import window, and that is the most common means for ingesting your photos’ information into the catalog. Notice I am deliberately not saying, “bringing your photos into Lightroom” because as I pointed out earlier, your photos are never “in” Lightroom. But I digress, along the top of the Import window there are four options to choose from; Copy as DNG, Copy, Move, and Add.
At their core, each of those options ingests the information about your photos into the catalog and provides options for applying information (like metadata or a Develop preset), but some offer a secondary copy or move function to help you in your workflow. Let’s understand the differences between those options, and when you would use (or not use) each one.
The Copy as DNG option adds the additional task of copying your photos to the location selected in the Destination panel, and then after the copy task is completed, converting your raw photos to the DNG format. The Copy option simply provides the secondary task of copying the selected photos to the location selected in the Destination panel. These are the only options when your source photos are still on a memory card but can also be used when you want to copy photos between drives as part of the import process.
The Move option copies your photos to the location selected in the Destination panel, and then deletes them from the source location. Move is not available when a memory card is the source (because Lightroom won’t delete from a memory card), so it is only viable when importing from a drive. I don’t recommend using the Move option unless you have a backup of the source photos in another location (in case something goes wrong during the move). It would be a lot safer to use the Copy import option, and then manually remove the source photos once you are sure everything was copied successfully.
The one key aspect of the Import window that Copy as DNG, Copy, and Move have in common is the Destination panel. The choice made here determines where the photos end up on your system, and this is a choice that is easy to overlook. I wish the Destination panel was at the top of the right side instead of the bottom.
So, if you want Lightroom Classic to assist in copying/moving your photos to a new destination as part of the import process, then choose one of those options and be on your way. However, if you prefer manually placing your photos in the final destination outside of Lightroom Classic first, then the Add option on the Import window is for you.

Add simply ingests the information about each photo and offers the opportunity to apply some information (metadata and Develop preset), while leaving the source photos exactly where they are on your system. Because there is no moving or copying involved with Add, there is also no option to rename during import. It almost goes without saying that Add is not accessible when the selected source is a memory card because that is a temporary location.
So those are the most common routes for importing your photos. next week I’ll follow up with a few alternative routes you should be aware of and possibly add to your workflow.
Side Note: Photoshop World!
I’m down at Photoshop World this week. Please stop by the Lightroom Help Desk in the Pavilion if you are attending and say hello. If you can’t make it this time, it’s not too late to sign up for Photoshop World in Las Vegas. Hope to see you there!


Hi Rob,
Your LR tips are always worth reading and studying, KUDOS! As for the importing to the LR catalog, I always mention to my baby boomer friends learning Lightroom, think of it as an on-line library card catalog like what they used in school. Remember library card catalogs? Listings by title, author and subject. Cards in the catalog drawers contain even more info. Once my friends understand the concept of cataloging and image relationship, they breeze past the import tab with ease.
Yes, that’s a great analogy for people who know what those are. 🙂
Thank you for your very clear explanation. Since I am sure that Adobe techs read these articles, I would like to see if they can add the following items to their import protocol:
1. Ability to check off more than 1 Collection.
2. Quickly copy last few import setting – That includes Keywords.
3. Ability to Straighten (from Crop tool)
4. Maybe — Preview what a Preset would look like on a thumbnail
5. Ability to perform several imports at one time so that you do not have to wait for 400 Raw photos to import to begin again.
6. Create a Favorites folder so that you don’t have to look for it on non-consecutive imports.
After import:
If you import with a Preset, there should be a different tag on the thumbnail for when I actually edit it manually so that I know which photos are completed.