
I hope your 2020 is off to a great start. One of my constant resolutions is to be able to manage all of the myriad of digital files that find their way onto my laptop. One of the perennial culprits are Develop module presets, and so on that note, let’s look at how to get those guys under control.
Editor’s note, this first appeared in Lightroom Magazine in 2019, and has been updated to reflect new functionalities released since then.
Develop presets are very useful as they can save you time, help you remain consistent in your editing, and can even help you discover new looks and editing styles. Develop presets, which I’ll simply refer to as presets from here on out, are simply a type of text file that can store a combination of Develop module adjustments, so that you can re-apply those adjustments in a single click, any time you want. These presets have also undergone a bit of an evolution in recent times, which provides the benefit of having them shared between Lightroom Classic and Adobe Camera Raw (the file extension changed from .lrtemplate to .xmp), but this has also resulted in some changes in how presets can be organized and managed. So let’s dive in.
Presets can serve as a new starting point, or the entirety of your adjustments. Presets are so handy that you can access them from the Quick Develop panel in the Library module for easy batch applications, or even from the Import dialog so that all imported photos enter Lightroom with those settings applied right out of the gate. That said, the most common place they are used is within the Develop module, where they are found in the Presets panel.

Presets Panel
Lightroom Classic now comes with fourteen groups (folders) of presets, divided into three sets, that you can use at your convenience. These serve to introduce new users to the concept of presets, and to show what is possible. I recommend exploring these presets to see what’s available. You can’t delete the pre-installed presets, but you can hide any preset folders that you don’t need cluttering up the panel (we’ll cover this in a bit). As you create custom preset folders those will appear below the pre-installed sets in a fourth set. Here’s how to control what preset folders are visible in the panel:
STEP ONE: Click the plus sign (+) at the top of the Preset panel and choose Manage Presets from the menu that appears.
STEP TWO: In the Manage Presets dialog that appears, uncheck the boxes next to any preset folders you no longer want to see in the Presets panel (you can always bring them back later).
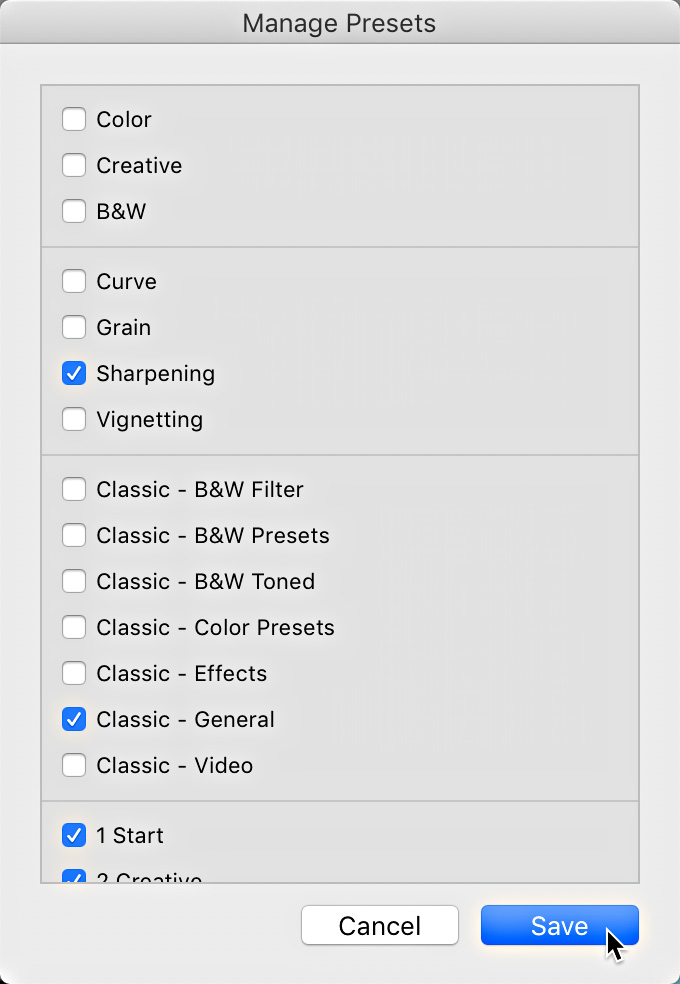
STEP THREE: Click Save to apply your changes and the Presets panel will reflect your choices.
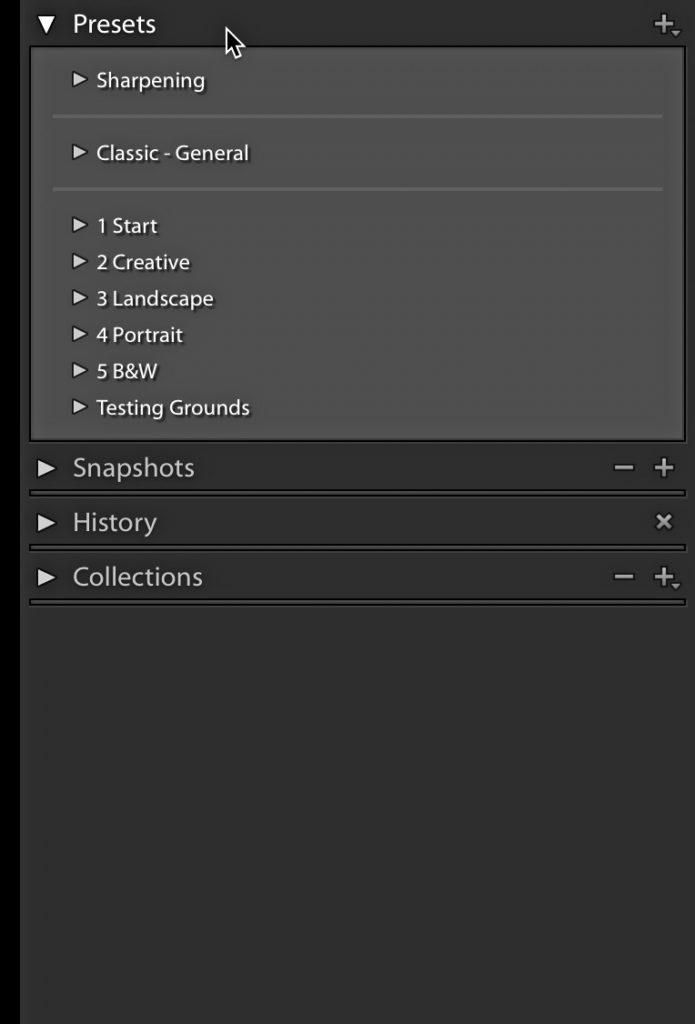
You can restore the hidden preset folders by returning to the Manage Presets dialog, or you can control-click (PC: right-click) anywhere within the presets panel and choose Reset Hidden Presets from the contextual menu.
Creating and Organizing Presets
Making your own presets based on your workflow needs is one of the smartest things you can do.
STEP ONE: Select an unedited photo.
STEP TWO: Apply the exact adjustments you want to include in the preset.
STEP THREE: Click the plus sign at the top of the Presets panel and choose Create Preset to open the New Develop Preset dialog.
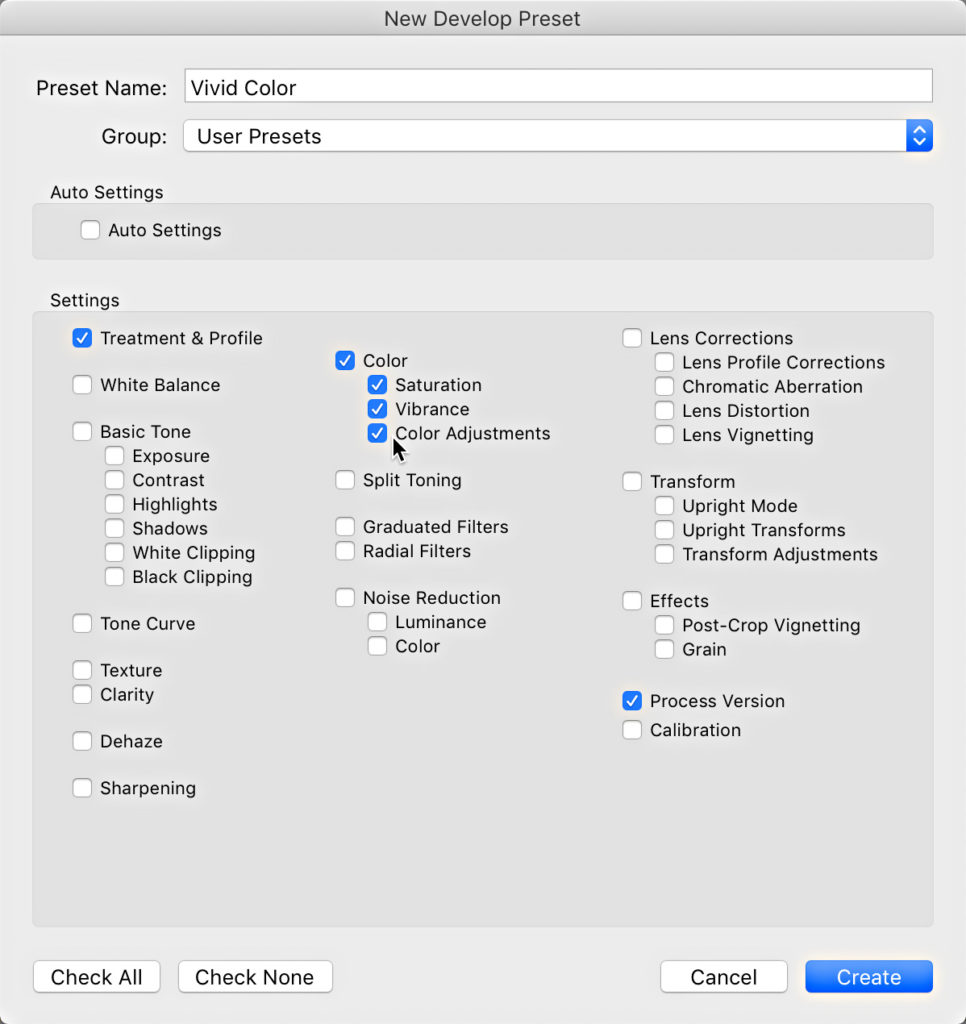
STEP FOUR: Check the boxes next to all of the settings you want to include in your preset. You can check as many or as few as you want to include. For example, you might want a preset that just uses Auto Settings and your favorite profile, or maybe a preset that applies a certain amount of Clarity, Texture, and Sharpening for portraits, and so on.
Keep in mind that it is a good practice to designate a folder for your presets to keep them organized. By default, they will be placed in the User Presets folder, and that’s ok, but just dumping all new presets in that folder is not a good practice over time. Instead, while you are in the New Develop Preset dialog take the opportunity to create a custom preset folder. Note, this is the only place you can create new preset folders!
STEP FIVE: Click the Group drop-down menu and choose New Group, and enter a meaningful name in the New Group popup window that appears. You don’t need to create a new group for every preset, just a few broad categories that fit your needs, and then add new presets to the respective groups (folders) as you make them. Note, I number mine as I create them to aid in keeping them organized and easy to find.
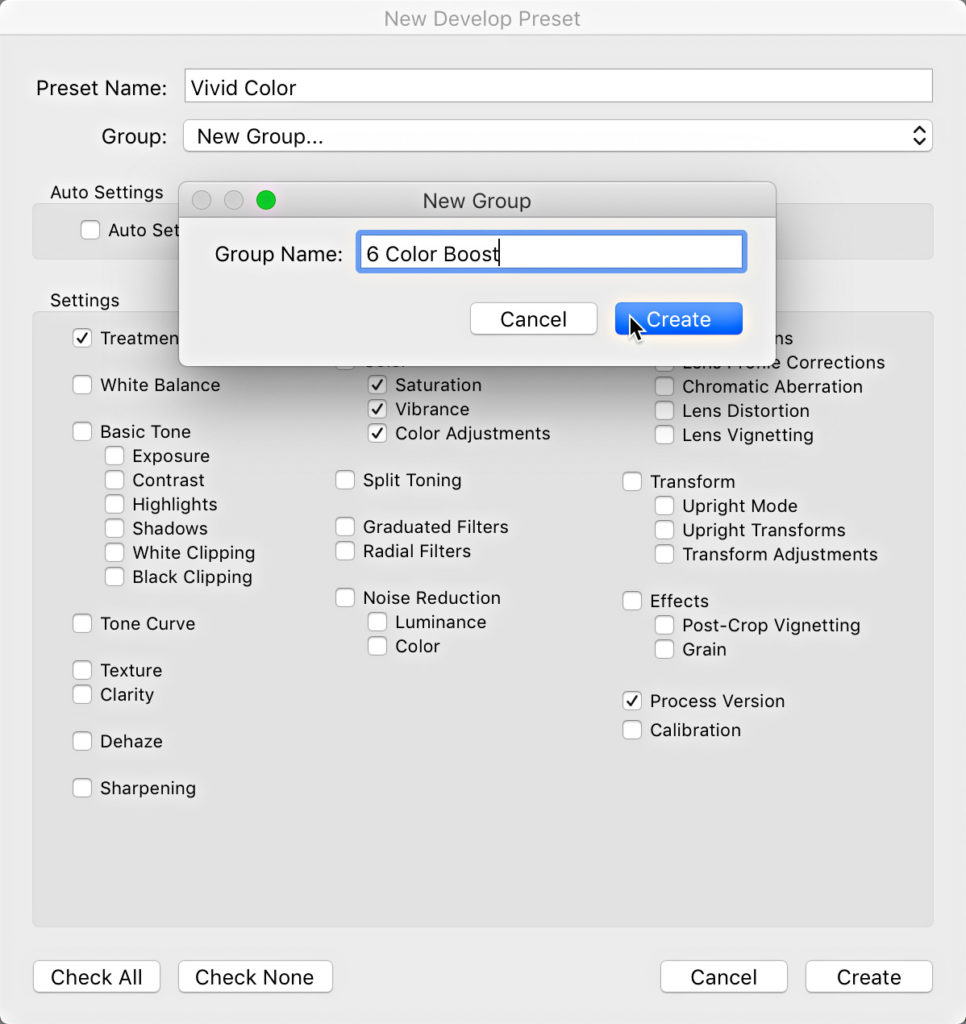
STEP SIX: Once everything is dialed in, click the Create button to complete the process.
If you made a new preset folder, it will appear in the Presets panel, and your new preset will be placed inside. As you create new preset folders you can drag and drop custom presets between those folders to continue organizing them to your liking (and move them out of the default User Presets folder). There’s also a new Move command in the contextual menu to use.
Unfortunately, we can no longer drag preinstalled presets into custom groups to create copies of them. But we can mark them as a Favorite, which will make the special Favorites folder appear at the very top of the Preset panel.
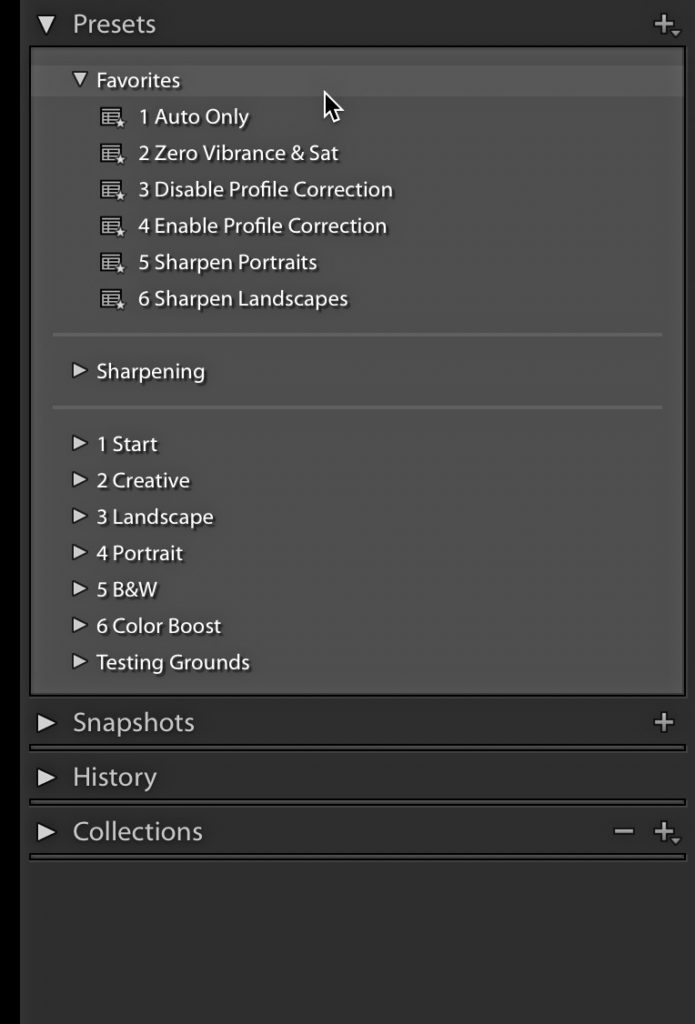
This way if you find there are one or two preinstalled presets that you like, you can mark them as a favorite, then hide the containing folder to tidy up the panel. To mark any preset as a favorite, just control-click (PC: right-click) the preset and choose Add to Favorites from the contextual menu. Because the Favorites group always appears at the top of the panel I like to include my most used presets in there for easy access. You won’t see the Favorites group until you mark at least one preset as a favorite.
Updating Presets
Over time, as features evolve or as your editing style changes you might want to update the settings in a given preset. Here’s how:
STEP ONE: Select an unprocessed photo (click Reset to be sure there are no settings applied).
STEP TWO: Click on the preset you want to update to apply the settings to the photo.
STEP THREE: Expand each panel on the right side of the Develop module to see what settings have been applied (if you already know what settings are contained in the preset you can skip this step).
STEP FOUR: Make the adjustments you want included in the updated preset.
STEP 6: With the settings customized, control-click (PC: right-click) the preset you are updating and choose Update with Current Settings to open the Update Develop Presets dialog box.
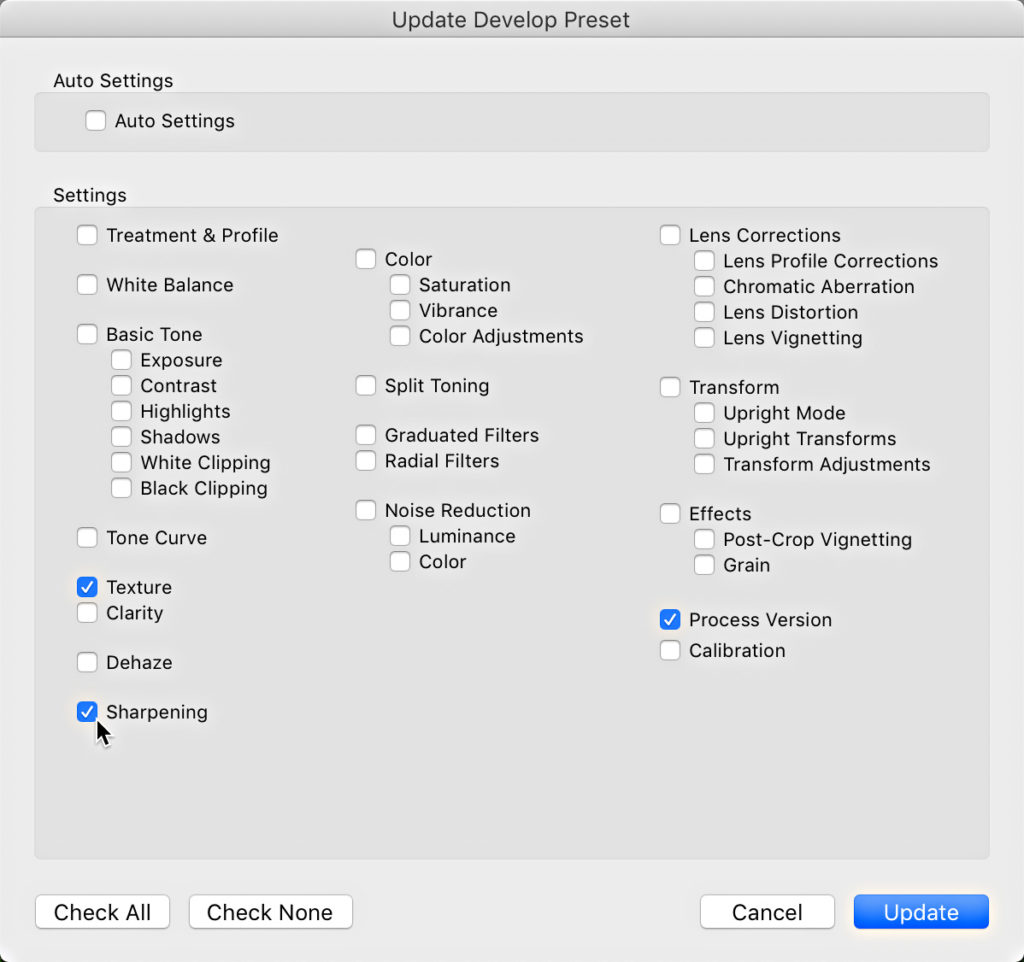
STEP 7: Check only the boxes you want included in the preset, and click Update (this is why I included Step 3 for anyone needing to learn what settings were included originally).
The update settings process works for any custom presets you want to evolve over time. Taking a closer look at the contextual menu options associated with a custom preset there are also options for applying on import, renaming, moving (to another folder), showing its location in Finder (PC: Explorer), and deleting the preset. A recent update gave us back the ability to export presets and even preset groups.
One final note, before the switch to .XMP presets we could create and manually manage the actual preset folders using Finder (PC: Explorer), and then restart Lightroom Classic to see the changes we made, but this no longer works. Due to the new preset format, the only way to create new preset folders and manage the presets within the folders is to do that within the Presets panel. Keeping in mind that the presets are now shared with the Adobe Camera Raw plug-in, any changes you make in Lightroom Classic will also show up in there too (and vice versa). You can also access the location on your drive where the presets are stored by going to Lightroom Classic > Preferences > Presets, and clicking the Show Lightroom Develop Presets button. I hope this helps you get the most out of your presets and keep them organized into the future.


Hello,
whenever I use a free or paid preset in LR the naming is quite bad. E.g. if the preset name from Jane Doe is “02.summer-gold” it doesnt give me information of who created and where to find it in my preset list. When revisiting the photo after a couple of month and want to apply the preset on another photo, I am lost. Sure, I can use right click, show in explorer but that’s too cumbersome. Is there an easy way to rename a set of presets in one folder?
You can right-click each individual preset in turn, choose Rename, and rename each preset one at a time.
Hello,
I got quite some free and paid presets over the years and it is all a mess. When I imported them, they show up in the user folder. Sorting them one by one into specific folders seems impossible when the import includes 50 presets and their alternate versions. I like to take all B&W and move them together but moving the folder on the HDD doesnt change the location in LR. Is there a way to do it in a batch?
Unfortunately, I am not aware of such a batch method.
Thanks! This has been very helpful! It was getting a mess – same with my Premiere Pro LUTS but sadly there isn’t a good way to organise those yet!
Thanks, Rob! I was organizing my presets yesterday ehehe! it would be amazing to have a field to search by name, so we can avoid scrolling up/down from the list, specially when you have tons of presets, and find it by their names. what do you think?
Rob, nice review.Thanks.One my list of things to do was to clean up my reset list. This was very helpful & timely!