
Focus Stacking for Photographers Made Easier (thanks to Lightroom)
Note: This isn’t just for Focus Stacking (see toward the end of the post).
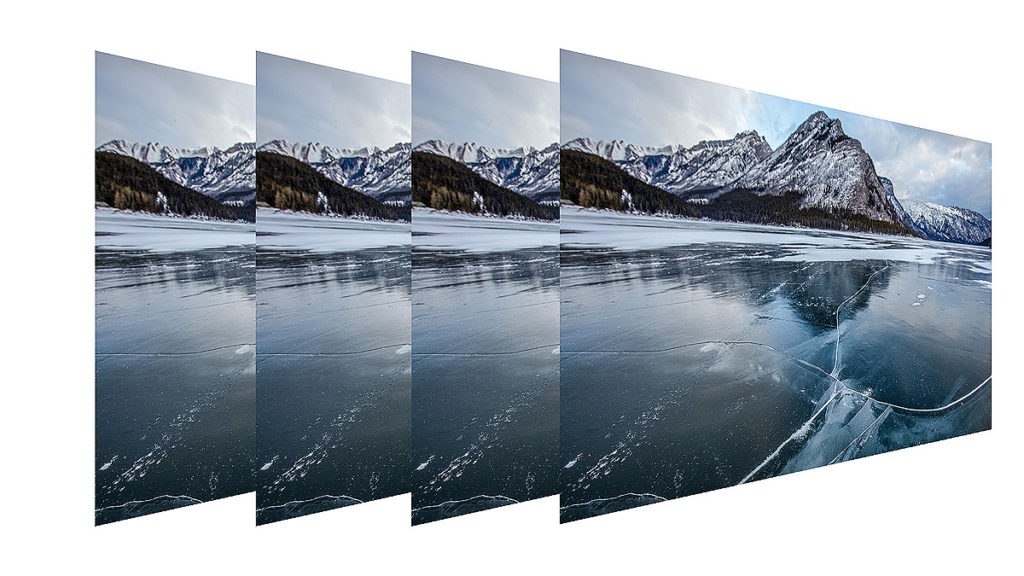
If you’re not familiar with focus stacking (where you create an image with extraordinary sharpness by taking multiple photos; each one focused a little further into the image, and then you have Photoshop automatically combine all the sharp parts of each image into one crazy sharp final image), then check out this tutorial from my daily blog. It teaches both the shooting technique in camera, and then how to have Photoshop combine the images into one for you.
That tutorial of mine uses a Photoshop’s built-in scripting feature to do part of the chore, and that definitely freaks some users out (as soon as they hear the word, “script” it’s like “I’m out.” However, there’s a way to make the Photoshop part of the technique three clicks total by using Lightroom up front to make the Photoshop part that much easier. It’s super simple (in fact, it’s really just one step. Well, one and a half, I guess). Here’s how it’s done:
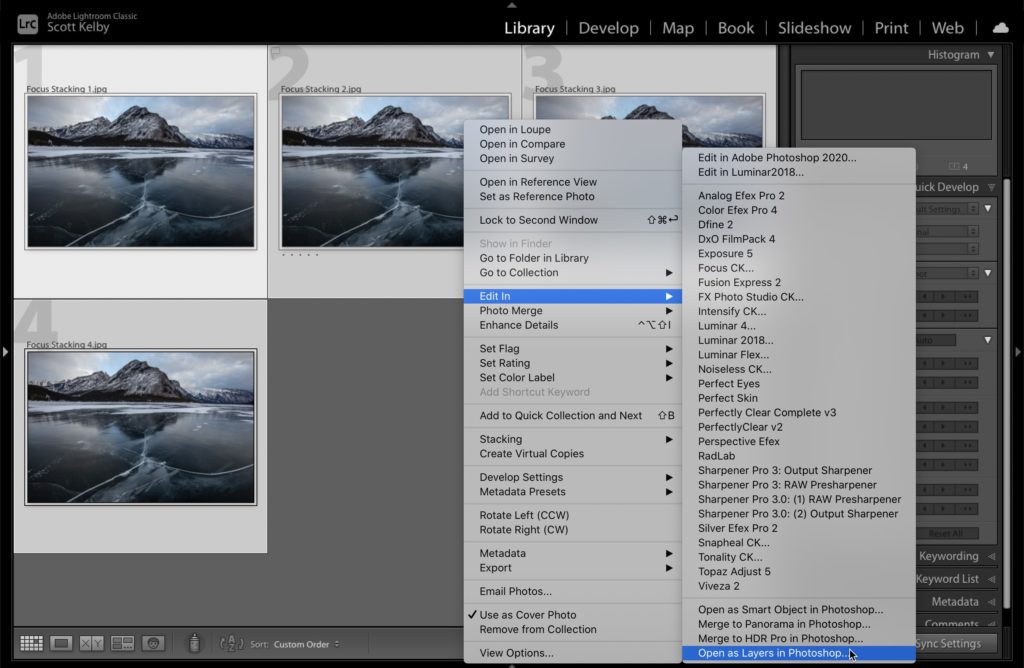
In Lightroom, select the images you shot to be focus-stacked. Now right-click (Mac: Ctrl-click) on any of the images and from the pop-up menu that appears, go under ‘Edit in’ and choose the very last choice on the list, which is ‘Open as Layers in Photoshop.’ If you’re just using Photoshop (like I show in that tutorial) then you’d need to run a script to do this (or I guess you could do a lot of manual copying and pasting of images), but this is the fastest, easier way to get those images over to Photoshop; all in the same document, with each image already on its own layer, and now you’re ready to let Photoshop do it’s layer blending focus-stacking magic. Yes, it’s that easy. Again, here’s a link to the tutorial on how to do the all the rest (shooting and post-processing), but now you’ll replace the script stuff with this trick you just learned.
It’s not just for Focus Stacking
This is also incredibly handy when you’re going to be doing a composite in Photoshop, because again, it takes the images you select in Lightroom; opens them all in Photoshop in one single document and puts each image on its own layer, so now you’re ready to start compositing. What if you’re doing real estate photos and you’re going to be making parts of each room? It works great for that too. You can probably think of half a dozen reasons or more why you might like a bunch of images in Photoshop as their own separate layers, and now you know how easy it is to make that happen.
Hope you have a safe, happy, healthy weekend, and I hope to see you here again next week. 🙂
-Scott
P.S. On Wednesday we did our monthly ‘Blind Photo Critiques” episode of The Grid. Terry White was my guest, and of course we wound up using quite a bit of Photoshop and Camera Raw to fix and tweak a lot of the images. You can watch the whole episode below:

As the steps to focus stack r always the same, surely it must be possible to add a new lightroom “edit in” function to trigger a photoshop action to automate the process, anyone done this?
Just use the Export dialog and have it include a droplet to run the action.
what exactly did you mean by “What if you’re doing real estate photos and you’re going to be making parts of each room?”
I’m pretty green, explain like I’m five? 🙂
LR Classic needs to include focus stacking to a DNG output the same way it can do panos and hdrs.
They have the code already, add the value into LR as a native feature.
That would be cool. Gets my vote!