
Howdy, everybody. It’s a new year — lots of new Lightroom users coming on board these days, and so I thought I’d kick this week off with how I think about “Clarity” (more precisely, the Clarity slider in Lightroom Classic or CC). I think of it’s as the “detail enhancer.” If I want to bring out texture our detail, I know it’s the slider to reach for.
Here’s a bit more in-depth on it, including a tweak I do to get better results:
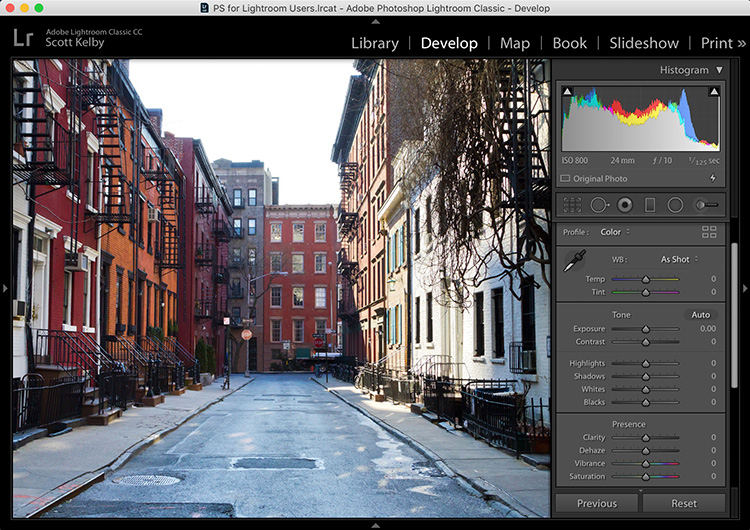
Here’s our original image (it’s a stock photo from Adobe Stock).
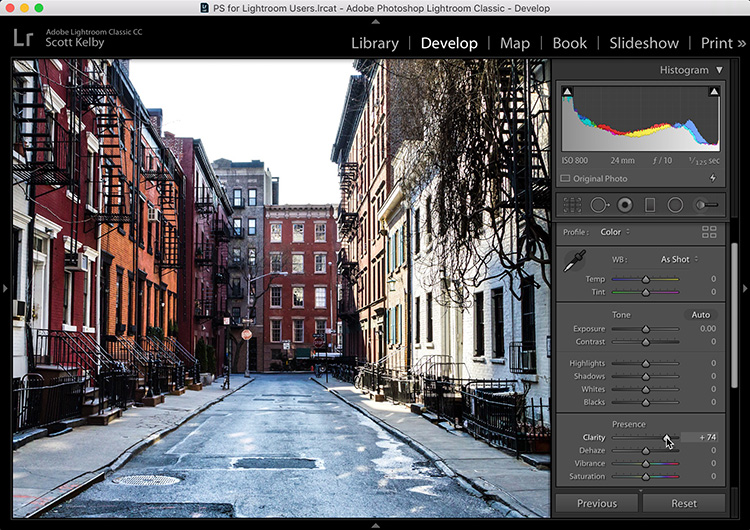
STEP ONE: If I see an image like this which has a lot of texture (the street, the sidewalks, the bricks on the buildings, the metal railings, etc.) I reach for the Clarity Slider to enhance the detail and texture. I cranked it up a lot here (I dragged it over to +74), which works for images that have a lot of hard edges like this. You couldn’t get away using this much on images that have people in them — it makes them look kinda bruised and dirty. You’ll know if you’ve got too far is you start to see dark halos appear around the edges of things in your image. Here I was able to crank it up big time, because of the nature of the image.
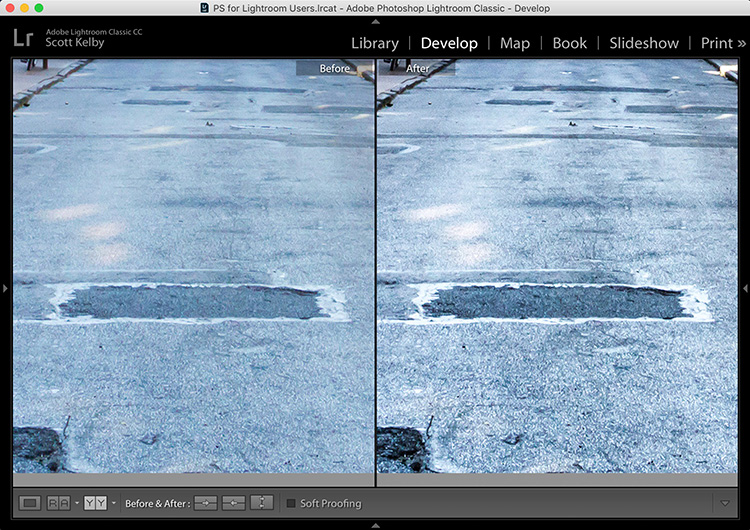
STEP TWO: Let’s zoom in (Press Command-+ on Mac or Ctrl-+ on Windows) and then look at a before and after view (press the letter “y” on your keyboard to get to this side-by-side view). The original is on the left, and the version with added Clarity is on the right. One side-effect of applying Clarity is that it tends to make your midtones darker (after all, what clarity does is add Midtone Contrast). You may be totally cool with that, and depending on the image, I often like how those darker midtones look after applying a bunch of Clarity, but if you don’t like how it looks, then go on the next step.

STEP THREE: My fix for the midtones looking darker is to (wait for it…wait for it…) brighten the midtones; dragging the Exposure slider to the right a bit, usually between +20 (as I did here) to +30, but of course, as always (say it with me now), “It just depends on the image.”
Well, there ya have it — short and sweet. I hope that helps those of you who might be hesitant about using Clarity, or maybe you’re hesitant about using a lot of Clarity, but when you use it on the right type of image, it can really make a big difference.
Hope you found that helpful (and if you did, let me know in the comments, so I can do more tutorials like this). It’s a new year, full of opportunities and possibilities, and here’s wish you lots of both. 🙂
Thanks,
-Scott
P.S. It’s one month ’til Valentine’s Day. Never too early to start planning (said the man who will be married 30-years this September). 👍


I will sometimes use the clarity in the other direction to smooth skin. Just a little goes a long way in easily hiding pores and small blemishes.
This article provided some very useful facts on the effects achieved through use of the Clarity control. I would appreciate other such articles.
Hi Scott,
Thank you for this tuto.
The trick for darker midtones is very interesting.
What do you think about Adobe clarity with respect to ON1 dynamic contrast, topaz clarity and precision contrast and Luminar advanced contrast which allow to process small, medium and large details ?
I often feel frustrated in lightroom having only this unique slider.
Same stands for local sharpening which uses same parameters than global sharpening.
I really wonder how the gurus of adobe who promoted small and large details don’t allow to process sharpening global and local independantly.
best regards
marc
Hi Scott,
Hey thanks for the tip! One question I have is should you do Sharpening First before using Clarity or does it even matter? I always use LR Sharpening before I do any Clarity or Contrast because of halos and stuff. How do you approach it?
Thanks,
Dennis
You should always Sharpen last. The reason is that everytime you make a change to the size of an image, you will want LR to sharpen different amounts. So get everything all set, then sharpen — Especially of you are Auto Syncing your Develop Module.
https://photo.stackexchange.com/questions/9439/why-should-my-last-post-processing-step-be-sharpening
I used that a lot but now I perfer dehaze tool to help photos look sharper
“You couldn’t get away using this much on images that have people in them — it makes them look kinda bruised and dirty.” How would you improve detail in photos of people?