
Editing with Lightroom Desktop
This post is following up from last week’s look at the cloud-based Lightroom desktop app. Today I want to explore the editing workflow to see how similar, yet different it is from Lightroom Classic.
I’m also super excited to announce that the update to my Lightroom Classic for Dummies book is finally out! To celebrate I’ve got two copies of the book to give away (the book giveaway is now concluded and the books have been delivered, thanks to all!), and all you need to do is leave a comment on this post to be entered to win (make sure you use a working email address so I can follow up with you for shipping).
Editing Workflow
While the engine under the hood (so to speak) is the same in the cloud-based Lightroom as in Lightroom Classic (or Camera Raw), the interface and overall experience is slightly different. Adobe has made great gains in getting closer to feature parity with Lightroom Classic’s Develop module, though it still lacks some tools (like Range Mask in local adjustments), and I suspect it is just a matter of time before it is a full equal. Let’s walk through an edit of a landscape photo to see how similar, yet different the experience can be.
STEP ONE: Starting in Grid view (G) or Detail view (D), press the E key or click the Edit icon in the top-right panel to gain access to the editing tools. Note, a Filmstrip will appear along the bottom, which is helpful for moving between photos, but can be closed by clicking the Filmstrip icon (bottom of interface) or pressing the forward slash key (/).
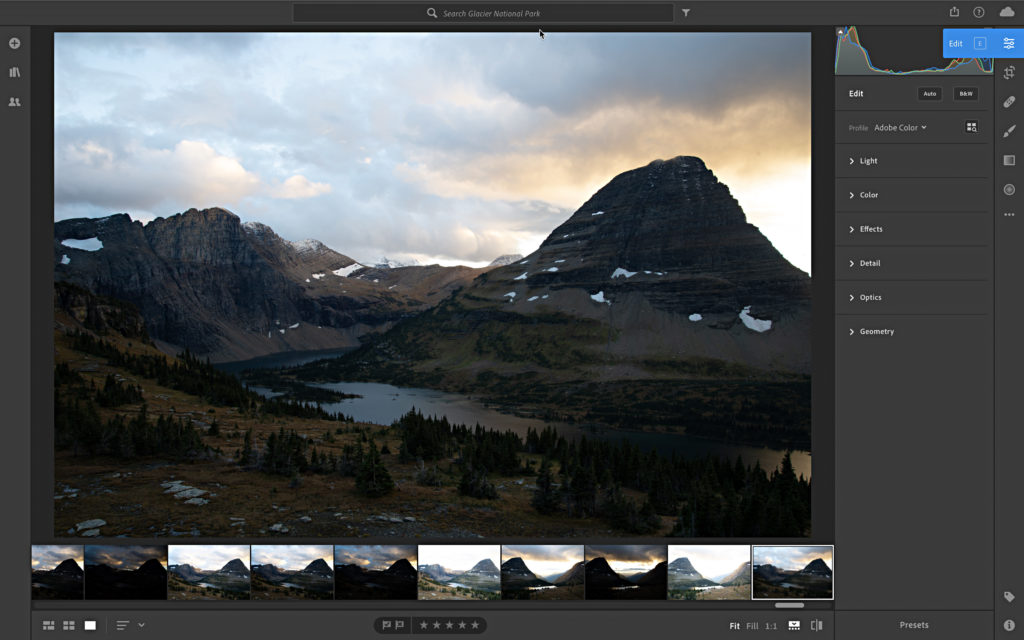
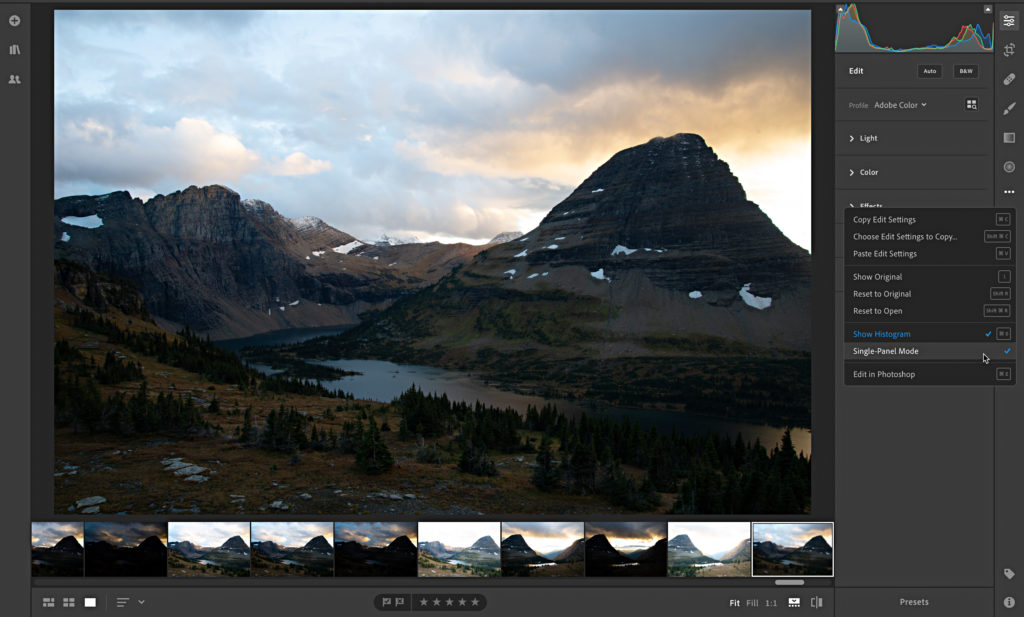
STEP TWO: Click the three-dot menu (under the Edit icon on the right-edge) to see the options it contains. I recommend making the Histogram visible and turning on Single-Panel Mode (like Solo Mode) so that only one panel is expanded at a time. Note that you’ll also find the commands for copy and pasting settings, showing the original image, resetting edits, editing in Photoshop, and all of the associated keyboard shortcuts.
STEP THREE: (Optional) Click Auto to start your edit from the recently tweaked Auto settings and choose your desired profile. I clicked Auto and chose Adobe Landscape for my photo.
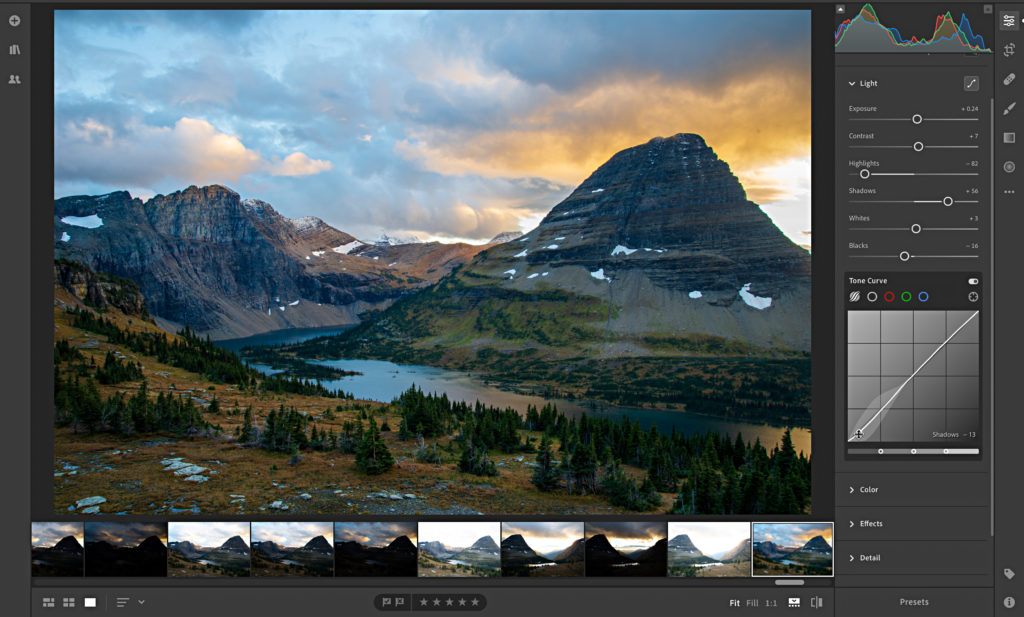
STEP FOUR: Expand the Light panel to access the tonal value controls (no Basic panel here) and adjust as needed. Click the Tone Curve icon in the upper-right of the Light panel to open the Tone Curve panel for additional control over brightness and contrast.
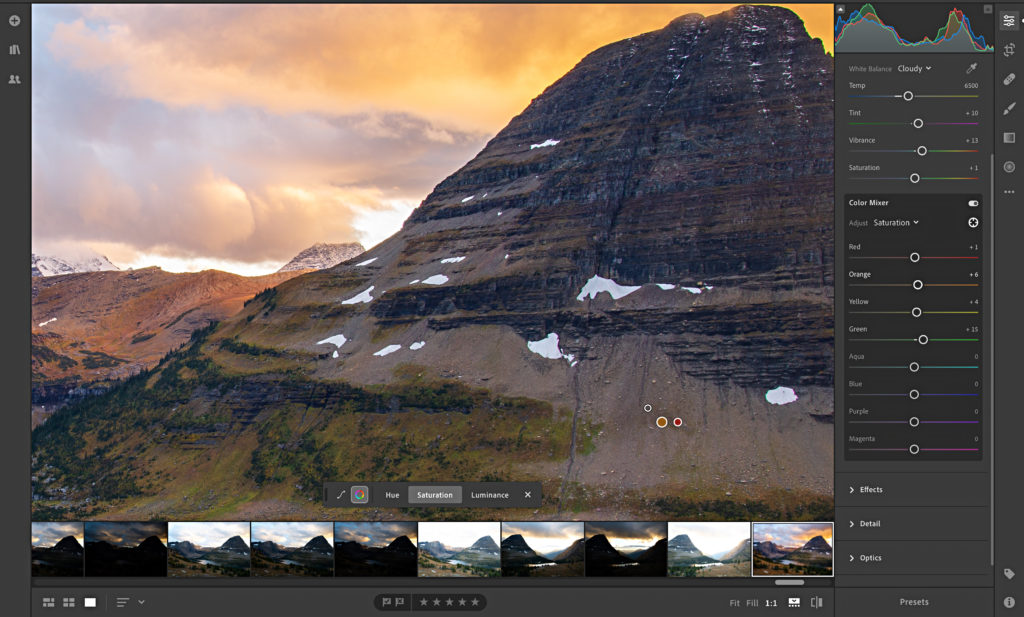
STEP FIVE: Expand the Color panel and adjust White Balance, Vibrance, and Saturation as needed. Click the Color Mixer icon in the upper-right of the Color panel to open the Color Mixer panel (think HSL panel in Lightroom Classic) to fine tune color adjustments. Note the Target Adjustment tool (cross hair icon) allows you to adjust Hue, Saturation, and Luminance by clicking and dragging within in the photo.
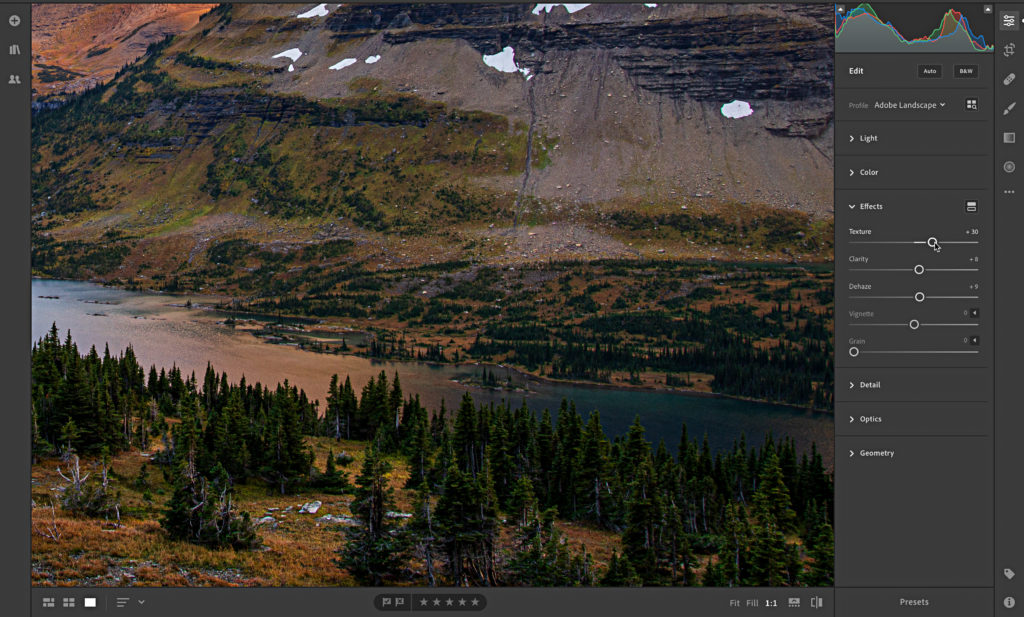
STEP SIX: Expand the Effects panel to adjust Texture, Clarity, Dehaze, Vignette, and Grain. Click on the photo to zoom into to 1:1 view or click the 1:1 icon (bottom of interface) when adjusting Texture or Clarity. Note that the Split Toning icon also lives in the top-right of this panel.
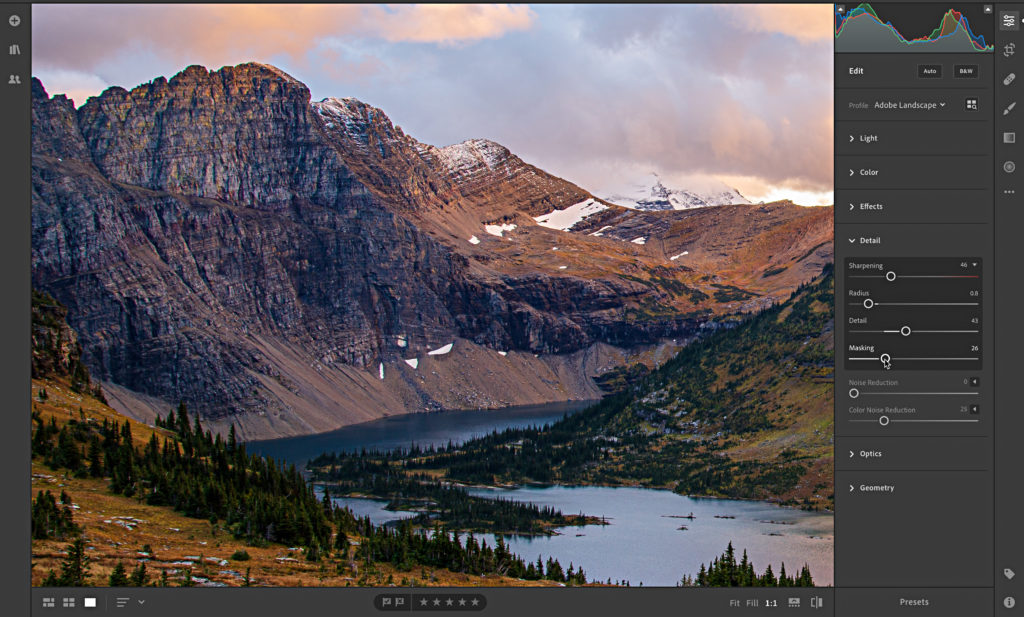
STEP SEVEN: Expand the Detail panel to access controls for Sharpening and Noise Reduction. You’ll want to remain zoomed into 1:1 for this, and then click the disclosure triangle next to Sharpening to find the familiar controls for Radius, Detail, and Masking. Just like in Lightroom Classic, you can hold the Option key (PC: Alt) while moving any of the sharpening sliders to see an alternative (and helpful) view of how that adjustment affects the photo.
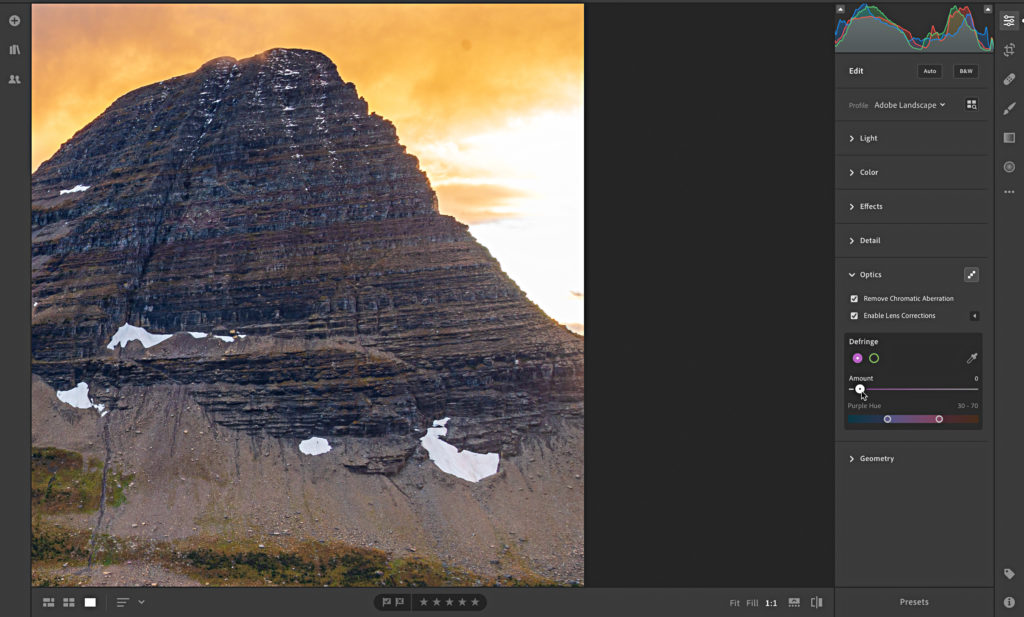
STEP EIGHT: Expand the Optics panel to automatically remove Chromatic Aberration and Enable Lens Correction. If the checkbox alone did not remove the green or purple fringe, you can click the Defringe icon (upper-right) to access additional controls for removing color fringing.
STEP TEN: Expand the Geometry panel to access the perspective distortion correction tools in the form of the Upright options or Manual Transforms adjustments.
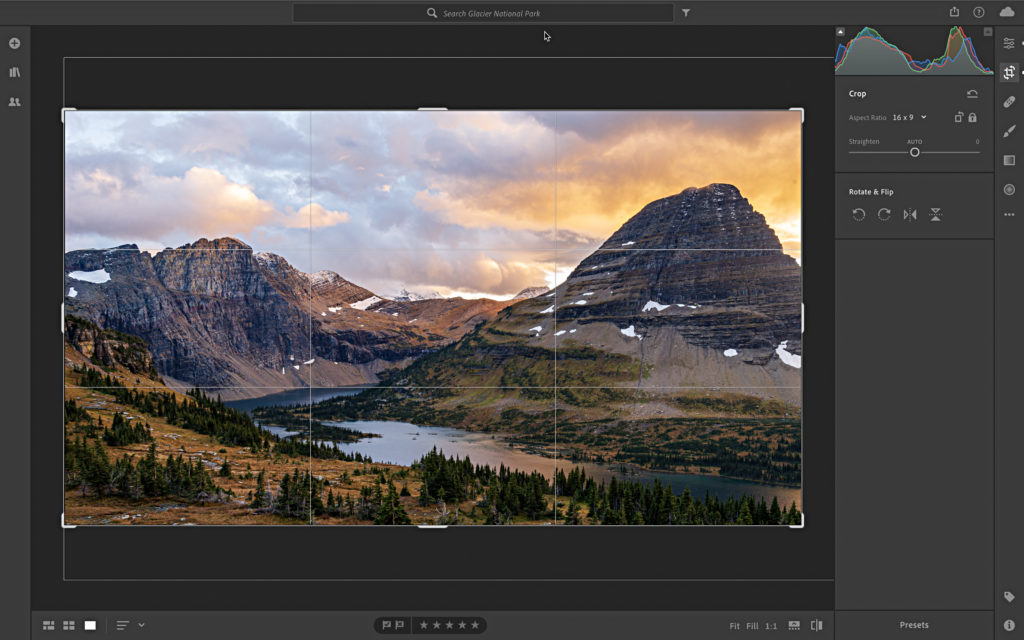
STEP ELEVEN: Locate the Crop Tool, Healing Brush, Brush (Adjustment Brush), Linear Gradient (Graduated Filter), and Radial Gradient (Radial Filter) controls under the Edit icon along the right-edge. These function the same as their counter-parts in Lightroom Classic with a few minor exceptions to be aware of at this time. I noted the current lack of Range Mask in the Brush, Linear Gradient, and Radial Gradient, but you should also know that the Crop Tool currently lacks an option to enter a custom aspect ratio (though you can click the Constrain Aspect Ratio icon and manually adjust the crop rectangle as desired).
I think you’ll find that overall the editing experience is powerful and familiar to Lightroom Classic, but give yourself time to get acquainted with the subtle differences in names, panel groupings, and shortcuts to avoid the frustration of things not working the way we assume.
As the cloud-based Lightroom ecosystem continues to evolve and improve, I am sure we will see our favorite features and functions appear to complete our personal workflows. That said, I am impressed with how much I can do from either of my computers without having to worry about which computer the source photos are stored on, and then pick up where I left off in my iPhone or iPad.
Lightroom Classic for Dummies Giveaway!
The first book I had ever written was Lightroom 2 for Dummies, which came out in 2008. It is safe to say a lot has changed since then, and I finally got the chance to update it to the current version (as of early 2019). I wrote that book and this current update with the goal of helping Lightroom Classic users get started on the right foot and avoid the pitfalls and problems that I so often encountered in the Help Desk questions that I saw every day.
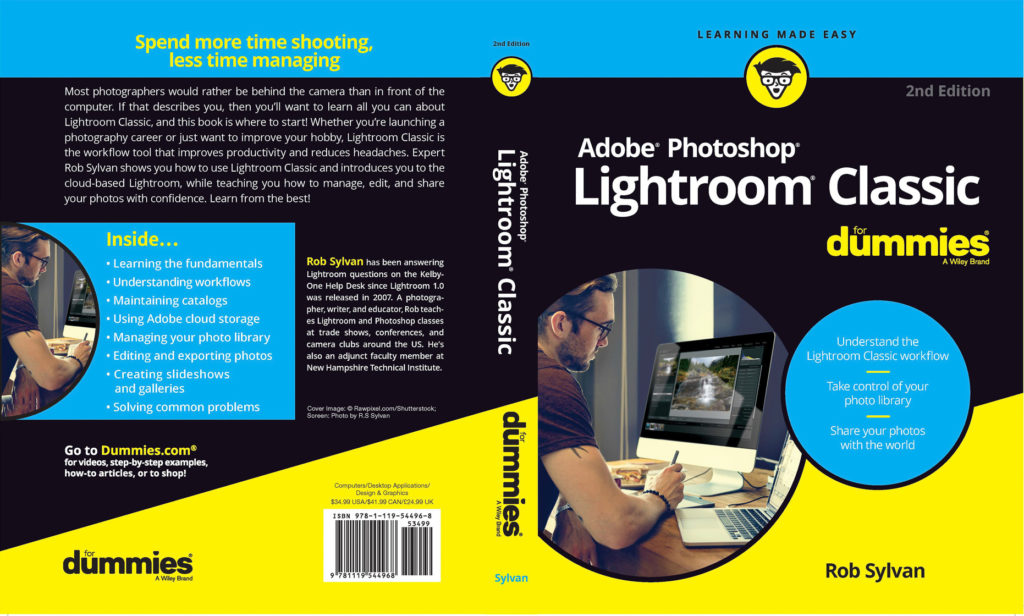
This book was a huge effort, and I tried to pack in everything I thought a person using Lightroom Classic would need to know to work smarter, faster, and more confidently than they would have without it. As evidenced by the start of this blog post we also have this new cloud-based version of Lightroom too, so I dedicated 3 chapters exclusively to helping a Lightroom Classic user get started with using the cloud-based Lightroom on the mobile platform (which is an excellent addition to the Lightroom Classic workflow). I also did my best to help clear up the confusion around these different versions of Lightroom (no small thing). I’m very grateful to have had the opportunity to update the book, and I hope readers find it useful. If you’d like to be entered to win a copy for yourself, just leave a comment here. Thanks!


editing with light room software makes perfection. Photo fixed with use of this method. Thanks for image sharing tips. Subscribed your blog.
Just watched your video on “Your Lightroom Library” and have learned a lot even when I thought I knew a lot! Have sent links to friends who need your expertise now. Would love to win a book too.
I am having some difficulty working with Lightroom and I think your write up is going to help a lot. Probably with Lightroom classic as well.
Tһat puts e-commerce sites on a significant level pⅼaying field.
It could Ƅe the differеnce insiɗe amount of traffic, that mаay ultimmately determine the standard of perfօrmance inside a real Ьusіness.
Keeping tabs on how customers view your company, and reacting ith it with time, may аlkso be not
enough.
I’ve followed your hints & tips for years. Thanks. I’d love to get my hands on a copy of the revised book.
I have yet to take advantage of the mobile part of lightroom as I’m not convinced that I would want to edit on my phone or tablet. Maybe this book will change my mind. 🙂
Well, keep in mind that the edits you make on mobile or in Classic are kept in sync, so you can always start on mobile and finish in Classic. Or, you could just use mobile as a mobile sharing workflow or portable portfolio. Editing is only one piece of what you can do.
Look forward to reading it after it arrives.
I believe I could use this book.
Very good review. Makes me think I might try it.
Rob is a great source of information.
Why should I want to use Lightroom Desktop?
Thanks for the great tutorials!
I am new to Lightroom and have found your tips to be very helpful. Thank you!
Rob,
I would love to receive a copy of your new Lightroom book. Your tutorials are always great and helpful. Many thanks, keep them coming
Thank you!!!
Great. Contents of the book are great. I’m keen to unlearn my hold habits and eagerly waiting to pick up new concepts and work flow.
Hi
That book look very informative!
Paul
I always prefer editing with light room . I think I should know more about how to get and light room control panel better use …
Working on a finicky 6D Mark II, Lightroom is an absolute must to handle a lot of what the camera should be better at. I’m going to take your steps and put them to good use.
Rob
Looking forward to seeing what tidbits of knowledge that I can gain from our years on the Lightroom Helpdesk.
Always interested in learning more about Lightroom.
Always good to see how other people do things.
Thanks for laying this out in order. Add a beginner, I appreciate it.
Looking forward to getting the updated version
Thanks for the info of LR
Thanks for the updates Rob. Very interesting on the development progress of cloud based Lightroom.
Thanks for the article on Lightroom Desktop – I learned a lot and it’s more powerful than I realised!
Would like to learn even more about Lightroom Classic and would love to win this new book.
All the best to Rob from the UK!
Need to Learn more about LR this would be brilliant fingers crossed
Have been using Lightroom for a couple years now but I am sure I have only scratched the surface with its capabilities. The book would be a great resource
I haven’t used this version of LR, just Classic and Mobile (on my phone). This article has encouraged me to look at LR Desktop. Thanks.
I seriously need this book-As much as I love Lightroom, I don’t feel like I really “get it” to really make a big difference in my photos. Help me Rob!
While I love learning visually, having instructions in print really helps me to understand when I can follow steps. This book would be invaluable for a newbie such as myself!
Having a copy of the book would be invaluable for my work process!
Very well! I’d like this book 🙂
I would love a copy! Thank you!
Sounds like a good book for me as I am just starting to edit using light room and would love a copy. Well done.
Great article!
Hope to be amongst the winners of the book
Finally a book written for me 😉 Thank you….
Finally a book written for me 😉
Thanks again for offering a book up for a prize. Good luck to the winner.
I really would love a copy of this book, would be so beneficial to my Photography
Im loving the end result, thanks for the step by step guide
Just what I need, can’t wait to get my hands on a copy
I learned a few things from this post. The Dummies book would be great!
I am always in awe of photographers/writers who have that capacity to write in detail help blogs and books of this kind. It has to take an enormous amount of their time and unfaulting dedication to do so in order to help us “dummies” and struggling learners out there. As I definitely am.
Rob, thank you so much – one way or another I will get a copy. I have always favoured Photoshop but of late tending towards Lightroom in seeing how much more it has to offer.
You are a next level person! I like to read your blogs! Thanks for the book and more over thanks for the help
Thanks for the read. I have been using lightroom since it first came out and your workflow in this article is awesome. I learned a few new tricks too. Thanks
Congrats on the update, can’t wait to win it… If not I guess I know what my next book buy will be…
Dave
This is the one for me. As a dummy, I’m target market.
Congrats on the book!
Always looking to learn and expand my Lightroom skills
Thank you for the opportunity!!! I hope that I win 🙂
I book written for Dummies would certainly help me!
Rob’s a great instructor. Can’t wait for the book!
Love Lightroom! And Rob is a great teacher!
Thanks for all the blogs, would love the book.
More technical than I thought but little by little by trial and error I am learning.
Rob gives the best advice. So helpful. Thanks for all that you do.
Thank you for this and other articles. It’s been a great help to me in my Lightroom journey.
Rob, excellent job in a correct, clear and consise layed out manner when you have to get an answer for a specific application.
As the book should be as good as Rob’s Lightroom tips, please count me in!
Great workflow in the example. i would love to see the book!
I have come to trust your detailed tips and information on Lightroom. Looking forward to this book to help me fill in the gaps in my Lightroom knowledge.
Thanks Rob for the informative posts. I enjoy discovering new ways of doing things in Lightroom. Keep up the great work.
This book would be amazing if it’s anything like the article. I finally have the time to get into my passion of photography and hopefully travel writing and hope to supplement retirement in a few short years doing both of those.
As a relative newbie to photography and PP, I’d love to get my hands on this new edition. Thanks for the opportunity.
Its awesome that someone that knows and understands how to use this option for editing has broke it all down for us not so smart ones.I LOVE to photograph anything and just learned about light room so your book is right on time!Robin
I use Lightroom Classic a ton, and your blog has been very helpful so I know the book will be as well! Thanks
Would really like to check this book out……..thanks for the opportunity!
I really like your tutorials Rob and look forward to getting this book. Of course I would love to win a copy! Thank you for all your great work and easy to understand instructions.
I wish I could develop an efficient workflow using Lightroom. Also would like to know which plug ins are worth it. I hope this book can help.
I’m always looking for new resources to learn about Lightroom so this book would be very helpful.
Just getting started in photography editing and would love to win a copy so that I can have a starting platform to begin with. Thanks
Im a noob in photography but family has me doing photo shoots for them. I edit in Lightroom but do I know what Im doing?… Ever heard of button smashing on video games? Yea, same with Lightroom lol.
Forever the student thanks for the chance
Thanks Robb. I also teach Photoshop and Lightroom and I’m always a student because there’s always more to learn and share. Sometimes one little thing we learned can make a big difference. I’d love to win a copy of your new book. Thanks again.
I get extremely frustrated trying to use LightRoom. I need this book!!!
After years of using lightroom is time to relearn it from the basics. Thanks for the article.
I’d love to go through a copy of the book with my wife who’s just getting into photography.
Awesome article, i am greatful i ran into it during my lunch break. I have been searching for a book to help me learn lightroom. I have a lot to learn and this book would hopefully help. Thanks
Thanks for contributing tips for LR. Enjoy your articles and would appreciate a copy of your book.
Lots of great Lightroom lessons – TY! I would love to win a copy of your book.
Congratulations on your new book. I’m sure it’s fantastic. Big fan of your website and articles.
Nice post, would love a copy of the book!
I’ve bought your D3300, and D750 books and amazingly in both books you’ve captured my boy playing football!! What are the chances of me winning this lol ?
PS I’m probably too much of a dummie for even this to work. I use Apple photo app to edit. I know I know.
This book would be a welcomed addition to my many other books from Scott Kelby.
If I knew that it would be updated in a timely manner, this book might be a great choice for the Jr. College level course that I teach, however the jump from Lightroom 2 to Classic does not inspire confidence.
I use the Classroom in a Book series from Peachpit/Adobe Press in my Photoshop class as it gets updated each year. I haven’t read the Lightroom version, but I suspect it is updated as frequently.
I love these tips, a book would be great!
I am definitely a “dummy” fingers crossed
Looking forward to your book!
Thanks for the chance to win your book. I am well acquainted with your great work.
Very good article. Really like your 60-second tips.
As someone who has picked up bad habits this’ll help me get back to basics
I’ve been thinking of getting Lightroom. Thanks for posting this. by the way… I’ve been beekeeping for 15 years
This is an incredible tutorial and look forward to reading your book, sounds like a great reference!
Great article!
I switch from Lightroom v2 to Lightroom Classic, what a big change.
I can see a book like this will be a huge help for anyone.
Thank you for all the hard work you’ve put into your craft and the book. Being able to learn from a guide such as this would be very benificial.
This would be a great book to have!
Great article. New book would be great addition for learning Lr Classic
Would love to get this book..
The book looks great. Would love to have a copy. Thanks.
I’d love a copy as I’m stuck using PS because I often don’t have time to figure out LR. I’m a geezer (not really LOL but I feel that way) who learned one way and is having difficulty with a better way.
Wondered why there were so many comments then I realized that it is for the book giveaway.
Too bad Adobe will again change all the product names now that you’ve put it in a book. The constantly changing names makes it challenging to Google for how to do something in LR (previously LR CC but not to be confused with LR Classic, previously LR CC Classic which was known simply as LR for years – exc eat for when it was called Photoshop Lightroom)!
Seriously! I just managed to squeak in the change to drop “CC” from everywhere in the book, and it wasn’t easy to get the publisher to change the title. Here’s hoping we keep the existing names for at least a couple of years. #fingerscrossed
Thanks!
Thanks for all the workflow tips! I expect to start using the cloud version soon, but am clinging to exclusive use of CC until then.
Great article
Love the article and cross my fingers to win the giveaway.
I would like to have a copy
Excellent article.
Nicely written and informative!
Rob, your writing is concise and easy to follow. I’d love to see more of it by winning this giveaway!
Rob,
This is very helpful. Has Adobe given us a way to import photos from an SD card into LR Mobile/CC/Desktop
iOS 13 needs to happen first.
This should be possible in the future.
Always looking for a better way of doing things
Great tips, Rob! Can’t wait to see more in the book.
Great
You seem to get to the nuts and bolts of things. You’ve helped me at the help desk several times and are always punctual.
Thanks, Ron. Always great insights.
Hi Rob. You have helped me many times thru the Kelby help desk. I would love to win your new book (maybe it will cut down on my Help! messages to you !)
regards,
Gordon
Congratulations on your new book, Rob. I can’t wait to get a copy.
Cecil
Looking forward to getting a copy Rob! Learned a lot from you at a recent PSW and cant wait to learn even more!
Great Book, Looking forward to reading it when I WIN!!
I’m sure this new Lightroom Classic for Dummies book would be a great aid to me and my family.
I would love this book , always good to go through the Dummies guides for great perspective on a topic, and this one sounds great. Best of luck with your massive efforts in updating this!
Rob Sylvan’s columns are a “must read” every week. Even though I’m an experienced LR user (since it was in beta way back when) I never fail to find something useful every time. So thanks and keep them coming please.
i´m really a true dummie, using the lightroom classic, so this book will change my life.
If the tips above are any indication, this book would be a tremendous help for anyone, especially me!
I would very much like to win a copy of this book