
It’s been about five years since we covered this gray card technique here on the blog, so…I think we’re a bit overdue, especialy since this is a technique I use so often in my own workflow to get my white balance right on the money.
Using a Gray Card
A ‘gray card’ is just what it sounds like — a card that’s 18% gray that we use to help us set a really accurate white balance. These cards are so handy that I include a perforated tear-out gray card in my”Lightroom Book for Digital Photographers” (so if you have my book, turn to the last page and tear your gray card out). If you don’t have my book, you can pick up a gray card from B&H (here’s a 12″ collapsable one I like by Impact for around $29).
Anyway, here’s how you use it with Lightroom.
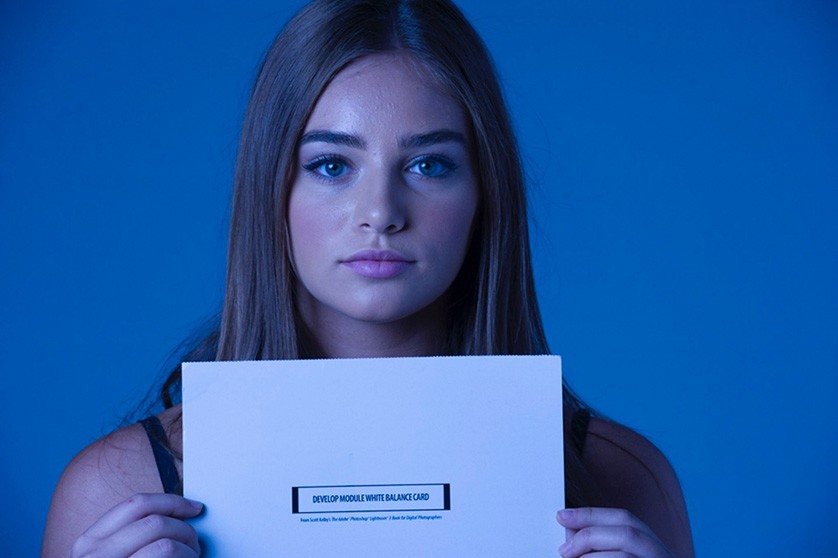
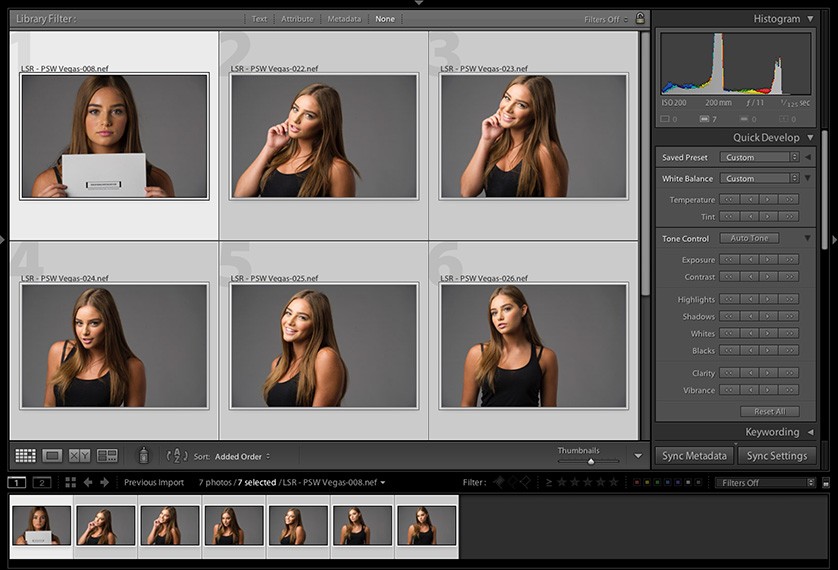
Once you get your lighting set, you’ll need to take one photo with the gray card clearly visible in the scene. In this case, we’re doing a portrait shoot so hand your subject the gray card and ask them to hold it so its in clear view (I usually have them hold it up near their face, like you see above). The card she’s holding here is the tear-our card from my Lightroom book. Once she’s holding the card, just take one shot (that’s all it takes).
Import the images into Lightroom
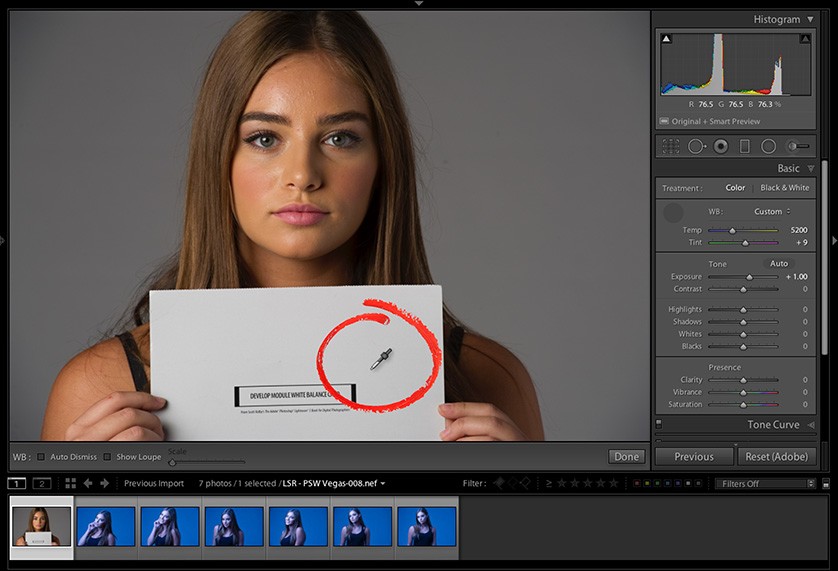
Import all the shots from the shoot into Lightroom. Get the White Balance Eyedropper tool (from up in the toolbar along the top left — it’s the one that looks like an eyedropper 1/2-filled with gray), and click it once directly on the gray card shot (the first shot you imported) and BAM! That’s it! Your white balance is set for this shot (as seen above).
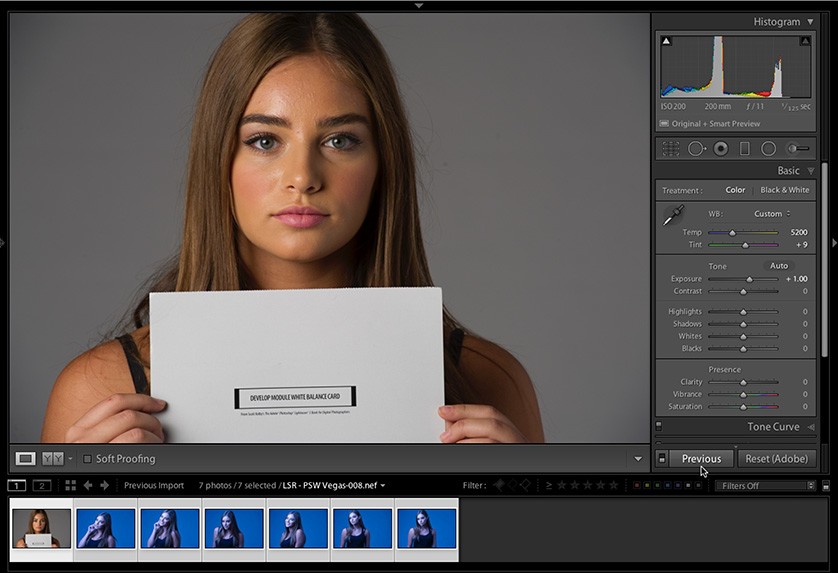
Applying this white balance to other images
Now hold the Command-key (on Mac) or the Ctrl-key (on Windows) and click on any images in that filmstrip that you want to have exactly same white balance settings (the same one as the gray card image you just corrected), as seen above.
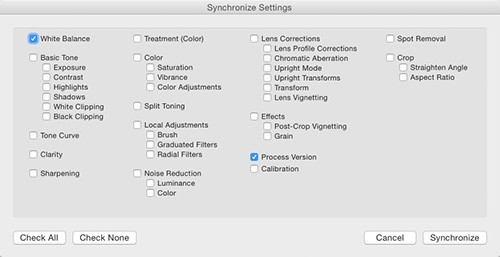
Now click the Sync button at the bottom of the right side panels. This brings up the dialog you see above left. This lets you synchronize all the changes you’ve made to the image with the gray card, with those other images you just selected, but since in this case we only adjusted the White Balance, click the “Check None” button (on the bottom left), and then turn on the checkbox for White Balance (and I always leave Process Version turned on so I’m using the most current math behind the images).
Just One More Click and You’re Done
Now just click the Synchronize button and it instantly applies the same gray card white balance setting to all your other selected images, as seen above (I pressed “g” to switch to the Grid view so you can see how the new white balance was applied).
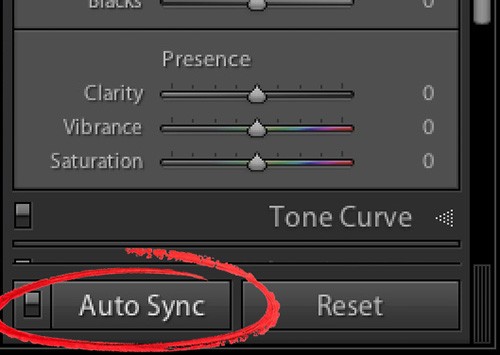
There’s an even quicker way
If you know right up front that you want to change the white balance for all the images in your shoot to match the one where you subject is holding the gray card, then your workflow is slightly different (and much faster). Step one is to Select all your images, then turn on Auto Sync (it appears where the Sync button used to be at the bottom of the right side panels.

Step two is to click on the photo with the gray card it in; click the White Balance eyedropper on the gray card itself, and voilá — all the selected images are immediately changed to that white balance.
Well, there ya have it. Hope you found that helpful. 🙂
-Scott

Scott was still answering in 2020, let’s see about 2023!
I set up four different flashes (and I know none of them are profoto!): A Godox speedlight, a Godox AD400, a Canon 580EX and a Yongnuo 560. I shot an admittedly older Lastolite grey card. All four were pretty consistent, but they each showed around 7500K when I put the eye dropper on them in light room.
All all spec’d at 5600K. Is my older Lastolite the issue? At 7500K they all looked grey
Hi, Steve: Do the process of elimination. Shoot them one at a time, and measure each one and you’ll find out for sure. 🙂
Recently I had a very tricky last minute photo shoot, where I needed to use 2 very different cameras. A Canon Eos and a Panasonic Lumix. What saved me hours of time in Adobe Lightroom, was taking the time to set the white balance on both cameras so the images matched! Great article, these simple tips are the best!
Hi! Thanks for sharing! Is it possible to sync and replicate the white balance to all the selected photos using adobe photoshop instead of lightroom?
Thanks for sharing this awesome article.
To save money I just printed a grey card on photographic paper and laminated it. It’s got 6 different colour values of grey and it has never let me down.
Thank You for this Tips. I will try next time,
It is confusing. LR and PS uses 50% gray for white balance but Scott is telling to use Gray card that is 18% and not 50%. I have color checker passport and when I use different gray patches for AWB, my white balance value changes. So it makes sense to me to use 50% gray card if LR and PS uses 50% gray for white balance..
From X-rite: “… film cameras, dSLRs cameras, and video cameras are all formulated to produce proper exposure when exposed to produce an 18% gray tone.” That’s why if you buy a gray-card from a camera store, it will be 18% gray, and that’s what we use to set a proper white balance. Hope that helps.
Actually, either 18% or 50% is fine for setting White Balance. It could even be 90% or 10% if you wanted. As long as the color is a neutral grey, then LR will properly set the WB when clicking it.
You can’t use random grey % for setting exposure, but it works fine for White Balance.
In fact, when I am shooting street scenes, if the color looks off, I often just find a white tablecloth or white shirt or similar and click on that. Most of the time, that fixes my WB instantly. (When it doesn’t, then I have to manually play with temp and tint to get a pleasing result)
“18% gray” and “50% gray” appear to be the same unit of measurement, but are measuring two different things. More here: https://www.scottwhill.com/posts/how-to-use-a-gray-card-with-lightroom-to-nail-your-white-balance-every-time
Good tip not always possible to find a pure white in the image
If you click on a white area within the image, Lightroom will pop up a warning telling you that area is too bright to set a white balance from.
Hi,
Click on Black and White button, and with the Eyedropper tool you will have same % RGB …
I do not understand why the photographer did not use AWB or manual white balance settings under the shooting. Using Lightroom and gray card for some kind of micro correction it is ok but I like to shoot with a correct wb setup to see what I will get later. It is very trivial and easy to set up wb on each camera.
Not always that easy. Sure, in the specific studio situation mentioned that is trivial. However, I was doing a survey of building paint colors in our town last week. Some walls were in the shade, some in the sun, some under artificial light, some under a combination thereof.
Rather than trying to come up with a custom WB for each image, I just shot the wall with a grey card in the image. Each image was slightly different, but each image became calibrated with one keystroke (‘w’) and one click (on the grey card). I zipped through all 90 images in less than 2 minutes, and had every one of them calibrated and ready to compare / contrast as the project needed.
your white balance on your camera need to not be on awb right ?
Doesn’t matter. Set it to deep purple if that makes you happy. As long as there is a grey card, then one keystroke (‘w’) and one click (on the card) will set the proper WB.
You can only use the trick of syncing the photo WB though, if the lighting did not change. So, if in the studio, with the same lights on every shot (same color lights, not necessarily the same number or position of lights), then that trick works fine.
If doing street photog, where each image might have different lighting, then you cannot just sync the images after doing one. Each image there will need to be processed separately.
Thank you for the information on that superior product, John MacLean. love quotes
I definitely need to get myself light room and a grey card. Color is always so difficult and time consuming the way we do it.
Is it not a good idea to have a colour chart too, as a further reference?
Might just remind you that you have not calibrated your monitor for a while.
Love Lightroom, love your tips. I bought the LR 4 book and it helped me learn how to use it. Now I am trying to add Photoshop to my skill set. Problem is, I found your PS CC book to be directed more toward people who understood a lot of things already! I had to find out what “Bridge” is, and had trouble figuring out how to open Camera Raw. And there was not much in the book about how to use layers. There were other things, but don’t want to make a list!
Naturally, I was disappointed after my positive experience with the LR book. I am hoping you will see this (no response to my comments on your facebook page), and offer some suggestions. I certainly don’t want to have to buy another book!
Which of your many books has the grey card? A search didn’t bring up the title “Lightroom Book for Digital Photographersâ€.
Thanks
For shooting tethered, I’d like to know how to take a Gray Card reading first, and then have all the shots I take during the shoot load into Lightroom and apply the WB edit. Thanks!
Heather, check your camera manual for instructions on setting a custom WB. Then it will come into LR as you shot it.
Yet another “Killer” tip Scott! It’s worth mentioning that (like all things printed) gray cards age. If you use a gray card that’s a bit on the “vintage” side and your white balance doesn’t come out looking neutral, it may be time to replace your gray card.
And color experts will say that Grey Cards aren’t spectrally neutral. It’s better to use an X-Rite ColorChecker/Passport, and WB click on the light grey patch below the green patch.
Thank you for the information on that superior product, John MacLean. However, there are 2 gray patches under the green one. Should it be the left or right one? 🙂
On the 6×4 grid half, either of the 2 center grey patches in the center of the grey scale row will work; the darker one I think is the real intended one (?). Adjust LR so your white value over the white one is somewhere around 95%, and on the black one it should be about 5%. Then click the white balance eye dropper on either of those 2 center grey squares. Individual R-G-B over any square on that row shouldn’t vary by more than a couple %.
X-rite is just a more expensive grey card…
Yes, it also gives you lots of color patches, so you can use it in tricky situations to pinpoint specific colors. However, in 99% of the time (and 100% of the shoots I have done) a grey card is perfectly fine, and an X-Rite card (which I also have) is just a nuisance — smaller target square to hit when you need to do so in LR…
Thanks
Thanks for the tip. Have you considered adding a ‘pin’ button for Pinterest on this site? I like to collect tips and tricks and Pinterest is a nice way to compile them all in one place. Cheers.
Hi Sharon,
you may add up a plugin to your browser (if you are using Chrome) just go to “chrome store” and search for pinterest and follow the simple instruction.
hope this will help.
Any suggestions on getting a proper white balance while shooting a lacrosse game?
What should the white balance in the camera be set to when shooting JPG with studio strobes?
Hi Claudia: I usually set mine to “Flash” – hope that helps 🙂
🙂 or you can use manual 5500K it is good for most of the flashes.
AWB also a good option:-)
Only as long as you don’t use any gels….
Great call. Many years ago, when my previous employers shut down their darkroom they told me to take any (minor) resources I wanted…. the grey-cards were one of the better finds. Really makes a difference. They also help as my uncalibrated monitor is a little cool.
Great advice Scott
I have maybe a stupid question since I am new to the photography side but I am more of a video guy. Why not just set the white balance in camera before the shoot? That way you would have a some what decent raw shot of the image before color correcting.
If you were shooting a party would you need to take several grey card shots pointing in different directions as the light may vary or would one shot be “good enough”.
I love your LR tips Scott!
If you were shooting a party would you need to take shots of the grey card facing different locations in the room as the light could look different in different areas? Or would one grey card shot “be good enough”?
Love your LR tips Scott!
Scott,
Good tip but I tend to set white balance in camera (D800e) using a gray card.
I use a colorchecker passport in my first photo to set color profile in Camera Calibration.