
Have Lightroom Automatically Organize Your Collection Using “Auto Stack”
Hi Gang. If you haven’t considered using the Auto Stack command to quickly bring some order to your collections (creating pre-sorted mini-collections inside your collection), give this a quick look:
[NOTE: This feature also works in Folders, where it was first introduced. Thanks to reader MattS for the reminder.]
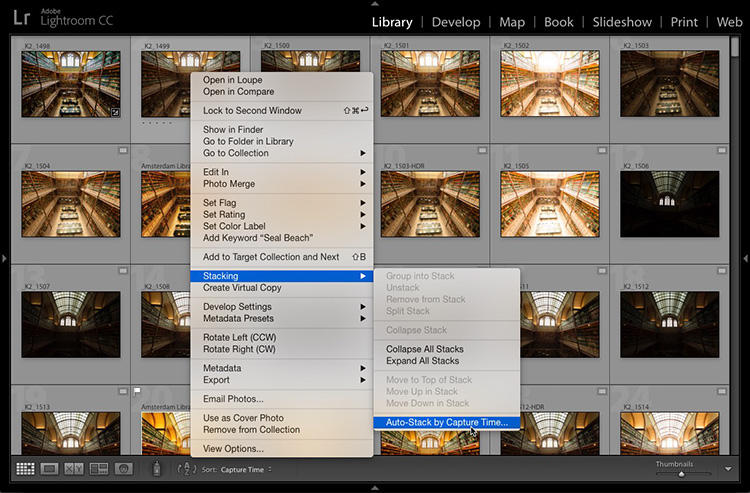
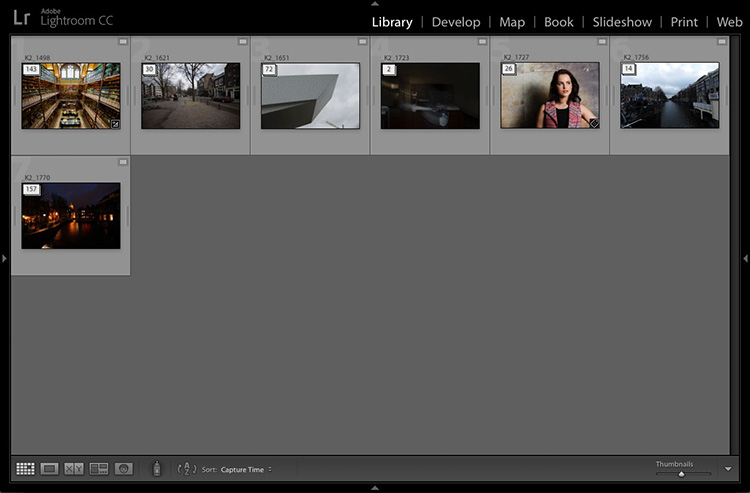
STEP ONE: Here’s a collection of photos I took a couple of years ago in Amsterdam, and although you’re only seeing 24 photos here on screen, if you kept scrolling down and scrolling down you’d see that there are actually 444 photos in this collection. These photos were shot at a handful of different locations and times. To have Lightroom automatically sort them into tidy stacks of photos for you, right-click on any photo, and from the pop-up menu that appears, go under Stacking and choose “Auto-Stack by Capture time” as shown above.
What Auto Stack Does (this is important)
The idea behind Auto Stacking by Capture time is that while you’re shooting a particular subject or location, you’ll be shooting pretty consistently, with perhaps only a few seconds, up to a minute to two between images. Then, maybe you walk to another area, or get on a train or bus, and there’s this “gap” of time between when you stopped shooting, and the next time you start shooting (when you get off the train or bus). That’s the gap it’s looking for to determine what gets stacked together.
For example, let’s say you’re doing a portrait session. You’re firing a lot of shots, then your subject goes to change outfits. That gap of time of time, between when you stopped shooting, and when your subject returns in a new outfit and you start shooting again, is what Lightroom uses to determine that the first group of shots you took should be stacked into one group — under one thumbnail. So how does Lightroom know how much time should elapse before it auto-stacks a group of images into a stack? You tell it — using the dialog you see in the step below.
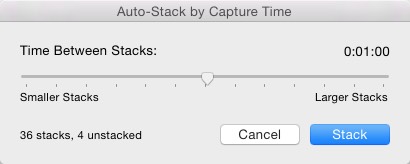
STEP TWO: When you choose “Auto-Stack by Capture Time” it brings up the dialog you see above which lets you choose how much time would need to have passed until it groups together a new stack of photos, and after a few seconds (be a little patient here — it has to do some math) it displays a readout in the lower left corner of how many stacks will be created. In this example, at 1-minute between images, it will creates 36 stacks and 4 photos aren’t sure where they go (time wise), so they won’t go anywhere. I didn’t shoot in 36 different places, so this is way more stacks than I need, so I would slide the slider to the right for less stacks with more images in each stack.

Above: If I were to drag it way over to the left, down to just 20-seconds between each stack, it would create 84 stacks, and leave 10 images unstacked where it didn’t really know where to put them. 84 stacks would only be useful if you shot in 84 different places, so it’s obviously creating lots of unnecessary stacks because a lot of my shots at the first location (a library) had more than 20 seconds between them, because I was moving from floor to floor during the shoot, so to me, those are bad worthless stacks. Ideally, I’d like all the shots from that library stacked into one single stack, and the other locations all be stacked into their stacks. That’s helpful in getting quickly organized).
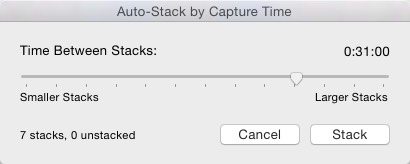
Above: I dragged it back to the right quite a bit because I shot over a few days in different locations, so I figured if I put at least 30 minutes in between each shoot, that would separate them into nice stacks.
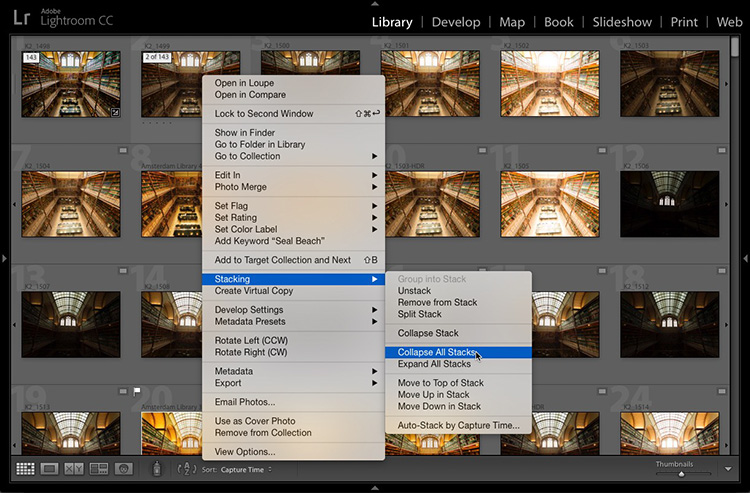
Above: Once I click “Stack” it stacks them into Stacks, but by default the stack are all expanded, so you see everything inside each stack. To see the order the stacking creates, right click on any image, and from the pop-up menu that appears go under Stacking and choose Collapse All Stacks (as shown above) and you’ll see (in the image below), how that tidies everything up.
Above: here’s what it looks like now. Just 7 thumbnails which represent all 444 photos grouped into stacks by the time they were taken (the number of photos in each each is displayed in the upper left corner of the stack thumbnail).
You can see here, it stacked all 143 shots from the library into one nice tidy stack (the first stack). Then to the right of that; some shots from just walking around later in the day went into this stack. Some from the Film Institute Museum building in the next stack. Two shots I accidentally took in my hotel room (doh!), then a portrait shoot I did on stage during my lighting session at the The ProImaging Conference (great event by the way. Absolutely top notch). Then more shots walking around near dusk, and lastly a set of images grouped into a stack that I shot at night. It’s like mini-collections inside my collection.
STEP THREE: To see what’s inside (known as ‘expanding’) any stack, just click-once directly on the little number that appears in the top left corner of the stack’s thumbnail and all the photos inside the stack instantly appear (as seen above). To ‘collapse’ them back again, click on the number again.
Hope this helps to bring some order to your Collection world. 🙂
Best,
-Scott
P.S. We released my new KelbyOne.com online course last week called “10 Essential Post Processing Techniques Every Landscape Photographer Needs to Know.” If you get a sec, you can check out the course right here.


I shoot HDR’s and this tip IS GOLD. I want to kiss your feet right now Scott !
Great Tips! I wondered if Photoshop can do the same thing and how?
Hey Scott,
Great tip! However, I have a question for you. When I use plug-ins on a photo or go back and forth to PS I use stacking to combine the edits into a stack. So, the question is does those individual edit stack get combined with the collection stacks?
Thanks,
Dennis
Hi Scott, we greatly appreciate these tips! Karl-
What happens to any stacks I already have? Do they become stacks within the new stacks, or are those stacks removed for good?
“10 Essential Post Processing Techniques Every Landscape Photographer Needs to Know” – Great concept for a book!!! Good luck with it. Hope you make one for sports as well!!
Hi Craig – I did one for sports. It’s on Amazon – it’s called the professional sports photography workflow 🙂
Two questions: Will this work only on the collection that I have opened (vs applying it to all my collections) and can I undo the stacking?
Hi Harry: If you select more than one collection it grays out all the stacking features, so you’ll have to do it one collection at a time. Sorry ’bout that.
Just don’t expect to use it with bracketed photos. It’s basically worthless when I come back from shooting a bunch of HDR shots. It will often choose one of the over/under exposed shots as the top of the stack. I think that’s because Lightroom is stupid about ordering the photos based on “capture time” will order things badly rather than also taking file name into account.
It seems that every time I try to use auto stack for HDR bracket images, I spend a large chunk of time going through each stack and making a new image be the top image
BTW: you do not have to be in collections. This works in the FOLDERS section as well
Good point, MattS. In fact, the feature was in Folders first, before it was added to Collections. I think I’ll add a little note to the story about that – thanks for mentioning it. 🙂