
Transfer Local Adjustment Presets to Camera Raw
Ever since Lightroom Classic (LrC) and Adobe Camera Raw (ACR) began sharing develop presets I’ve found myself using ACR more and more, such as when sending a copy as a smart object from LrC. However, despite sharing develop presets local adjustment presets are unrelated silos that exist separately in both programs. Here’s how you can manually transfer the local adjustment presets you have in LrC to ACR.
What Are Local Adjustment Presets?
In LrC, if you select any of the three local adjustment tools — Adjustment Brush, Graduated Filter, or Radial Filter — you will find they share the same panel of adjustment options, and the ability to save a given configuration of adjustments as a preset.
ACR has this same functionality, but it doesn’t come with a set of default local adjustment presets like LrC does, and so, you need to create all of your own presets.
The Transfer Station
My assumption here on Lightroom Killer Tips is that if you are reading this, you are a person who primarily uses LrC or Lr, like me. As such, like me, you have have been creating or installing local adjustment presets for years, and you might like to have them accessible in ACR.
LrC still saves local adjustment presets in a .lrtemplate file format, which ACR does not use. So, the simplest way I found to transfer the settings in a given local adjustment preset from LrC to ACR is to apply them to a photo, then open that photo in ACR, and create the preset from the existing settings. Here’s how it works.
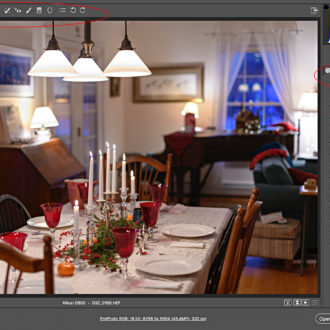
Step One: Starting in LrC, select a raw photo (just to make this easier), and preferably one that doesn’t have any other settings, and to really make it easy on yourself, one that makes it easy to see where the local adjustment pins are located. I picked one that had a lot of open blue sky.
Step Two: Grab the Adjustment Brush, and single-click somewhere at the top of the photo, then select the local adjustment preset you want to transfer to ACR.
Step Three: Press Enter/Return, to create a new adjustment, and single-click just below that first pin, then apply a different local adjustment preset.
You may be detecting a pattern here. Sure, you could do this one adjustment at a time, but I think this speeds up the process a little. Just be sure to press Enter/Return so that you create a new pin each time, as each pin is where the local adjustment preset will be applied. I did this 7 times, but you can do it as many as you like.
Step Four: With all of the separate pins with different presets for each applied, press CMD/Ctrl+S to have LrC write its adjustments to XMP. You may see a prompt asking if you want to do this, and if so, click Continue.
Step Five: Right-click the photo and choose Show in Finder/Explorer (or press CMD/Ctrl+R) to open your file browser to that photo. Then, since you started with a raw file, double-click the photo to open it in ACR (which is most likely the default program for raw files, but if it is not, open that photo in Photoshop to see it open in ACR).
Step Six: In ACR, select the Adjustment Brush, then click the first pin to enable that adjustment. You will see the associated settings of that pin appear in the adjustment brush panel.
Step Seven: Click the three-dot (…) menu at the top of the Brush panel, and choose New Local Correction Preset… from the menu.
Step Eight: Enter the name for that preset in the resulting dialog box (I just switched back and forth between LrC and ACR to see the names and keep them the same).
Repeat that process for each pin you applied to the original photo in LrC, until you’ve transferred over all of the settings for each pin. Each time you click a pin you’ll see the settings associated with it, and that’s what you use to create the new local correction preset each time.
Once I finished that first batch of 7 presets, I canceled out of ACR and switched back to LrC. Then, starting with the top pin, I applied a new presets to each pin on that photo, saved changes to XMP, and repeated the process until all of my presets were in ACR.
Is There a Better Way?
If there is, I’d love to hear it, but this was the best I could find. It is not likely something most people will need to do often, so after maybe 10 minutes of time invested I had all of my local adjustment presets mirrored over to ACR. If you know of a better way, please feel free to share in the comments. I’m always learning too.
hello,
very interesting but I have hundreds of local presets from Scott, Mattk, Ramelli, SLRlounge, prettypresets,…
local preset panel is a mess with all these lines, no category, scrolling hours with a small arrow on bottom, no solo mode to close a category (mattk, …), LR no being able, as for develop presets, to convert lrtemplates to xmp definitely.
Hi, adobe, wake up !!!
I don’t understand why Gurus like you cannot “influence” adobe making something in that sense.
such interface improvements are so easy to do in few days compared to what they do with shapening new tool,…
Agreed, wake up Adobe
Actually, thinking about it, I have LR / ACR and Photoshop on two computers, I assume I would have to do it twice !!!