Sharpening in is Lightroom Mobile. Noise Reduction, too! They’re Just Kinda Hidden.
Sharping and Noise Reduction — they’re both been in Lightroom Mobile since the last big update, but they were so hidden that even I didn’t realize they were there until this update when I saw the “Sharpening” icon from Photoshop once I clicked on the Selective tools, and thanks to the new User Interface in yesterday’s update — I now saw it.
Other people are writing about this like it was just released, too — I had to go ask Adobe directly, and they confirmed that it had been in there since the last update. I searched the Web and still couldn’t find anything on it…until yesterday. Anyway, it’s not hidden anymore. Here’s how it works:

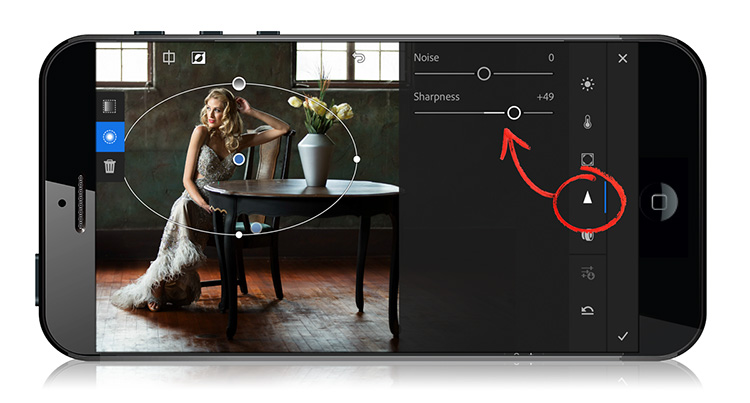
When you enter Edit mode, and click on the Selective tools (on the far left), you’ll notice the Triangle icon on the right (shown circled here in red). Tap on that, and out pop the Noise reduction slider and the Sharpness slider.
These only work with Selective Edits
Drag out an oval, and you can sharpen within that oval area. Want to sharpen a whole lot of the image? Make that oval really big.
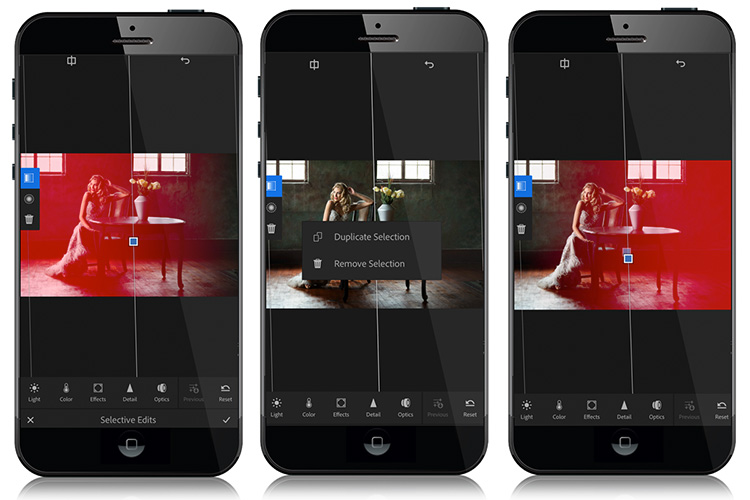
Or, try this:

Above: L: Use the Selective Edits gradient mask; drag it from the left side to the right side. Basically 1/2 your photo is sharpened. Center: Tap and hold on the center point of the gradient and choose Duplicate Selection. R: Use your finger to rotate this duplicated gradient mask 180° so now the other side is sharpened. This is not a perfect. But…ya know. It’s kinda close.
So, these things are there, and we can use them as a workaround to what we really want, which is (of course), just regular ol’ sharpening and noise reduction on a global level, and I imagine one day we’ll have that, but until then…this is at least some sharpening and some noise reduction, so I’m happy. Well, happier. 😉
Hope you all have a great weekend. I’ve got a cool Photoshop thingy for you on Monday, so hope to see you then.
Best,
-Scott
P.S. Thanks to all the KelbyOne members around the world who tuned in to my live Q&A on my “Simplified Lightroom Image Management” System Webinar yesterday. You guys, rock! 🙂


Why’s there no noise reducer in my LR mobile cc… There isnt also a triangle button on my app.. How can I fix it??
In Lightroom Classic we can press Alt or option button to see sharpening mask, is it possible on Lightroom Mobile? Highlights and Shadows masks too?
Use two fingers at once to move the sliders to see the same behavior as holding the Alt/Option key.
Thank YOU! Excellent tip. Works great – answered an issue I had with not being able to reduce grain in dng images.
Beer on me
I do not see a triangle on my android Lightroom. Not able to find noise reducer. Also, is there a way to color a vignette? Thanks
Hi Scott,
Thanks for this quick tip. Just, shot some iPhone images that needed some noise reduction. This tip is exactly what I was searching for.
Thanks! I always thought the triangle button was to start a slideshow! Looks like the Play button
I’m not 100% sure about NR (maybe 89,3% ;-), but sharpening was available for local adjustments in the previous version too.
Um…you mean like I said in the first sentence of the post? 😉
Or just make the selective area cover the entire image. Still strange that there isn’t a global version of those sliders, but at least it can be done.
Yeah, that’s what I meant when I said make the oval really, really big. 🙂