
How to Make Lightroom’s Improved “Auto” Button Even Better!

Hi, gang and greetings from Washington DC (my family and I took a walk down Pennsylvania Avenue Saturday with about 800,000 other folks). 🙂
By the time you read this though, I’ll be in Atlanta for my seminar today (well, that’s the plan anyway), and I’m delighted to have over 300 photographers spending the day with me here learning Lightroom. I’ll be in Milwaukee on Wednesday with the seminar – maybe I’ll see you there?
After Adobe’s recent Lightroom Classic update which featured a much enhanced one-click Auto tone button (and it is much better) I’ve been using it more and more as a starting place, but I’ve noticed something about it, and that is, depending on the image it can actually make your image look a little bit “HDR’d.” Ack! Luckily, if this happens to you it’s an easy fix. Here’s what to do (well, here’s what I do anyway).
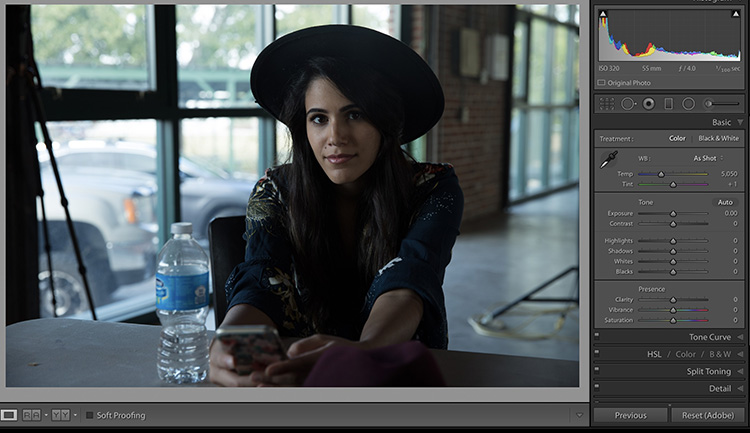
Above: Here’s our original image (it’s just a behind-the-scenes shot taken between shoots on location).

STEP ONE: When you click the Auto Button, you get this look, which is certainly better, but to me, it doesn’t look very natural. In fact, it has a little bit (or a medium bit) of HDR-look to it. I think there are two reasons for that, and they are both characteristics of the new Auto button’s algorithm: (1) The shadows are opened too much (the slider is way too far to the right), and (2) the Contrast amount is lowered.

STEP TWO: To get a more natural look, after I click the Auto button I generally do this:
(1) Lower the Shadow amount to around 1/2 of what the Auto slider bumped it up to. The Auto feature set the Shadows to +59, I lowered them down to +30.
(2) Bring the Contrast back up to at least 0 or higher into the + side. How far to drag it is a judgment call based on the image you’re working on, but I usually at least take it back to zero, if not a bit higher.
(3) I increase the Exposure amount a little bit (here I went from Auto’s +45 up to +85, nearly doubling the amount).
(4) Then I drag the Blacks slider to the right a bit (it opens the shadow areas back up without giving it an HDR look).
This only takes 10-seconds, but you wind up with a really good starting point for more tweaking (or even a finished edit).
The next time you hit Auto and it looks funky (HDR’d) give this tweak a try and see if you don’t like the results a whole lot better. 🙂
Hope I get to meet you here in Atlanta today. 🙂
Best,
-Scott
P.S. Check out this new video trailer for the upcoming Photoshop World Conference in Orlando in June. Makes ya wanna go, doesn’t it? Awwww, yah!
Nice update! Thanks for the article!
Thanks for the article and validation I’ve what I’ve just figured out. I just upgraded from LR 6 after 3.5 years and I hate the updated auto settings. It takes me longer to get a natural looking photo. The default settings looking over-processed and like the HDR photos off my iPhone 8. It crushes contrast and sometimes leaves some very strange artefacts and colourisation. I thought at first it was trying to avoid white clipping, but actually I can boost contrast back to zero, exposure up well above zero, and increase highlights by +75 before I even have to think about reducing whites back towards zero due to clipping. If I’ve taken a photo of somebody, I really don’t need the background around them brought up to the same luminance level because that dilutes the focus and subject of the photo. It’s really frustrating and now I can’t take my catalogue back to LR6 (nevermind permanent licences of LR6 have been stiffed with the map module being deactivated.) Like most things around HDR, people seem to do it because it’s technically possible, not because it particularly makes sense. Light is one of the most important aspects of photography, and contrast is part of that and is one of things that brings interest to a photo – why overly reduce this?
Does anyone or company offer updates to LR 6.14, now that LR CC and Classic CC are offered as subscription models only?
No, just Adobe in the form of the free DNG converter for converting newer camera raw files to DNG so that you can import them into older versions of their software.
Scott you didn’t mention the clarity, vibrance and saturation settings in the new Auto button. It NEVER moves clarity but ALWAYS increases saturation and vibrance.
exactly. I want to change it so that it does not increase the saturation and vibrance, but I can’t find any way to do it.
I just have a preset that zeroes those out, so I can easily apply if needed (marked as a Fav, so up at the top).
Very nice tutorial I was looking for just such an improvement, I am just gaining experience in machining.
I don’t want to start a back and forth squabble but I feel that I have to say something. Scott posted a photo about an experience he shared with his family – and he has done this numerous times in the past – but he made no political statement about it. One of the strengths of the USA is the freedom of its citizens to express their ideas without recrimination, so I would hope that readers would let Scott post his photo without threatening him about quitting his site. Everyone has the right to his or her opinion and I have no quarrel with anyone thinking the way that they do, but I do hope that people will be civil in their disagreements. As for the information in this post, it was extremely useful.
Thank you Scott, I was noticing the same HDR type effect myself, and your tips have pointed me in the right direction, yet again! Keep up the great work/blog.
Always interesting and worth a try.
Thank you
When you start airing your political convictions is when I start ignoring your page. This page used to be about Lightroom tips. I’m done with you at that point. (Insert your smart ass smiley face here)
Nice job ignoring. Perhaps you are ignorant of the meaning?
Maybe you misunderstood the killer tips here?
Good glad to see you go! Bye!
I usually zero or add some + to contrast.
What I do with whites and blacks is SHIFT + double click (it is individual auto for sliders) them. They allways move a bit finding better setting, even I have clicked Auto button.
I find it odd that, after AUTO, if you doubleclick every slider, nothing moves except white (sometimes alot) and black (slight movement). Wonder what Adobe’s strategy is for these two.
Good tip! I’ve noticed the same effects with the Auto button, which I’ve been using regularly for my indoor volleyball photos. I run Auto AFTER I crop though, not on the overall image. I process similarly, zeroing Contrast after Auto–to start–then adjust Contrast, Shadows, and Whites for each photo for a VB match. It takes a second or two, but it’s MUCH faster then adjusting every slider manually for 100-150 photos per match. Thanks.
This is a good opportunity to select images ENMASSE and make these adjustments in Library’s Quick Develop, where the adjustments are relative instead of absolute, as in it’s ABSOLUTELY ridiculous to think that guns aren’t the problem when it’s RELATIVELY easy to buy high capacity assault rifles and wondering why there are so many DEAD people ENMASSE.
PROUD to be a KelbyOne member!
Any way to set up a preset for making post “Auto” adjustments? Based on a percentage of the shadows, contrasts etc?
But do I really have to ask: Uhhh why didn’t Adobe put these adjustments into the AUTO button to begin with?
They put it in an AUTO button because a FULLY AUTO button would be illegal. A little gun humor for the haters.
So, we might refer to it as the “semi-auto” toning button ? 😉
It would be nice if they had a light, medium and heavy Auto inclination you could set like you can on the tone curve… I find I’m hitting that for post-Auto setting.
I have found it does a fair job much of the time if you don’t have a lot of black/deep shadows. What I’m doing is throwing up the crop fence, cropping – hitting Auto – then resizing the fence back to full frame. I avoid the super brights and darks and it often really nails it in this manner.
And, I’m a 2A guy (don’t own any guns) – but you did a good thing by being heard on such an important issue of the day. Props to y’all for that.
I am a photographer who is also a responsible gun owner and proud NRA member. I truly hope you are not promoting anti-gun sentiments or the infringement of our Second Ammendment rights with the photo above. No one wants to see crimes of violence committed with a gun or any other weapon. But guns are not the problem and high-profile protests are not the solution. All those folks should be protesting their local school administrations demanding they do their jobs by making schools more secure and safer.
Thank you Walt Young. I am also a photographer and a proud NRA member. I totally agree with your statement. I’m disappointed that this is even on Lightroom Killer Tips. I thought this blog is about photography-period? We all have choices and if this blog or Kelby.com becomes a platform for personal views then I have a choice to not purchase any Kelby products.
I never thought I would open a Lightroom tutorial and see something about politics. You can’t get away from it anymore.
Hi Scott,
Good advise on the Tutorial! However, I have to agree with Walt Young’s comments above.
Dennis
Hi Scott,
Have to agree with Walt Young. Too bad politics has come to Killertips.
“Hi, gang and greetings from Washington DC (my family and I took a walk down Pennsylvania Avenue Saturday with about 800,000 other folks). ”
What, exactly has that opening statement to do with making modifications to the Auto setting in Lightroom Classic? The image is not illustrative of the tips offered that followed the image.
If it’s Kelby’s wish to alienate about half of his potential market with an unrelated political statement on a photography software blog … then well done, sir.
You know that EVERY post here is filled with promotional content encouraging us to sign up for KelbyOne or got to workshops. Often the promotional verbiage is as long or longer than the actual Killer Tip.
Ignore that s the same way you ignore the other promotional content.
and consider growing a thicker skin. Sensitive prick.
Geez, Robert … does name calling make you feel better? Does it allow you to feel superior? Does it bolster your self worth? Just curious.
Isn’t it quite obvious that the name calling is out of frustration. And you are right to call me on it. It isn’t constructive.
Was it not your intention to express your irritation? Perhaps you understand how I came to make the mistake I did.
Now you’ve experienced my irritation.
I know you are a sensitive fellow. Please accept my apology
I’m sorry.
At best half of his potential market in the US, but he is spot on on the world market (Including outside the US). Given that the US is < 20% of the worlds population that is not a bad choice covering about 90% of the world population 😉
It’s quite possible to be pro second amnendment and pro regulation. Many weapons are regulated.
I’ve spent some time with the AR-15 at my local firing range. Really enjoyable to shoot. Accurate and lots of rounds in the clip.
I can’t see what I would need one for outside the range. It’s too small a bullet to drop big game without a long chase. It’s perfect for dropping a lot of human targets quickly, though.
Makes sense, since that’s exactly what it’s designed for.
Would it be so bad if this weapon were only available for usage in licensed rifle ranges?
I’m a proud citizen of a country with strict gun laws, as in most civilized countries.
We don’t have school shootings. Even better, we hardly have any victims of shootings. And no, we don’t need schools with strengthened walls, doors or armed guards.
Guns are the problem!
How many more dead children do you need to see the reality?! Wake up! Just look at the statistics of how many people get killed by guns. In the USA and for instance in Australia, Netherlands, Sweden and so on. And get real.
Well said Walt Young. Politic also have no business on a photography education site. I came here to learn photography not politics. I also am a life member of the NRA and a responsible gun owner.
Put yourself in those parents shoe who lost their child and try to imagine making the same comment. How do you know that gun is not a problem?
This is one of those small but extremely useful tips that will be used regularly. Thanks.
Thanks for these solid tips! I know these will be very useful next time I click the auto button.