
Another Hidden Lightroom Shortcut for Using The Adjustment Brush
Happy Monday, everybody! I’m back from shooting the Falcons/Packers game last night — the first regular season game in the incredible new Mercedes Benz stadium – what a treat!
Today I’ve got another one of those little-hidden shortcuts that’s really handy when you’re using the Adjustment Brush. What’s different about this one is that it toggles on/off the Auto Mask features, but it does it without any visual feedback (for example, you won’t see the Auto Mask checkbox turning on/off like you would with most other shortcuts. Here’s how it works:
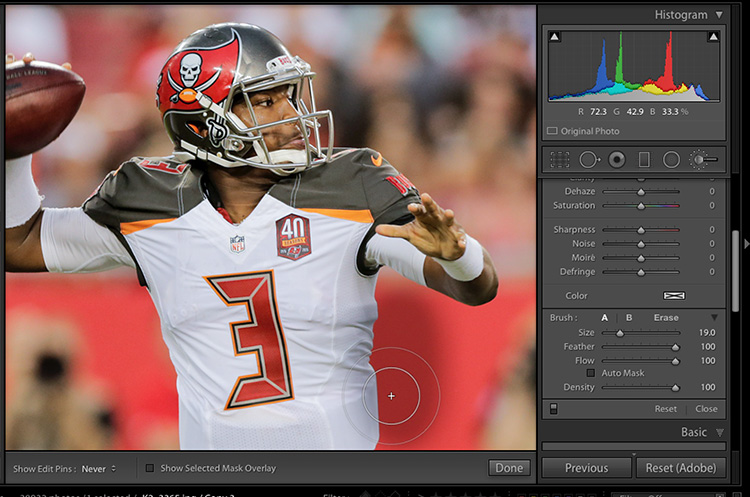
Above: Let’s say you want to use the Adjustment Brush to darken the background behind the quarterback (this shot of Jameis Winston is from last season). When you get near his jersey on the right side of the image you can see it not only darkens the background but darkens the sides of his Jersey as well.

Above: To get around this problem, when you get near his Jersey, if you hold the Command-key (PC: Ctrl-key) it turns on the Auto Mask features, which means the only area that will be affected by the brush darkening as you paint is the color beneath that little crosshair in the center of the brush. The edges of the brush are clearly extending right over onto this jersey, but thanks to that shortcut (which turns Auto Mask on behind-the-scenes — note that the Auto Mask checkbox is NOT turned on in the capture above), it lets you paint right up to the jersey without spilling the darkening onto the jersey (as seen above).
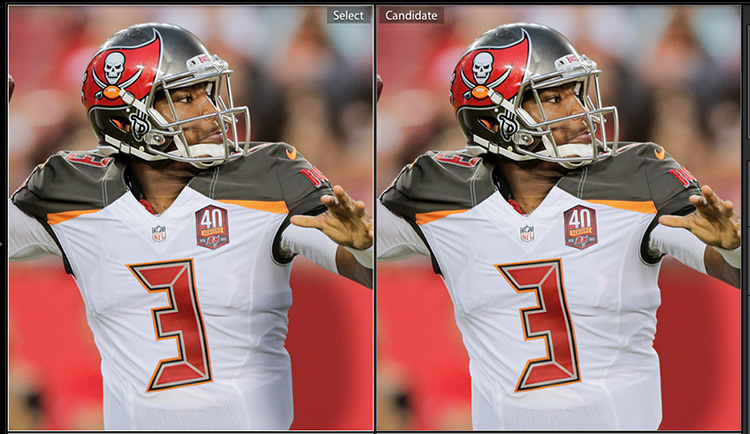
Above Left: You can see the darkening spilling over onto his jersey. Above Right: By holding the Command-key (PC: Ctrl-key) it avoids spilling over.
Hope you found that helps.
Hope today is a much better than average Monday for ya!
Best,
-Scott
P.S. On Friday I’m in Denver with my Lightroom seminar.It’s just $99 for the full-day. Hope you can come out. 🙂

Great post thank you for sharing with us.
Nice Post. Thanks for sharing with us.
Thanks a bunch for sharing. photography orlando
Just so you know
If automask is selected while you do this….it turns off automask
How is that different from just clicking on the auto mask check box?
You can toggle it back and forth during a single stroke as you move around objects which should and shouldn’t be fully overlapped by brush modifications. Very handy, without having to go to a menu and interrupt your visual continuity. It’s not an end-all, but a good thing to know for certain situations with lots of brush work.
The point is that you don’t have to click on the auto mask…
Brilliant tip Scott! My Monday hasn’t been brilliant but this has improved my day – thank you! You’re the best …
I’ll echo everyone so far. This is a huge tip! It makes things so much easier when using the adjustment brush. Thanks, Scott. You rock!
Thanks for the great tip Scott! After taken so many classes and training at KelbyOne, I’m still learning frequently from you! Amazing!
Great tip, How do you take these screen shots?
Craig, if you are on Windows you can use the included free Snipping Tool. I’m sure a similar tool exists for MacOS. If you want a more sophisticated tool, you can use Techsmith’s SnagIt (available at a cost for both Windows and Mac).
On windows a really good tool for area/region/window static screen captures (including full webpages which you can’t even see all of yet) is the tool “greenshot”, free or shareware – I don’t recall at the moment.
thanks to both of you.
Hi Scott – GREAT tip – I never knew this even after 7 years with LR. However it is also a great image, I’m assuming the roof makes it darker (I can see reflections of the lighting), but it is so sharp, clean & tight but no visible noise. I know you have some insane-spec gear but it takes a master to catch these images reliably, and you clearly do catch them. The studio must feel a bit tame on the day after a game
Thanks @Paul , Exactly what i was thinking!