
Last week we covered the components you need to know about, so now we can dive into the most important organizational tools Lightroom Classic (LrC) has to offer.
Organizational Tools
The Develop module is the sexy beast everyone likes to spend time in, but the Library module is the most important place for keeping your photo library under control and for finding the photos you want when you need them. I include the import process as part of the Library because that is your first opportunity to keep yourself organized and moving in the right direction, so let’s start there.
The Import Window
Earlier I stated that the main job of the import process was creating records in the catalog file about each imported photo, but the secondary job of importing can involve copying or moving photos to a storage location of your choosing. You need to be in the driver’s seat for this job and ensure that LrC is not placing photos in an undesired location. There are two choices on the import window that determine where your photos will end up. The first choice is along the top of the screen where you choose between Copy as DNG, Copy, Move, or Add.

The two most common choices are Copy and Add. If your photos are coming from a memory card you will choose Copy (Copy as DNG is effectively the same as Copy except it also includes the operation to convert the raw photos to DNG, but for organization purposes it is beyond the scope of this article). If your photos are already exactly where you want them to be stored (because you put them there outside of LrC), then you will choose Add.
A word about Move. I don’t recommend using Move for safety reasons because Move includes a copy operation followed by a delete operation from the original location. It is much safer to use Copy for import, and then once the copy operation is done successfully you can go and manually delete the source files from the original drive if that is what is needed. Move will be unavailable when the source is a memory card, so it would only come into play when source photos are on a hard drive.
When choosing Copy the only other choice you need to make at this time is in the Destination panel. When Add is selected the photos are already in their final location, so the Destination panel is not included.
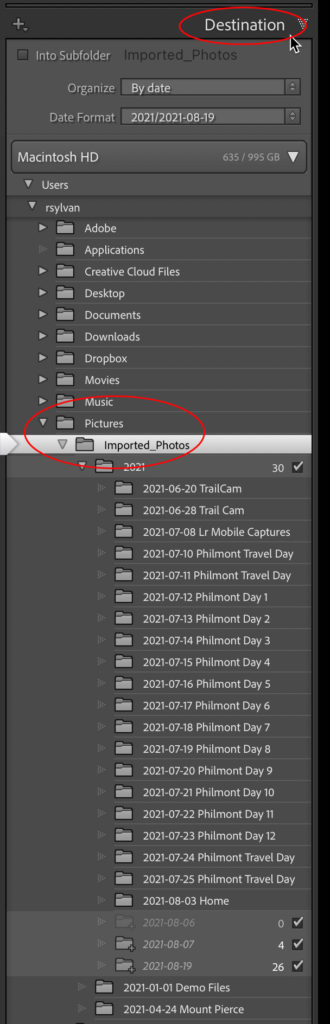
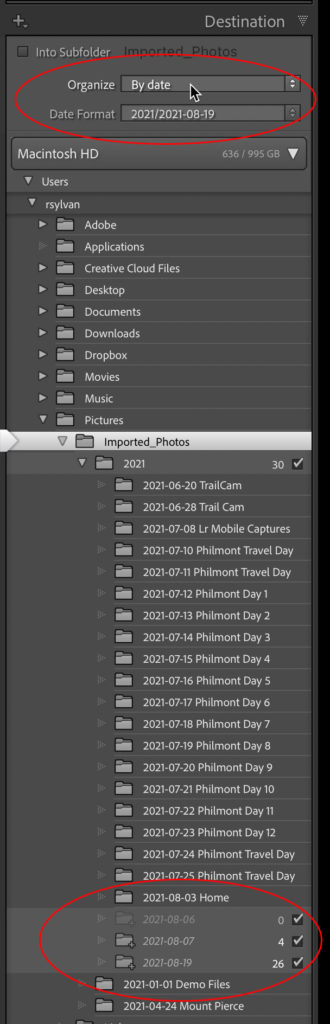
When configuring the options in the Destination panel you have two choices to make. The first is where do you want the photos to be stored and the second is how do you want them to be organized at that location. Keeping in mind that the settings in the Import window apply to ALL photos being imported at this time you want to choose a location that works for all photos being imported. The default setting in the Organize drop-down menu at the top of the panel is By date, which includes options for your choice of date format in the drop-down menu below it.
The nice things about the By date organize option is that it is fully automated using the creation date of each photo to create corresponding folders within the folder selected in the Destination panel and it scales nicely into the future. That said, dates alone may not give you enough information to find your photos easily in the future. I work around this limitation by simply renaming the date-based folders after import (using the Folders panel) to include additional meaningful information along with the date. This way I don’t have to think about organizing my photos during the Import window, can let the automation of folder creation save me time, and get the benefit of dates added to each folder so that they sort in a meaningful way within the Folders panel.
All that said, if your system utilizes the Into one folder option in the Organize drop-down menu, and that works for your brain, then don’t let me stop you from using that option. I recognize the benefits of putting your photos in custom named folders from the outset, and I know many who use that option.
Additionally, I recommend standardizing on the top-level location for all newly imported photos. In my case, I copy all new photos to a folder structure within the Pictures folder of my internal drive with the same top-level parent folder selected for all imports (and let LrC create the subfolders within it). This way I don’t have to spend any time thinking about where to put photos at this time, and best of all, can create an import preset that includes the settings in the Destination panel (as well as all the panels above it). Over time, I use the Folders panel to move folders to a larger external drive to maintain space on the internal drive.
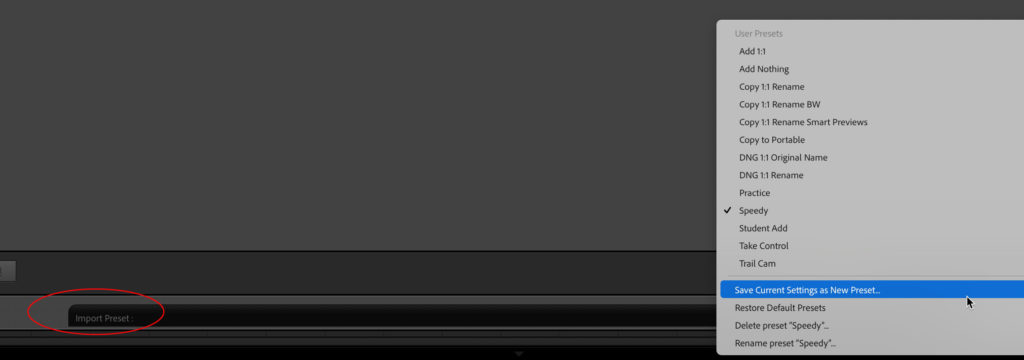
To create an import preset, configure all desired import settings (in all panels), then click the Import Preset drop-down menu at the very bottom of the screen and choose Save Current Settings as New Preset. You can create as many of these import presets as your workflow requires. These are huge time savers and allow for consistency in your organizational efforts. For each subsequent import job, simply choose your desired import preset and everything is done. After a quick visual confirmation all you need to do is click the Import button and LrC does the rest.
The Library Module
Once the import process begins your view returns to the Library, and as the photos fill your screen you can turn your attention to the Folders panel to confirm the photos are going exactly where you designated. The Folders panel is one of the most powerful tools for organizing your photos over time. It is here that you can move folders into new folders and drives, rename folders, remove folders, create subfolders and more. For example, I mentioned that I rename all newly created folders during import to include a meaningful name in addition to the date. Here’s how to do this:
Step One: Right-click the folder you want to rename.
Step Two: Choose Rename from the contextual menu.
Step Three: Enter a meaningful name in the Rename Folder dialog box that appears and click Save.
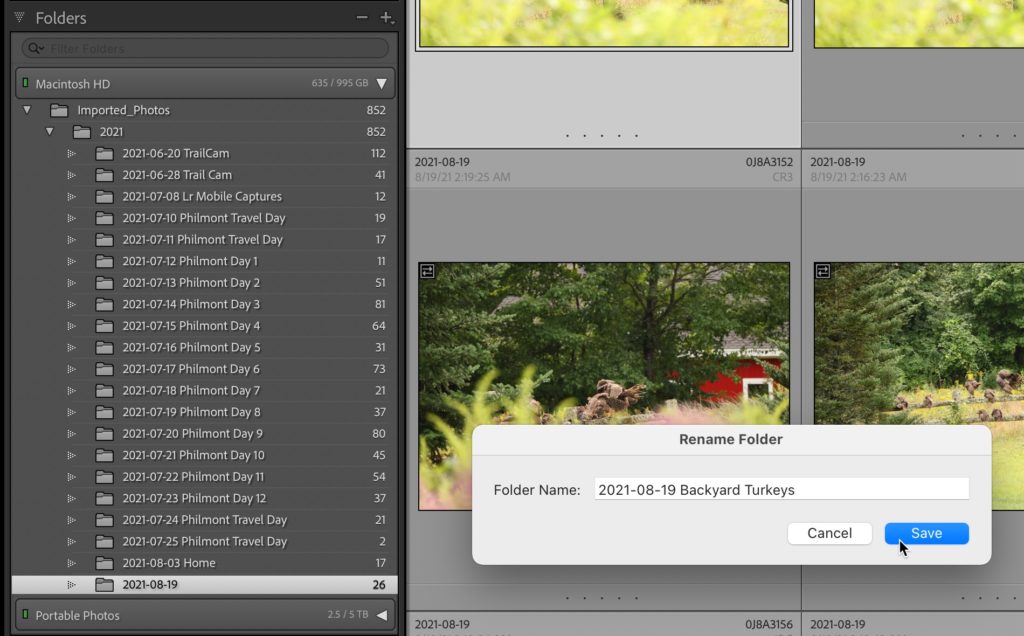
This renames the folder in the Folders panel as well as on your drive all in one move while keeping the record in the catalog up to date. By performing all your file management tasks in LrC you keep your files organized and keep the catalog updated. To learn even more about the Folders panel and how to unlock all of its power, be sure to bookmark my article on the Role of the Folders panel.
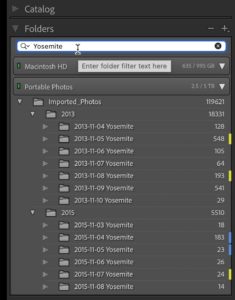
A powerful benefit to naming your folders with simple, descriptive, and consistent names is that you can utilize the filter at the top of the Folders panel to quickly find all of the folders that match what you type in that field, even across multiple drives. This works with both numbers and names, so if I wanted to see only folders from 2021 I can just type that in the filter and display only the folders that match. Likewise, if I wanted to find all folders containing photos from Yosemite, I just type that in the field and I don’t need to remember when I was there at all.
The key is to be consistent when naming folders so you can get consistent results from the filter. This same trick works in the Library Filter bar for finding photos based on the names you gave the containing folder. Here’s how to do it:
Step One: Click All Photographs in the Catalog panel so the entire library is searched and press G for Grid view if not there already.
Step Two: Click the Text button on the Library Filter to open the text input field.
Step Three: Type the text you want to search on into the field. In my case I typed Yosemite here too.
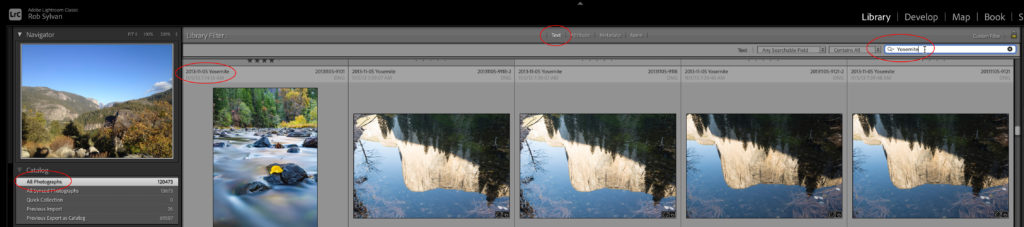
Your entire library is now searched for that word in all searchable fields, which includes folder names. In this screen capture you can see the folder name displayed on the thumbnail. I find this much faster and simpler than keywording each individual photo. I’ve got nothing against keywording in general if it is needed for a given workflow, but in my experience, it is a non-preferred activity for most people. If keywording is your thing, then take a dive into my controlling keywords article to learn more about them.
With these basic concepts mastered and put into practice you’ll be well on your way to being organized, and can then take it up a notch with becoming more efficient over time.


If we already have the folders organized by Year > Month, how do we change it to the Year > Year-Month-Date? I understand that I’ll have to still go in and rename the days folder to add in context.
Hi Pratik, It sounds like you just want to rename the folder currently called “Month” to “Year-month-Day” is that right? If so, just right-click the folder and choose Rename from the contextual menu, then enter the desired name. Repeat for any other folders (tedious, yes, but the only way to keep the catalog and renamed folders connected in LrC).
Yeah! That’s gonna be a pain since I’ll have to know the exact month and date for each photo. Currently, all photos from a month are categorized into e.g. 2017 > September
Hmmm … I’m not sure that is worth your time. I would just keep the existing photos organized as they are, and employ the new folder structure to all future imports.
nice tuto Rob,
can you please explain (or give a link to a previous post) how to clean iphone
after importing filmstrip and lightroom mobile librarty into LR classic ?
I am not interested at all by bidirectional editing and updates. just using LR mobile as easier transfer mode than usb and dropbox.
In LR classic preferences, i specified a folder D:\photos\LR_mobile with subfolder 2021-09-25 format for sync images.
In LR mobile i have create a inbox folder with auto from filmstrip.
So in LR classic 3000 HEIC images appear in inbox. Now i want to clean my iphone and delete these 3000 heic.
Should i create a “From iphone” folder on my hard disk, pause sync in LR classic, inside LR classic move all content of inbox sync folder to “From iphone”folder so any delete from iphone won’t delete in LR classic, link being broken.
Then, in iphone, delete all filmstrip and LR mobile inbox folder content.
Then reactivate sync in LR classic ?
Where is this “Destination” panel you are referring to?
The right side of the Import window when using Copy/Copy as DNG (or Move).
I think it would be a useful option within the Import function to have a confirmation message re the destination folder. Default is the last one used but whilst I normally use the same one I do occasionally change it but then forget to change it back for a subsequent import! Not the end of the world as files can subsequently be moved, just annoying.
Could be useful, but I don’t see Adobe ever implementing it. I’d recommend standardizing on a single location/entry point knowing, as you do, that you can move photos and folders using LrC later. Just get the photos in, and then use LrC to manage them and don’t waste time on the import screen.
“It is much safer to use Copy for import, and then once the copy operation is done successfully you can go and manually delete the source files from the original drive”… well yes, but you should point out that the deletion should be done from withing Lightroom. If you just delete the original files off the hard drive then Lightroom will be left with a bunch of “missing” images.
That’s incorrect. If you use the Copy function during import into Lightroom Classic then the copies are what are being monitored/referred to/managed by Lightroom Classic, not the originals. You cannot delete the originals from within LrC because they are not in LrC. Deleting from within LrC would only delete the photos you just imported, which would be counter-productive.