Photoshop For Lightroom Users, Part 1
I’m kicking off a new column here on Tuesdays for the next three months or so – it’s from my column in Photoshop User magazine of the same name, and it’s aimed at photographers who have been using Lightroom as their main tool but are thinking it’s time they learned Photoshop.
Don’t get me wrong – I love Lightroom, and it’s absolutely wonderful for organizing your images, and making things brighter or darker, fixing exposure problems, correcting white balance (or getting creative with it), making prints, and stuff like that, but Photoshop is where the “magic” happens. So each week for the next new months I’ll be helping you along on your Photoshop journey, and I’m doing it all from the angle of “you already know Lightroom,” so I’ll be picking things up from there. We’ll start with…
JUMPING FROM LIGHTROOM TO PHOTOSHOP
When you’re working in Lightroom and you hit that point in your editing process when you need to do something to your image that Lightroom can’t, you can take that image over to Photoshop, work your “Photoshop magic,” and then bring that image straight back to Lightroom. It all works seamlessly and easily because Lightroom was developed to work with Photoshop from the very start.
Getting an image over to Photoshop differs depending on the type of format you shoot on your camera. If you shoot in RAW, and you want to take your image over to Photoshop to do some further editing, you simply press Command-E (PC: Ctrl-E), and it opens your image in Photoshop (if Photoshop wasn’t already running, it automatically launches Photoshop for you).
Lightroom doesn’t ask you any questions beforehand; you simply press that shortcut and the next thing you see is your image open in Photoshop ready for you to start editing.
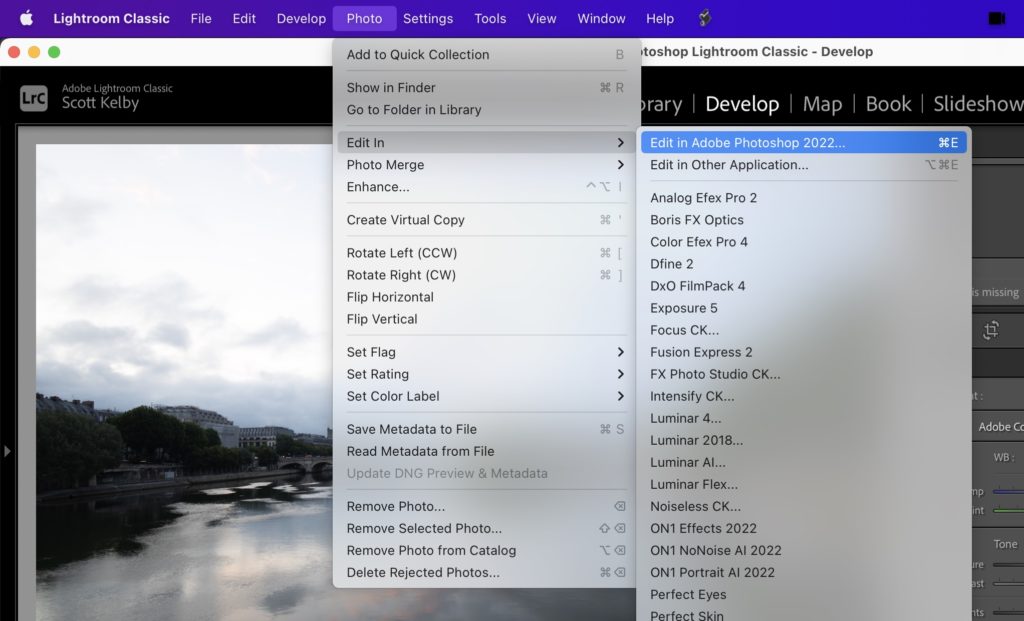
By the way, if you’re not a fan of keyboard shortcuts, then you can go under Lightroom’s Photo menu, under Edit In, and choose Edit in Adobe Photoshop 2022 (or whichever version of Photoshop or Photoshop Elements you currently have installed), as shown above.
Getting That Image Back To Lightroom
Now in Photoshop, make any changes or edits you’d like (there’ll be lots more on what you can do to your images in Photoshop in upcoming columns), and then, when you’re done, you simply do two things:
- Save your document: Just a simple Command-S (PC: Ctrl-S) will do; then
2. Close your document: Command-W (PC: Ctrl-W).
When you go back to Lightroom, the edited image will already be there waiting for you, right beside your original image (as shown below).

When you jump a RAW image over to Photoshop, it automatically makes a copy of your original RAW image and sends that copy over to Photoshop for editing, so your RAW original remains untouched in Lightroom.
By the way, if you’re working in collections (called “albums” in Lightroom “cloud”), the image that comes back from Photoshop will be right next to the original in Lightroom. If you’re working in Folders (booo!), then it may appear as the last image in your Folder, rather than right beside the original. Just a heads up on that. Okay, that’s the process; it’s quick and easy.
OTHER FILE FORMATS
But what if you’re shooting in JPEG on your camera? Then the process is a little different, but still super easy. When you either choose the Edit in Adobe Photoshop menu command or press Command-E (PC: Ctrl-E) to take your JPEG image over to Photoshop, it brings up the dialog shown below.
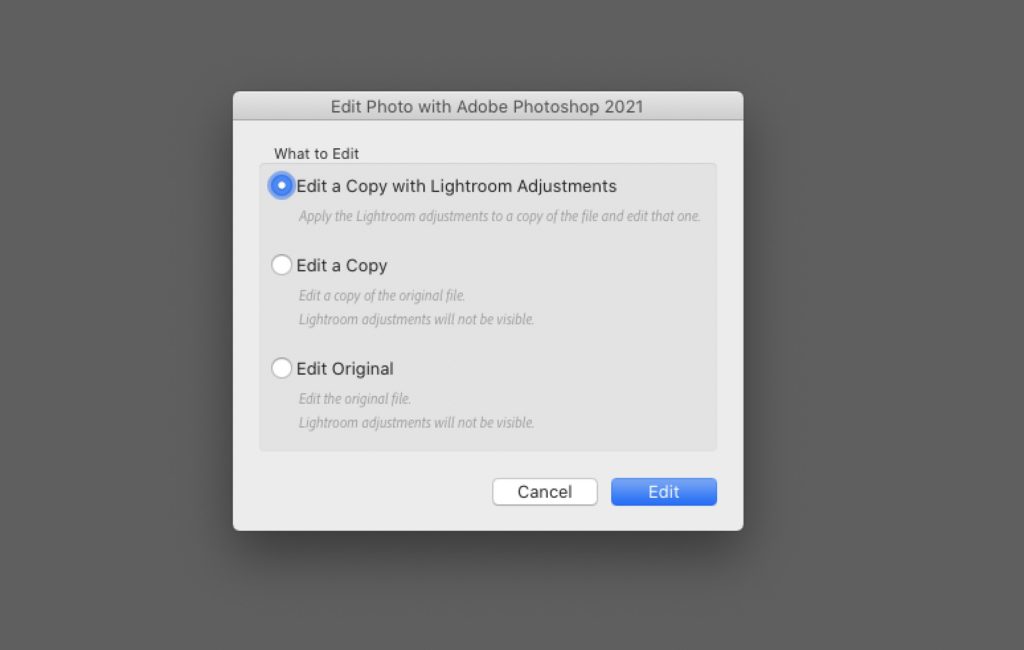
It gives you a description below each choice, but I can tell you that I use the top choice, Edit a Copy with Lightroom Adjustments, about 99.9% of the time. I’ve never once had a need to send an image over with the second choice—the one that ignores what I’ve done in Lightroom—but at least it’s an option if you wanted that for some reason (I can’t think of one, but I’m sure there’s at least one).
If the third option, Edit Original, sounds risky like you might be possibly messing up your original image, that’s only because it is risky, and you could mess up your only original, so I don’t choose this option. Well, there’s one single instance you might choose it, and that’s a very specialized situation that we’ll cover in a future column, but for now, let’s stick with what’s behind door #1, the topmost choice: Edit a Copy with Lightroom Adjustments.
Once your image is over in Photoshop, the process is the same: When you’re done editing, just save and close.
Yes, it’s that easy to get your image back to Lightroom; just save and close.
CHOOSING THE FILE FORMAT FOR IMAGES SENT TO PHOTOSHOP
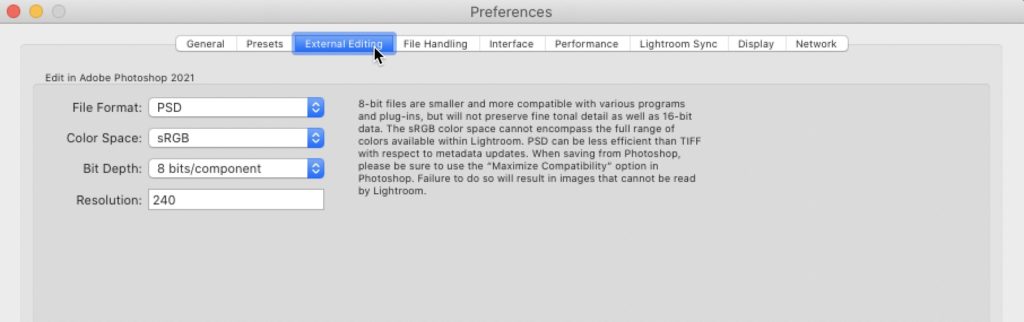
There’s one more thing you might want to know about: You do get to choose the file format for that copy of your original that goes over to Photoshop, whether it started out as a RAW or JPEG image. You choose it from Lightroom Classic (PC: Edit)>Preferences, under the External Editing tab. Where it says Edit in Adobe Photoshop 2021 up top, under the File Format drop-down menu, you can choose which format you want to send over to Photoshop.
I have mine set to PSD rather than TIFF (the file sizes are smaller, they’re compatible with almost every application on earth, and there’s no visible loss of quality). I wrote an article about why you should never use
TIFF is a file format anyway, and it made enough people mad (apparently, some folks had been saving as TIFFs for years and got very defensive) that I’m not even going to post a link to it here, but I still strongly believe that you don’t need to save files as TIFFs in 99.9% of the situations you’ll run into (or basically like never). We’ll talk about Color Space and Bit Depth on another day, but you can see my settings in the screen grab shown below.
Okay, we’re off and running with our new column, and we’ve learned how to get our images over to Photoshop and then back in Lightroom one piece. It’s a good start, but there’s lots and lots more to come.
See you next Tuesday for more “Photoshop For Lightroom Users”. 🙂
-Scott