Merging Two Drives Into One
… And keeping Lightroom Classic from freaking out. That was just too long for a title, but that’s what I set out to do. I’ve had the bulk of my photo library stored on two external drives (each 2TB capacity), and one of them started making that weird sound of doom that you never want to hear your drives make, so I decided to replace that drive while it still worked. I documented the process in case it helps anyone else in a similar situation.
Side note, I do have both of those drives backed up, so if the drive failed I would have the back up to, well, fall back on, but why wait for disaster to strike at the wrong time when you can resolve the problem on your schedule, right?
So when replacing the sad sounding drive I opted for a single 5TB drive to replace the two 2TB drives (plus I picked up a second 5TB drive to mirror that working drive to later on as a local backup).
The Setup
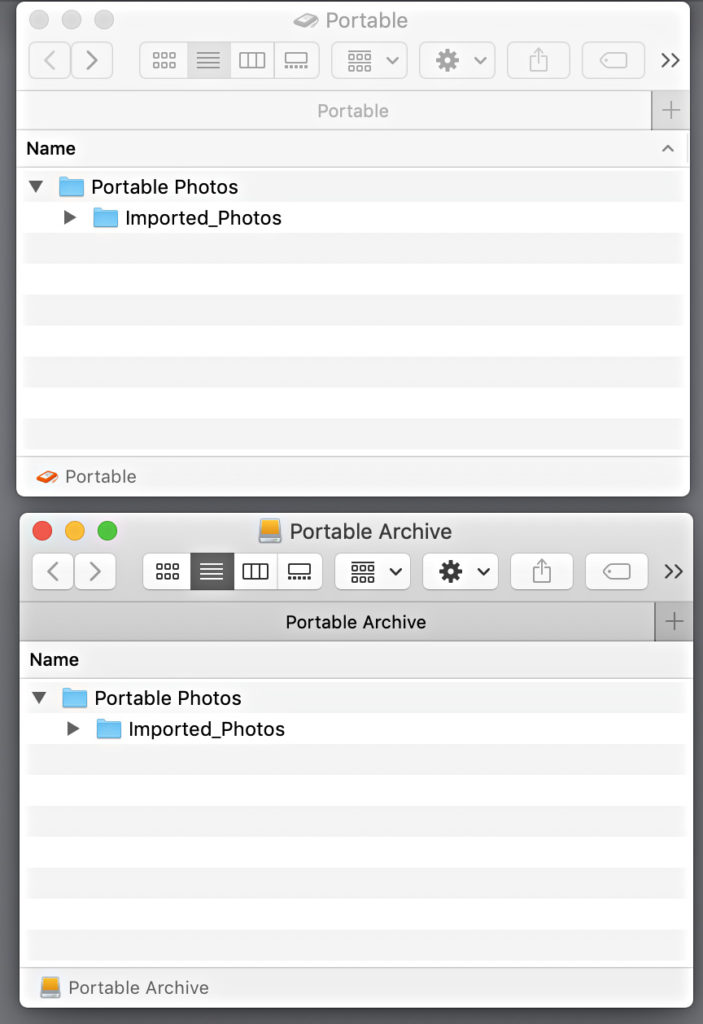
As a matter of practice, I have always created a parent folder on any external drive I use for photos that I call Portable Photos. Then, within that folder I create a subfolder called Imported_Photos. This way if I look at that drive outside of LrC I know not to mess with any folders within the Imported_Photos folder as they are being managed by LrC. Anything not in that folder is fair game for moving, deleting, renaming, etc., outside of LrC. Just keeps things simple for me.
This also keeps things simple when I want/need to migrate that content to a new drive, which is just a regular part of managing a photo library over time. Having the same basic structure and a single parent folder makes this whole process super simple.
The first task was to use third-party software to copy the contents of my old drives to my new drive. I used a product called SuperDuper! on my Mac, but a similar product for Windows is ViceVersa Pro (though there are others for both Mac and Windows). I feel more confident in letting software designed for this purpose to do the job than simply drag/dropping files in my file browser. However you do it, the goal is to maintain the folder structure of each drive on the new drive so that it is easy to reconnect the LrC catalog to the new drive once the data is in place.
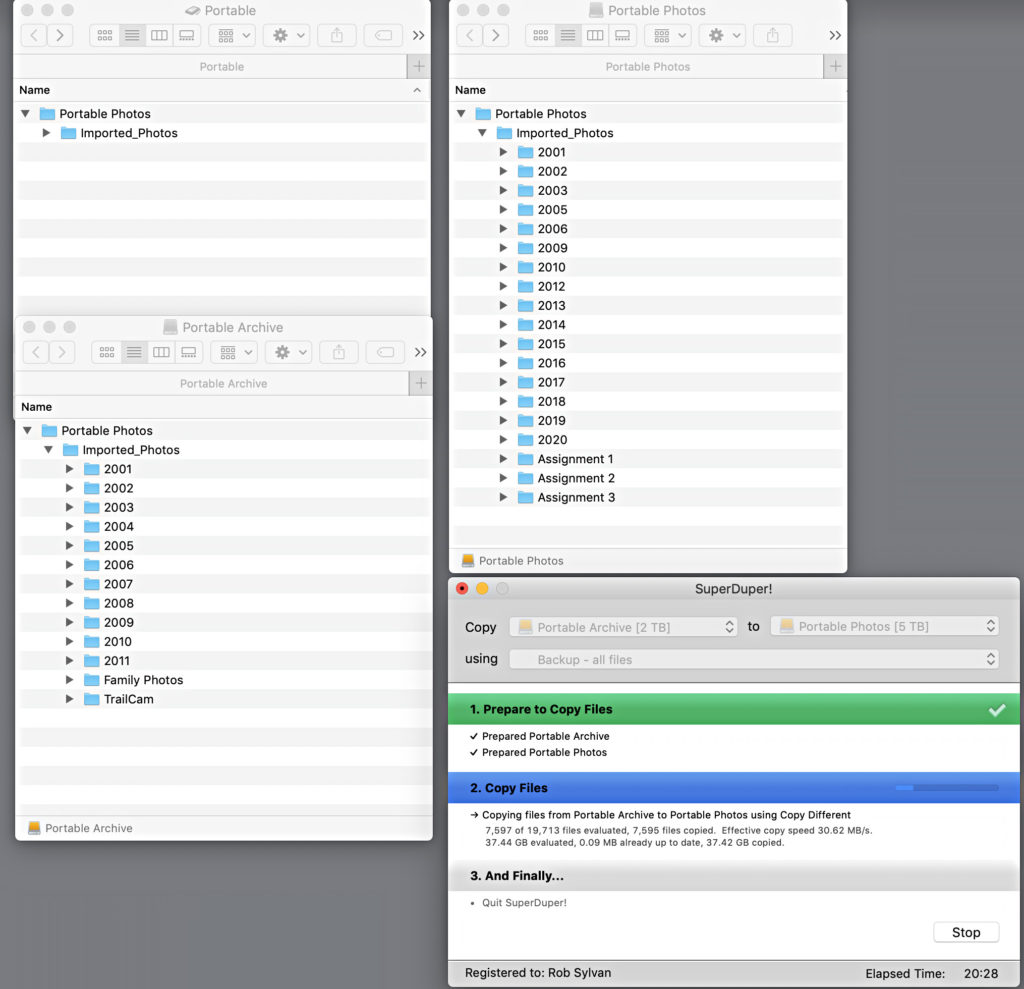
Within each of my Imported_Photos folders are (mostly) date-based folders by year, which is just my personal preference for how to store photos (because it is simple and automatic). I recognize there are different ways of approaching this, and I don’t judge what works for others. Because the parent folder structure was the same on both of my drives it made it easy for me to point SuperDuper to my new drive and have it simply copy all the data from the old to the new, which created a single unified structure under the same parent folder as it was originally. This is important when it comes time to update LrC to this change.
Back in Lightroom Classic
While that process was running in the background I opened up LrC to check on a few things. Remember, because SuperDuper was copying the data from the old to the new drives nothing has changed as far as LrC is concerned. As long as I don’t do anything that would write to the drives, then I would not disturb that copy process in the background. All I wanted to do was to make sure both drives were showing as online and accessible, which they were.
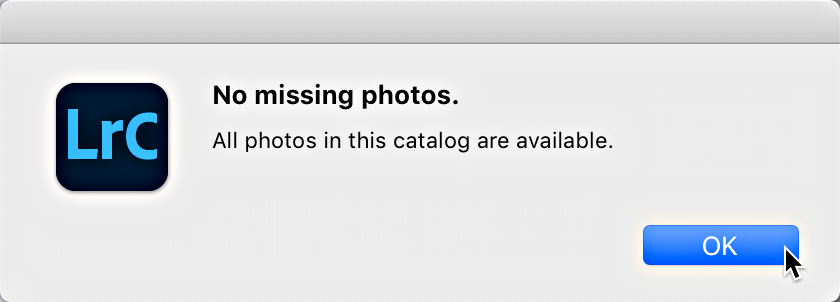
The next thing I wanted to ensure was that no photos were considered offline/missing, and if there were any, to get that resolved. So I went to Library > Find all missing photos, and let that run. This just runs a check to make sure LrC can access all photos in the catalog. When it was done it confirmed what I expected, that there were no missing photos.
If you find that some photos are considered offline/missing, then you might want to check out my article on When Photos Go Missing. Otherwise, you are good to go and just need to wait until the copy operation is complete and your new drive is ready for action.
Update Folder Location
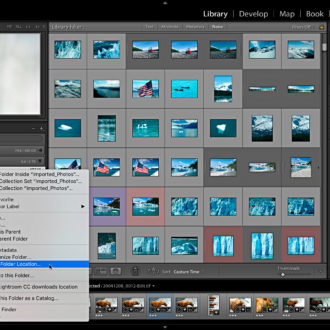
Ok, once the copying was done and my new drive contained all of the contents of the two old drives I was ready to update the LrC catalog to this change. Because my two old drives were still connected (and working), that is what I was seeing in the Folders panel. My new drive is not yet part of the picture inside of LrC. To make that happen I just needed to use the Update Folder Location command you find when you right-click the name of a folder in the Folders panel.
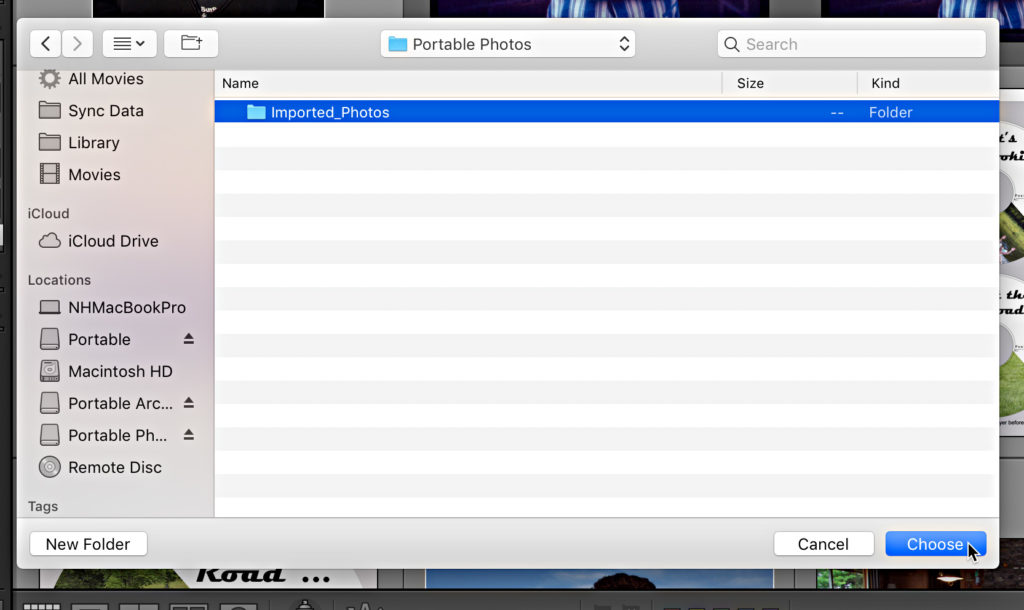
The key here is to right-click the top-level parent folder in the Folders panel under the first drive you want to update. In my case it was the drive named Portable, and under that Volume Browser was the parent folder called Imported_Photos, that’s the folder I wanted to choose for this action.
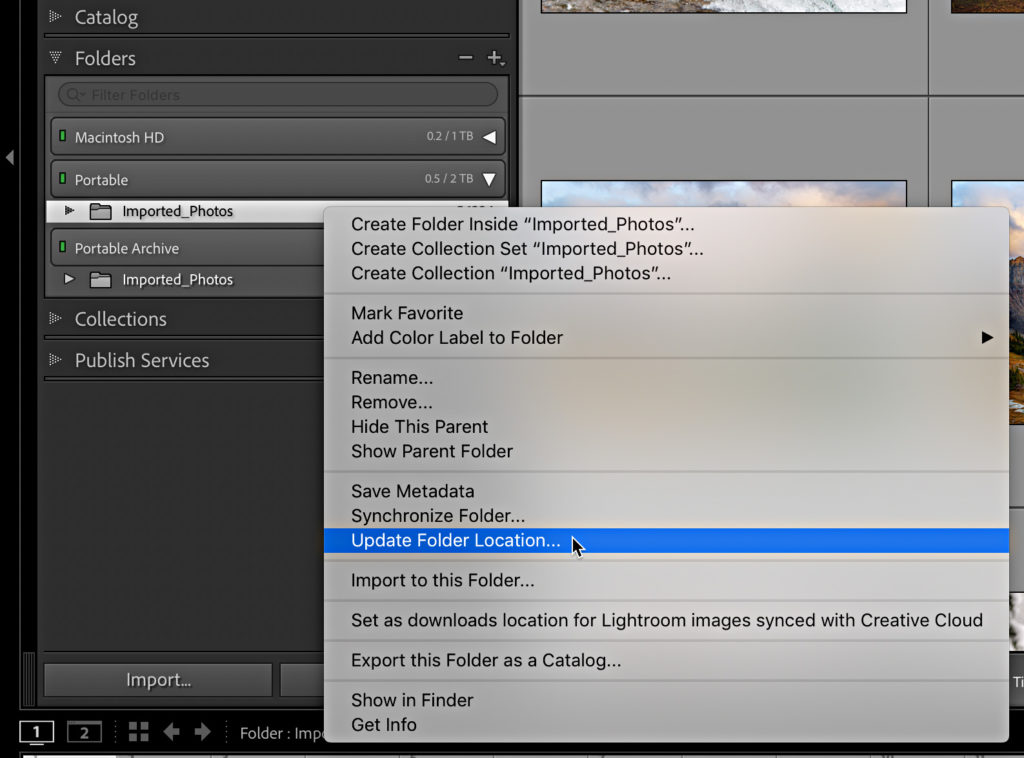
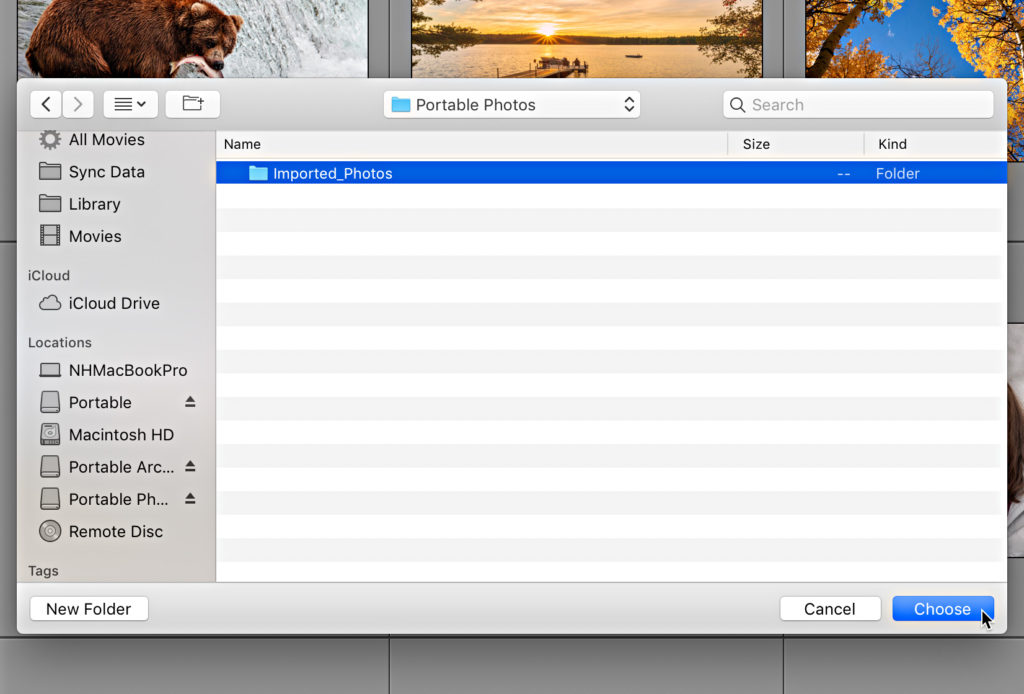
That will open an operating system dialog box (so it will look slightly different on Windows) where you manually navigate to that exact same folder on the new drive and select that folder. You are manually updating the location of the folder to tell the LrC catalog where to reference from this point forward in place of the old drive it was previously referencing.
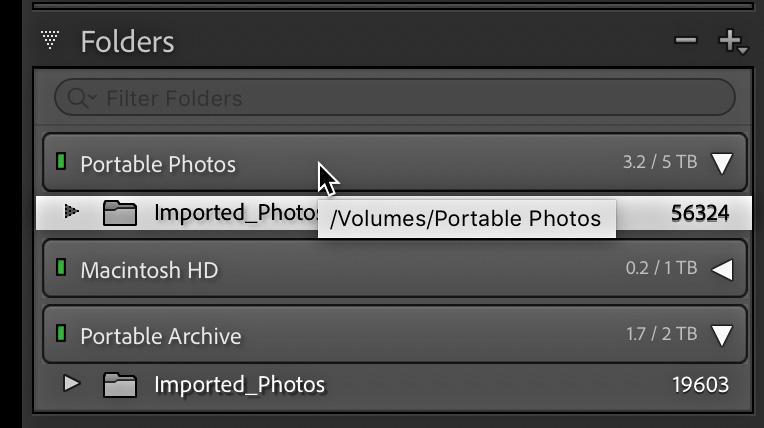
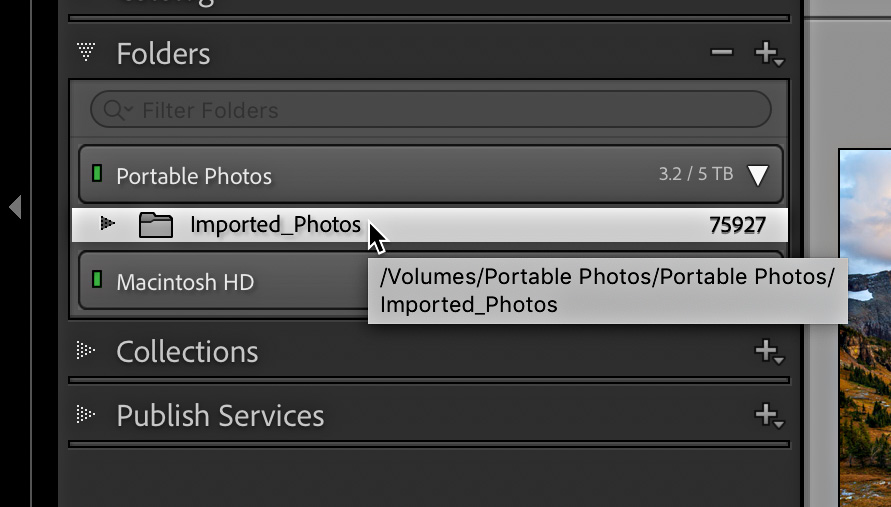
When that folder location is updated in the catalog the old drive will vanish from the Folders panel and be replaced by the new drive, which is exactly the goal we have in mind.
Now, if you only have a single drive to replace, you are done. Go off and celebrate your successful operation. If you’re like me and have a second drive, then we need to repeat that process with the other drive. So, I right-clicked the Imported_Photos folder of the second drive, and selected Update Folder Location.
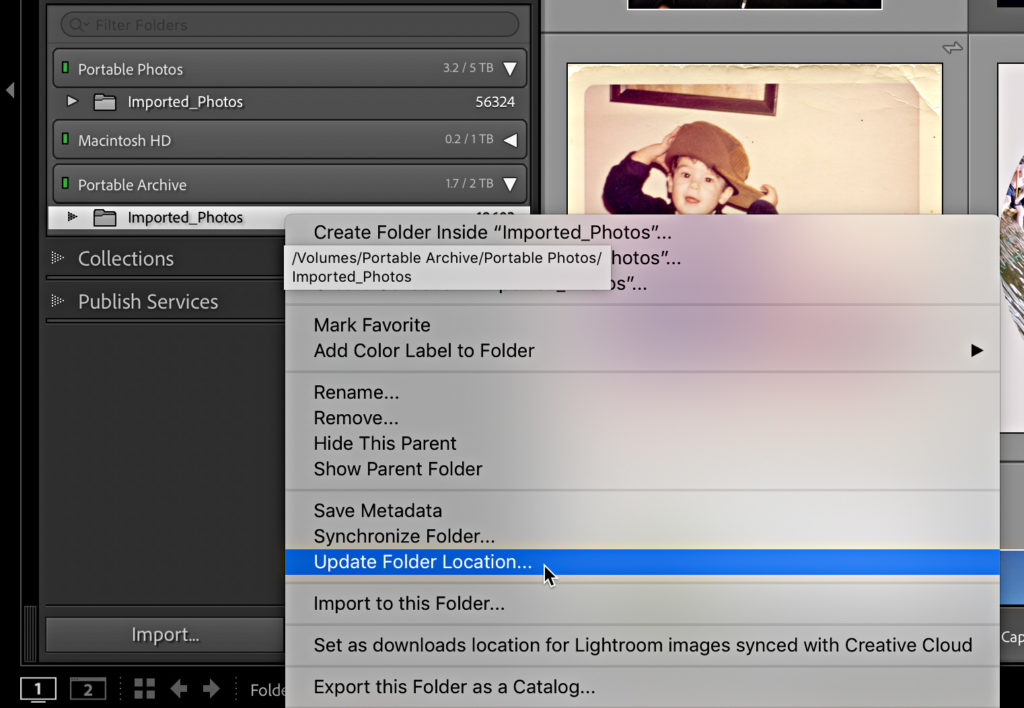
Then, manually navigated to that same parent folder on the new drive (yes, the same parent folder as before because I merged the contents of both drives under that same parent folder). If you did not merge under a single parent folder, then you would navigate to where ever your second folder was located. I wanted everything under one roof so to speak.
Now, because I merged the contents of two drives under one parent folder, and that parent folder was already in Lightroom, I was greeted with a dialog that informed me of this, and asked if I wanted to combine those folders.

Now, the contents of those folders were already merged by my copying the two drives to the same parent folder. All LrC is asking is if I am sure I want to update the location of the old folder to the folder that is already showing in the Folders panel. LrC isn’t going to move or copy any folders or photos on my drive as part of this operation. It’s only job is to update the catalog to refer to the right location, and it is just making sure I am choosing the right drive/folder. I appreciated its caution, and clicked on Merge. When the process was complete both of my old drives were removed from the Folders panel, the new drive was showing in the Folders panel, and all of my folders were nested under the single parent folder on that drive.
And that was just what I had in mind. I then made sure the new drive was included in my cloud backup solution, and then used SuperDuper to clone the contents of the new drive to the new 5TB backup drive. Hope that helps anyone in a similar situation.