Efficiency Through Consistency in Lightroom Classic: Part 1
We love Lightroom for the power of the Develop module, but there is so much more to love about how it can streamline our entire post processing and asset management workflows. Over the next two weeks I’m going to share some of my favorite practices for becoming more efficient. One of Lightroom’s greatest strengths is its ability to help you create a consistent foundation to your workflow that saves you time through its efficiency and gives you dependable results. In fact there’s a number of things you can do right from the start that will help you create a more consistent workflow.
Consistent Naming Practices
One of the first places is creating a consistent file naming and folder naming convention. I don’t believe that there is a single right way to name files and folders, but as long as the method you choose makes sense to you (most importantly) and it can scale up over time, then that should do the trick. Lightroom can help you with both of these jobs, so let’s look at folder names first.
Folder Naming
I like to use Lightroom to create folders as part of the import process, and I also like to use the automated date-based folder name structure as it scales nicely into the future without me having to do anything more. The one thing I don’t like about Lightroom’s automated folder naming functionality is that you can’t customize the date-generated names to include more than just a date. However, this limitation is easily overcome after import. Here’s my approach:
Step One: In the Destination panel of the Import dialog set the Organize option to By date and choose a Date Format that suits your needs.
Step Two: Select the parent folder where you want Lightroom to create these date-based subfolders.
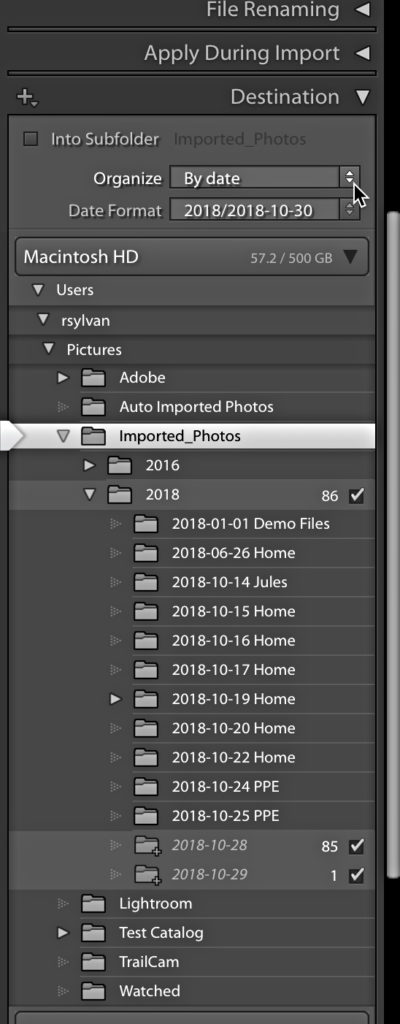
Note: Lightroom creates the subfolders based on the capture date of the photos being imported, and these new folders will appear in the Destination panel in an italicized font.
Step Three: Configure the rest of the Import dialog options and click the Import button.
Once the import process is complete you’ll see the new folder(s) appear in the Folders panel. At this point I’ve got the date-based folders, which is great, but I also want to add a descriptive word or two to the folder name to help me know what the folder contains. This is easily done simply by ctrl-clicking (PC: right-clicking) the folder name and choosing Rename from the contextual menu that appears. This opens the Rename Folder dialog box where you can add a word or two and click Save, which renames the folder on your drive and updates the catalog to reflect this change.
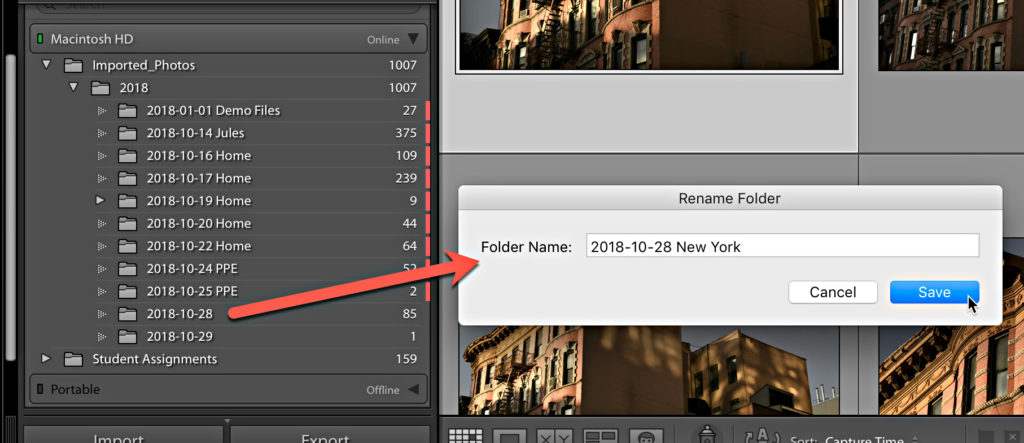
For me, this process gives me the best of all worlds, which is an automated process that contains meaningful information and scales nicely into the future.
File Naming
When it comes to individual file names I also look to Lightroom to automate the process. Again, this is an area with a lot of room for individual customization as we all have our own needs to fill, but the basic process starts with creating a custom filename template that includes the information that is important to you. Once you create a filename template you can configure it to be applied from the File Renaming panel of the import screen, or you can apply it at will from the Library module after import. You’ll need to decide where it suits your workflow best, but I know some people prefer to rename after import so that they can delete bad photos then rename all remaining files with a continuous sequence number that doesn’t contain any missing numbers.
You can access the Filename Template Editor from any place you can rename photos. From the Library module, go to Library > Rename Photo(s), then click the File Naming drop-down menu in the Rename dialog box and choose Edit. From the Import screen, expand the File Renaming panel, click the Template drop-down menu and choose Edit. Once the editor is open the steps for creating a new template are the same.
Step One: Delete any existing tokens from the editing window to start fresh.
Step Two: Choose any combination of tokens to create a template that suits your desired file name convention.
Note: You can hard code data into the filename template simply by typing into the editing window. For example, I often enter a hypen or underscore separator by typing this character between tokens.
Step Three: Click the Preset drop-down menu and choose Save current settings as a new preset to save your template for reuse. Give it a meaningful name that represents the tokens used.
A simple template I use consists of the Date token in YYYYMMDD format, followed by an underscore, followed by the Filename number suffix token (this is the camera generated sequence number without the three letter prefix), which is shown in the figure. These can be quite sophisticated, but I lean toward keeping it short and sweet.

Next week I’ll explore additional tools to make your workflow more consistent, efficient, and customized to your needs.