
Editing in Lightroom Classic vs. Lightroom: Part 2
Last week we started looking at what is the same, so now let’s look at what’s different.
What’s Different?
The most obvious, and initially potentially disorienting, difference is the interface. LrC’s interface has largely remained the same since it was released in 2007. Yes, it has gained new features since then, and some panels have been revamped, but a photographer moving directly from the original version to the current version of LrC would be completely oriented to where things are and even find many of the same panels and adjustments.
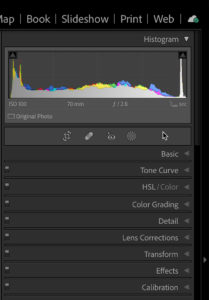

However, a photographer moving from LrC to Lr may need a little time to get oriented to where certain adjustments are located. The most obvious difference in the interfaces is the overall layout, but there are also differences in the names of some of the panels as well. The editing controls are all found along the right side of the interface in both programs, but you’ll find that LrC has 9 different panels and Lr has only 6. You’ll also find that certain features found within panels in LrC, like the Profile Browser and Auto button within the Basic panel but are exposed in the interface itself in Lr.
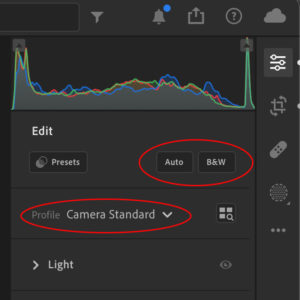
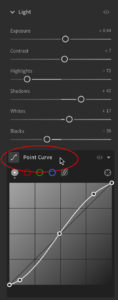
Part of the reason why there are fewer panels in Lr is that some features have been reorganized into some of the other panels. For example, instead of a separate Tone Curve panel you’ll find the same controls nestled within the Light panel under Point Curve. Similarly, in LrC you’ll find dedicated HSL/Color and Color Grading panels, but in Lr those same controls are nested within the Color panel. Keeping in mind that HSL/Color controls in LrC are in Color Mixer in Lr.
This renaming of panels is another reason why some may think Lr is lacking in certain features, when in reality the features are just in a differently named panel. Here’s a quick decoder chart for easy reference:
| LrC | Lr |
| Basic | Light |
| Lens Correction | Optics |
| Transform | Geometry |
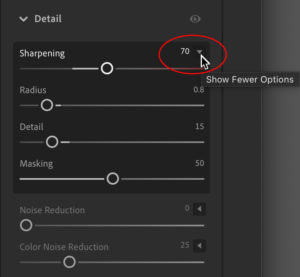
Aside from some panels being re-named you also have to understand that some adjustments within the panels of LrC have been slightly reorganized in Lr. Look for all color related adjustments—like White Balance, Vibrance, and Saturation—from LrC’s Basic panel to be found within Lr’s Color panel. Similarly, Texture, Clarity, and Dehaze were moved to Lr’s Effects panel. I recommend any LrC user to spend time clicking through each panel in Lr to get reoriented to the layout. One of things to look for in Lr is that Adobe hides some adjustments that are much more visible in LrC. At first glance in the Detail panel you might think Lr is lacking the Radius, Detail, and Masking sliders but they are simply hidden under the Sharpening disclosure triangle.
That said, there are some panels related to the editing experience that simply do not exist in Lr, such as the Calibration and History panels. Those features just do not (yet?) exist in Lr. Adding to the list of LrC editing features you won’t find in Lr (at the time of this writing) are:
- Reference View
- Soft Proofing
- Masking tool presets
- Auto Sync (edit multiple photos simultaneously)
- Red Eye/Pet Eye Correction
Adobe maintains a feature comparison document that you may want to bookmark and check back on as new updates are released throughout the year. While Lr does not have the Auto Sync feature for editing multiple photos at the same time, it does have the ability to Copy settings from one photo and Paste those settings to one or more photos.
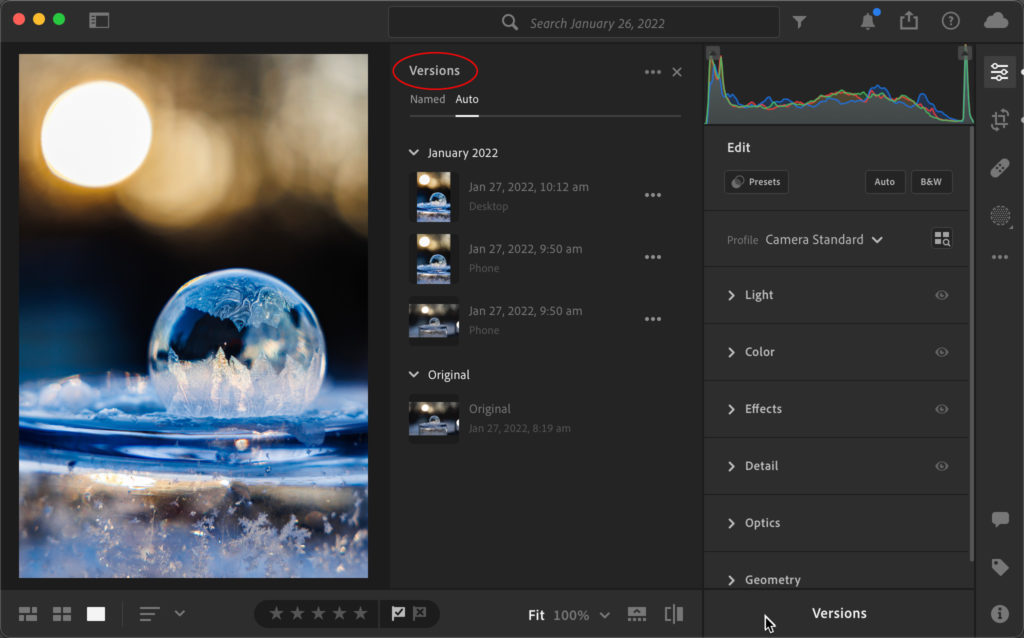
There are also two features that have slightly different implementations and (of course) names than their LrC counterparts. The first is what as known as Snapshots in LrC are known as Versions in Lr. You can read more about Versions, but just like Snapshots they allow you to preserve an editing state so that you can create different versions within the source photo. The other feature known as Virtual Copies in LrC is not exactly the same in Lr, but it is possible to create a duplicate of the photo and edit it separately from the original (and creating a duplicate is only possible in Lr for Mac/Win not on mobile). If you are a long term LrC user you may rely heavily on Virtual Copies, Snapshots, and the History panel and the implementation of those features in Lr is not nearly as robust as in LrC.
One last point when it comes to differences in the editing experience are the keyboard shortcuts. I’ll share links to the shortcut lists for each application, but I just want LrC users to know that the shortcuts your muscle memory are programmed to use may give you different results in Lr. Here’s the complete list of Lightroom Classic shortcuts and here’s the list for all Lightroom shortcuts. Neither application allows for custom keyboard shortcuts.
So, I do think it is safe to say that the editing capabilities have nearly reached feature parity when you just look at whether a feature exists in both programs. However, I feel confident in saying that when it comes to efficiency of over all workflow, especially for any photographer with significant volume, LrC has a leg up on Lr due to features like Auto Sync, but also because of the batch editing features in LrC’s Library module (such as Quick Develop panel and the ability to apply editing presets on import). That said, due to Lr being newer and having a much simpler interface I think it may perform better than LrC in some situations, and it is much more intuitive for newer users to get up and running. I am a huge fan of both programs and feel each one has a place in my workflow. I hope this closer look at both applications helps you find the one that best suits your needs as well.

