Replacing the words “Adobe Lightroom” With Your Logo
Last week we were fortunate enough to have Adobe’s own Worldwide Evangelist for Design and Photography, Terry White, in our offices for a private members-only Webcast and he was also my guest on our photography talk show “The Grid.” One thing that I found surprising was that when Terry opened his copy of Lightroom, with his logo in the upper left corner of Lightroom (in place of the words “Adobe Lightroom CC”) a flood of questions came pouring in from people asking “How do you do that?”
In fact, it was probably the single “most asked” question of the day.
So, I thought I’d better cover it here, especially for folks who are new to Lightroom (or just new to LightroomKillerTips.com). Here we go:
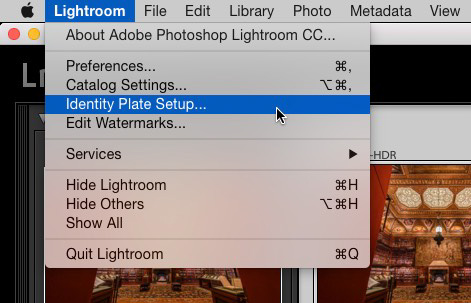
STEP ONE: On a Mac, you’d go under the “Lightroom menu” (seen above) or on Windows it would be the Edit menu, and choose “Identity Plate Setup” as shown here).

STEP TWO: This brings up the Identity Plate Editor window you see above. In the top left corner, from the pop-up menu choose Personalized (as seen here). Then below that, you have two choices for replacing the Lightroom logo with your own custom logo. One is to just type in the name of your studio (the default choice is to have you do this), but if you click the button to the right of that choice, the one called “Use a graphical identity plate” (as seen here), then you can either click the “Locate File” button and navigate to wherever you keep your logo on your computer, or just drag and drop that image into the black rectangle on the left side (right under the two buttons). That’s it. Click OK — boom — you’re done. Now your logo will appear in that upper left corner.
TIP: Lightroom’s interface is solid black up there, so if you want your logo to blend in, you need to either:
(a) Put your logo on a black background before you bring it in to Lightroom this way, or
(b) Put your logo on a transparent background in Photoshop (put your logo on a transparent layer, then delete the background layer in Photoshop and save the file in .png format, which is a format that maintains transparency when you import it into Lightroom). I did a tutorial on how to do this transparent logo thing last year – here’s the link.
Hope you found that quick little tip helpful.
Have a great Monday, y’all. 🙂
Best,
-Scott